Categories
Advanced Workouts BODYWEIGHT EXERCISES

How long does it take to progress in the human flag?

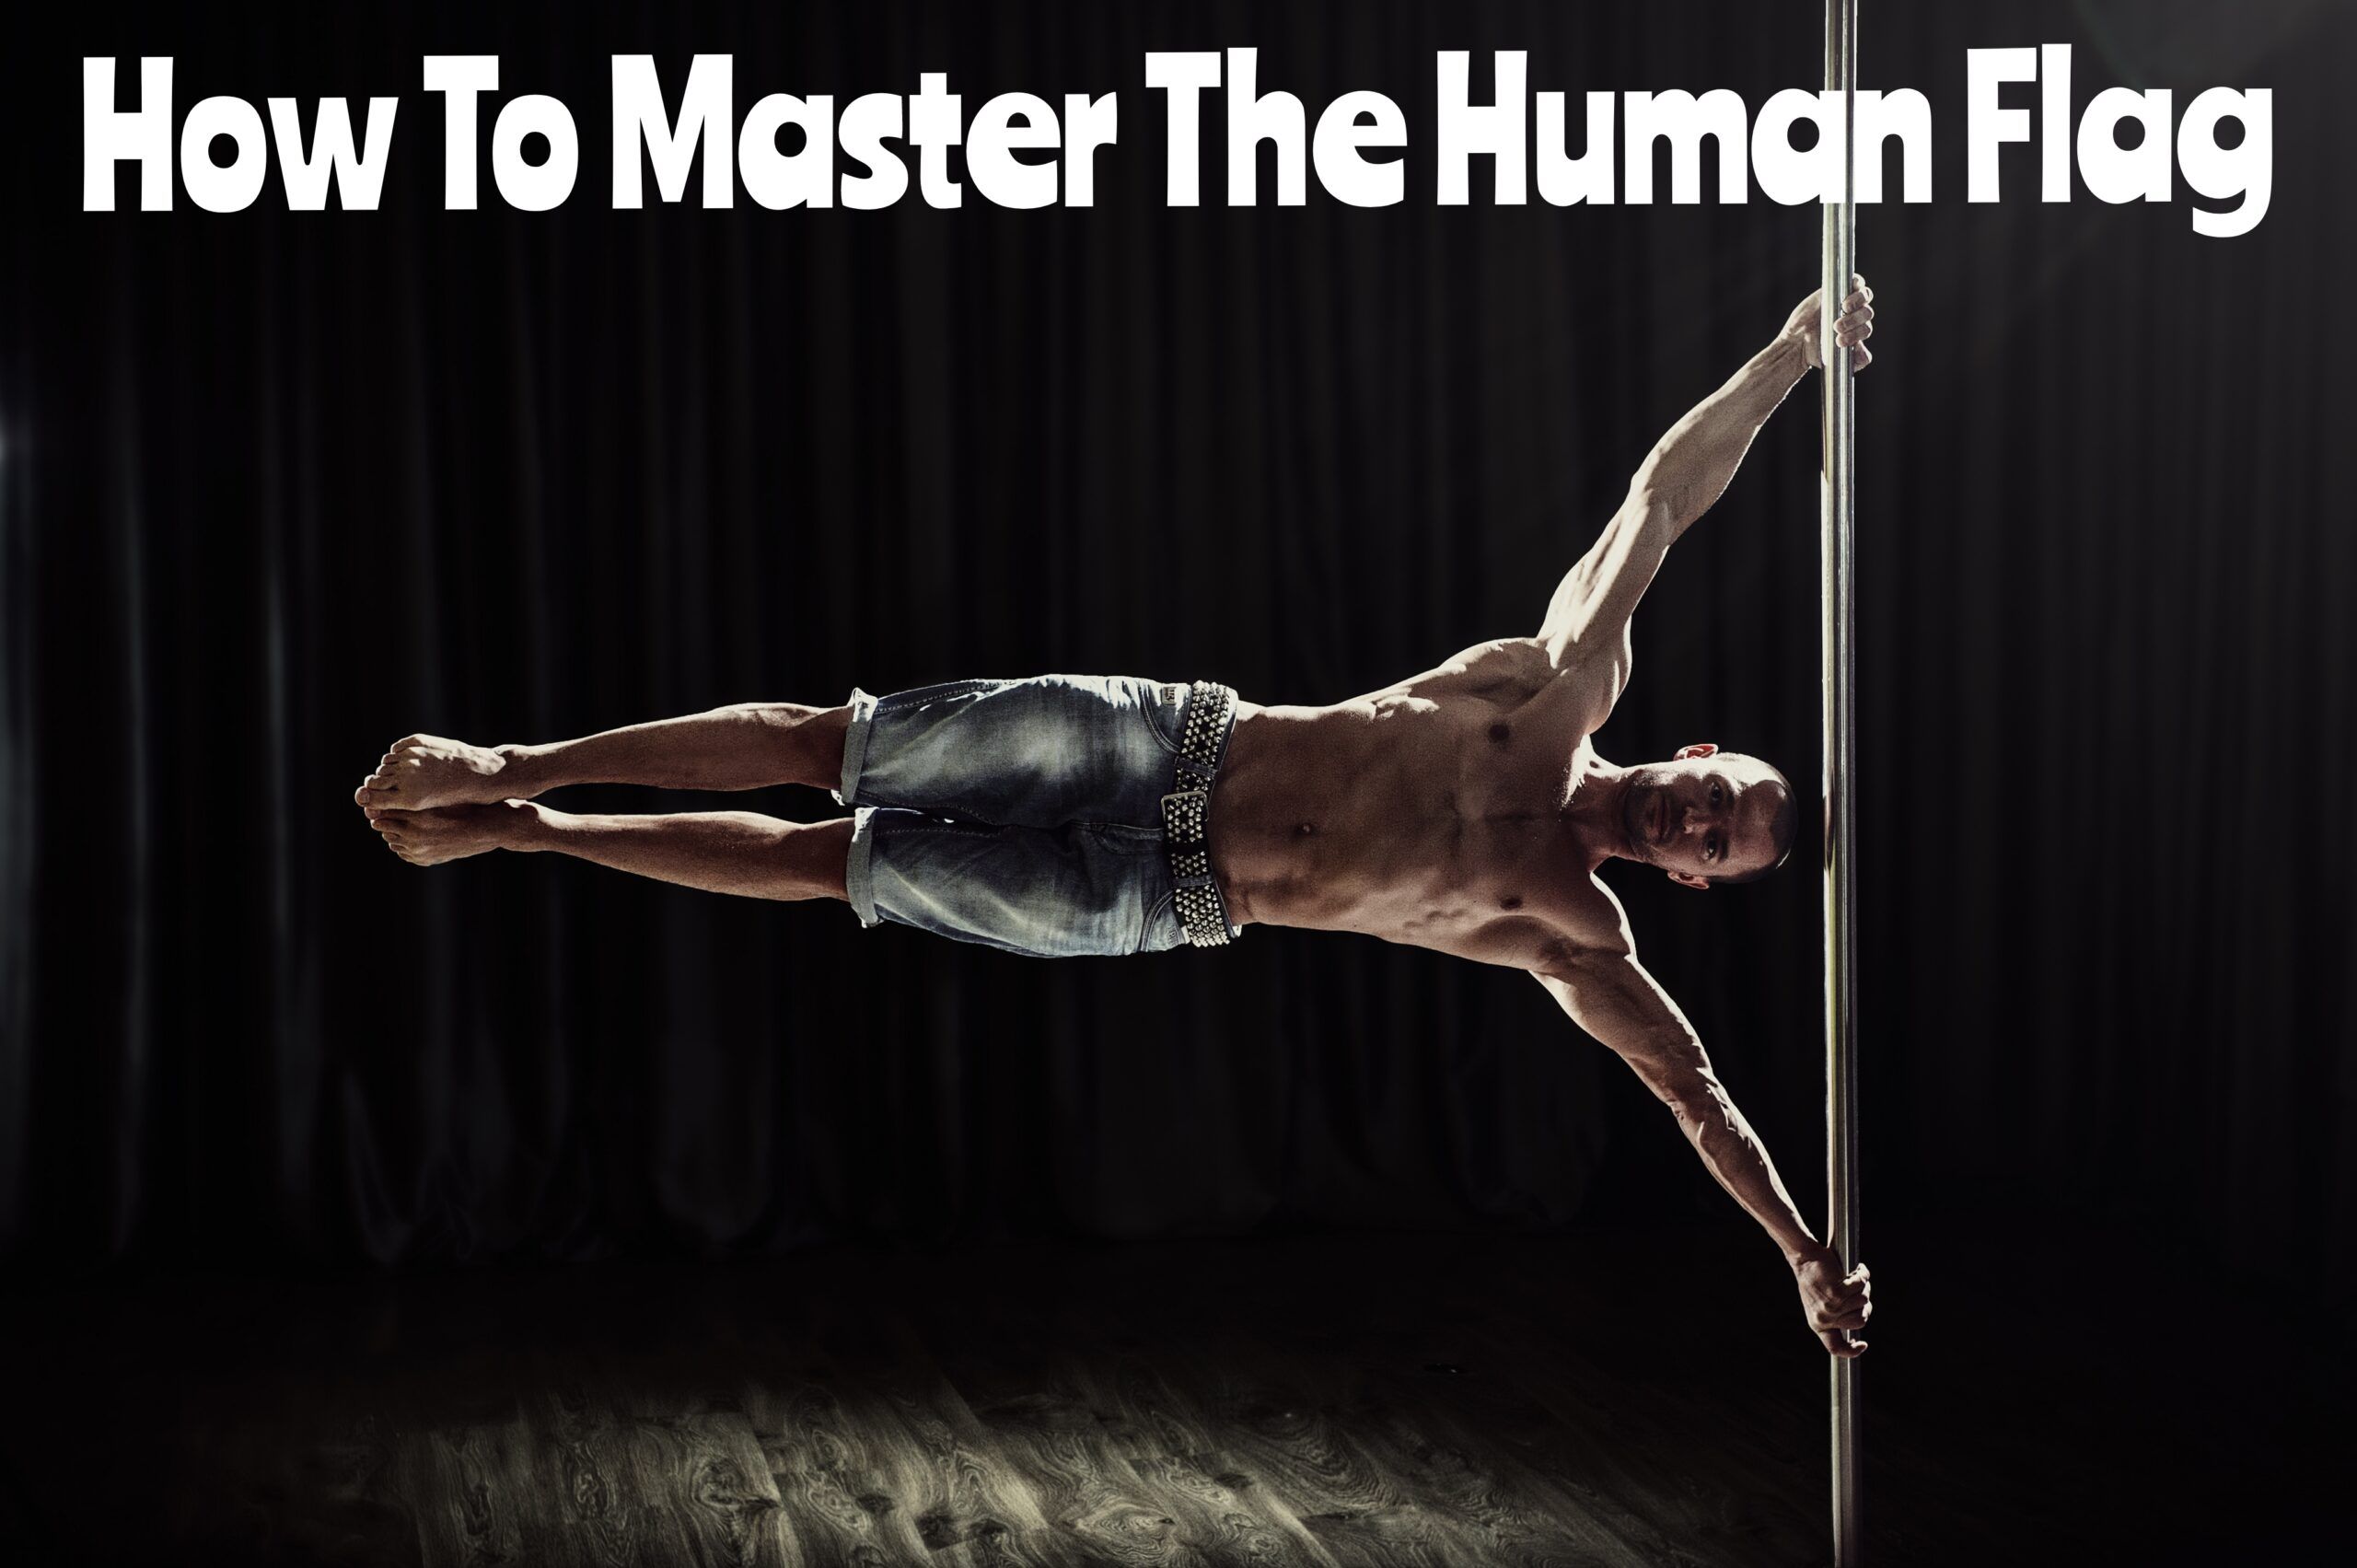
When I first saw someone pull off the Human Flag, I was blown away.

It’s one of those moves that just stops you in your tracks.

The body stretches out horizontally, like a human banner that’s mocking gravity, and honestly, it’s hard not to be impressed.

Straight arms, stiff body—it’s a real show of power and control.

Makes you think, “How is that even possible?”

The first time I gave it a try, I felt that mix of excitement and, let’s be honest, a little fear.

It’s not just about strength; it’s like you’re testing how far you can push both your body and your mindset.

The upward push, holding that balance—yeah, it’s tough.

But there’s something about that challenge that hooks you.

It’s like the harder it gets, the more determined you become to conquer it.


Approximate estimates for progressing toward the human flag

If you’re starting with a good fitness base, it could take anywhere from months to over a year to nail the full Human Flag.

If you’re already into calisthenics or pole fitness, you might get there in just a few months.

When I started, I realized quickly that it’s not about rushing the process.

Instead of stressing over timelines, I’ve learned to focus on my own progress.

Every small victory counts, and this is what has always pushed me to move forward.


Best Exercises to Prepare for the Human Flag

The-fascinating-skill-of-the-Human-Flag

I know, watching someone hold themselves sideways on a pole can seem unreal.

That’s the Human Flag, and believe me, it’s just as tough as it looks.

What I’ve learned is that the secret to pulling it off is a workout that hits all the right spots.

The abs, lower back, and obliques do the heavy lifting, keeping your body in line when everything else wants to give up.

But honestly, I didn’t realize how much my shoulders and triceps needed to step up.

These muscles are like your lifeline—they hold you up, and without them, you’re going nowhere.

Then there are the legs.

At first, I thought they didn’t matter much.

But once I got deeper into training, I realized they play a big role in keeping you stable and in control.

A full-body workout is the only way to crack the Human Flag.

I’ll be honest, it’s a grind.

But every time you see progress, it feels incredible!

Here’s what worked for me—and can work for you too!


1. Core Strengthening Exercises

A strong core is absolutely non-negotiable when it comes to the Human Flag.

Without it, you’ll collapse the second you try to lift yourself sideways.

These exercises are what helped me build the core strength needed to stay solid in the air.

Hanging Leg Raises

This is one of my go-to moves for firing up the lower abs.

Hang from a pull-up bar, lift your legs to a 90-degree angle, and make sure you control the descent.

Side Planks

If you want those obliques to pop and support you during the flag, side planks are essential.

Start with 30 seconds on each side, and if you’re feeling bold, throw in some hip dips.

I found this move really improved my balance too.
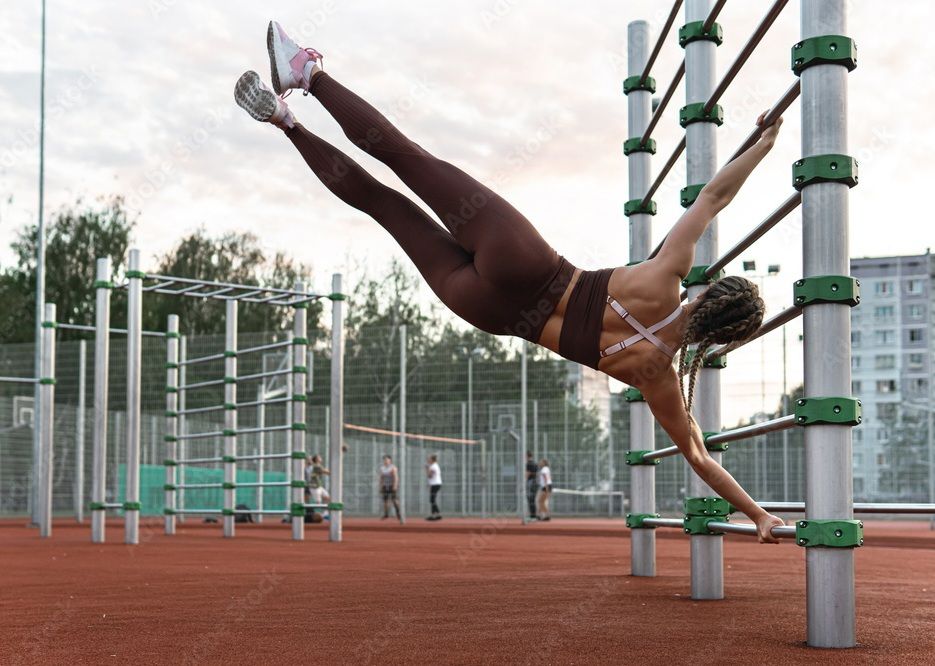
Dragon Flags

This exercise is brutal, but it’s a game-changer.

Lie on a bench, grab the sides, and lift your body into a controlled flag-like position.

When I started these, I felt muscles working that I didn’t even know I had.

2. Shoulder and Arm Strengthening Exercises

Your shoulders and arms do the heavy lifting in the Human Flag—literally.

Without strong shoulders and triceps, holding yourself up is nearly impossible.

These exercises made a huge difference for me.

Pike Push-Ups

When I was first trying to build shoulder strength, pike push-ups became my best friend.

Get into a pike position, lower your head to the floor, and push back up.

It’s a simple move, but it hits those shoulders hard.

Handstand Push-Ups

Once I got the hang of pike push-ups, I leveled up to handstand push-ups.

These mimic the kind of pressure your shoulders will face during the Human Flag.

Start with wall support if you need to—it’s a great way to build up strength gradually.

Archer Pull-Ups

Archer pull-ups are fantastic for working both arms and shoulders.

To do them, pull up to one side while extending the opposite arm straight out.

I liked how this exercise helped me focus on each side individually, which is crucial when one arm has to do more work than the other in the Human Flag.


3. Leg and Hip Stability Exercises

Leg-Role-in-Human-Flag

Legs aren’t just along for the ride—they’re crucial for keeping you balanced while you’re hanging sideways.

At first, I underestimated how much control and stability come from strong legs and hips.

Bulgarian Split Squats

I love these for balance and lower body strength.

Elevate one leg behind you on a bench and squat with the other leg.

This one really helps with the stability needed to hold the flag position.

Single-Leg Deadlifts

This exercise was key for me in improving hip stability.

It’s great for hitting the hamstrings and glutes.

Grab a dumbbell, lean forward on one leg, and keep the other leg extended behind you.

It’s tougher than it looks but super effective.

Hanging Knee Tucks

Not only does this engage your core, but it also gets your legs involved in controlling the movement.

Hang from a bar, tuck your knees up, and slowly lower them back down.

I found this exercise gave me better control when practicing the flag position.


Progressions and Specific Practices for the Human Flag

To nail the Human Flag, you’ve got to work through specific progressions that will build up your strength and control.

It’s not something you can rush, but these steps will help you get there.

Tuck Human Flag

Start by tucking your legs toward your chest while gripping the pole or bar.

Lift your body off the ground, keeping your legs bent and holding that horizontal position.

This one’s all about core and arm strength, plus some serious coordination.

Consider the Tuck Human Flag an intermediate step that brings you closer to nailing the full Human Flag.

Chair Progression

Grab a sturdy chair and place it next to a wall or pole.

Grip the seat tightly and lift your legs off the ground, aiming to hold your body in a horizontal position for a few seconds.

Trust me, at first, it feels impossible, but with practice, you’ll build up to holding it for at least 30 seconds.

I was shocked by how much this simple move helped.

Band Progression

Using a resistance band is another great way to ease into the Human Flag.

Loop the band around a pole or tree and slip your foot inside.

Lift yourself up, and let the band provide just enough support to help you stay horizontal.

I liked this progression because you can gradually reduce the band’s assistance as you get stronger.

Stick Progression

Set up a horizontal stick between two stable supports like gym racks.

Grip it firmly and lift your feet off the ground, trying to keep your body straight and horizontal.

This one really hones your core strength and balance.

It’s tougher than it looks, but I found it super helpful in improving control for the Human Flag.

Partner-Assisted Progression

Ask a buddy to help you out by lightly supporting your legs while you work on maintaining the flag position.

Having someone there to spot you takes off some pressure while still letting you work on balance and strength.

As you get better, your partner can reduce their support until you’re holding the Human Flag on your own.

This was a huge confidence booster for me!

Stick with these progressions, and you’ll be flying in no time!


Step-by-Step Guide to Performing the Human Flag:


  • Stand sideways next to a sturdy vertical pole or structure.
  • Grip the pole tightly, with your outer arm raised high above your head.
  • Your inner arm should press against the pole with the elbow bent, ready to push.
  • Now comes the fun part—lift your legs off the ground, bending your knees and bringing your thighs up toward your chest.
  • Once you’re off the ground, straighten your legs to form a horizontal line with your body.
  • Focus on keeping your entire body aligned and tense. This part’s all about balance and control.
  • Hold the position for as long as you can without sacrificing form.
  • When you’re ready to come down, lower your legs slowly and with control.
  • Don’t forget—it’s key to start with progressions and build up the strength and control you need for the full Human Flag.


READ ALSO:>>> Mastering the Front Lever: How Long Does It Really Take?


Conclusion

Mastering the Human Flag requires more than just strength—it’s about balancing power, control, and precision.

Progress happens step by step.

You start with foundational exercises and build from there, increasing the challenge as your body adapts.

If you have a decent fitness level, it could take several months to a year to develop the strength and skills needed for the full Human Flag.

For those already experienced in calisthenics or pole fitness, it may take only 7-8 weeks to achieve.

Focus on your own journey.

The real reward is watching your body evolve and mastering the move on your terms.


FAQS

Can I learn the human flag exercise in one week perfectly?

It’s highly unlikely to learn the human flag exercise perfectly in just one week.

How can I start learning the human flag?

To start learning the human flag, it’s important to have a strong foundation of upper body and core strength. Exercises like pull-ups, chin-ups, and core exercises such as plank and leg raises can help build the necessary strength. Additionally, practicing side planks and side crunches can help develop the specific muscles used in the human flag.

Do I need any equipment to learn the human flag?

While it’s possible to learn the human flag without equipment, having access to a horizontal bar or sturdy vertical pole can make the learning process easier. These structures provide a stable point to hold onto and assist in balance during the exercise.

Is the human flag safe for everyone to attempt?

The human flag puts a significant amount of stress on the upper body, particularly the shoulders, and core. It’s important to have a solid foundation of strength and consult with a healthcare professional before attempting the human flag, especially if you have any pre-existing injuries or conditions.

What muscles does the human flag work?

The human flag primarily targets the muscles of the upper body, including the shoulders, back, arms, and core. It requires strong shoulder and grip strength, as well as core stability to maintain the horizontal position.

Can I practice the human flag every day?

Practicing the human flag every day is not recommended, especially for beginners. The exercise puts a significant strain on the muscles and joints, and adequate rest and recovery are essential for proper muscle adaptation and injury prevention. It’s best to incorporate rest days and allow your body to recover between training sessions.

How can I improve my grip strength for the human flag?

To improve grip strength for the human flag exercises like deadlifts, farmer’s walks, and hanging exercises such as pull-ups and hanging leg raises can be beneficial. Additionally, using grip-strengthening tools like grip trainers or stress balls can help develop grip strength.

What should I do if I can’t hold the human flag position yet?

If you can’t hold the human flag position yet, it’s important to continue working on building strength and stability through the progressions and exercises mentioned earlier. Consistent training and gradual progression will eventually lead to achieving the human flag.

Is it normal to experience muscle soreness after training for the human flag?

Yes, it is normal to experience muscle soreness after training for the human flag. When you engage in intense physical activity that your muscles are not accustomed to, it can result in delayed onset muscle soreness (DOMS). DOMS typically occurs within 24 to 48 hours after exercise and is characterized by muscle stiffness, tenderness, and reduced range of motion. It is a natural part of the muscle repair and adaptation process. To alleviate soreness, you can try gentle stretching, foam rolling, and taking rest days between training sessions to allow your muscles to recover.

Recommended
Categories
Advanced Workouts BODYWEIGHT EXERCISES

How Much Time Do Beginners Need to Achieve a Handstand?

The handstand—it’s one of those moves that always turns heads at the gym.

I remember seeing someone do a perfect handstand and thinking, ‘I need to try that.

But let’s be real—mastering it takes time.

So, how long are we talking?

Let’s break it down.


How Long Before You Can Handstand? A Realistic Timeline

If you’re just starting out with handstands, let me tell you—getting that perfect balance is a journey.

It can take anywhere from 1 to 3 months to start seeing progress.

But here’s the thing: it could take up to a year or longer to consistently nail it without feeling like you’re about to tumble.

So, if you’re new to this, don’t worry if it feels like it’s taking a while.

You’re making progress even when it doesn’t feel like it!

Now, if you’ve already built up some strength and experience in the gym, you might find yourself balancing sooner—maybe in just 2-6 weeks with regular practice.

But remember, it’s all about consistency.

In my case, even with years of weight training under my belt, it still took some time, and every little win felt like a big deal.

So, whether it takes months or more, enjoy the ride.

There’s nothing like the moment you finally hold that handstand.

It’s definitely worth the effort


Handstand Execution: Step-by-Step Guide

Positioning

Start standing tall with your feet together.

Raise your arms overhead like you’re reaching for the sky.

Then, place your hands on the ground, keeping those shoulders open and arms straight.

Your hands should be just wider than shoulder-width apart, with fingers pointing forward.

Preparation

Take a step back with one foot at a time.

Bend forward and keep your legs straight, aligning your hips, knees, and ankles.

This might feel a bit awkward at first, but trust me, it’s all part of the process!

Weight Loading

Bend your knees and push your feet into the ground while lifting your heels.

Shift your weight onto your hands, keeping your arms straight and shoulders open.

At this point, you’ll be leaning forward with bent legs and your hips above your head.

It might feel a little scary, but that’s totally normal!

Leg Extension

Once you’ve got your weight on your hands, push through those palms and lift your legs upward.

Aim for a straight, vertical position.

Keep your legs together and point those toes like you mean it!

This is where the magic starts to happen.

Balance and Alignment

Now that you’re in the handstand, focus on balance.

Keep your core tight and engaged—this is crucial for stability.

Shift your gaze between your hands to help you stay steady.

It might feel like a balancing act, but you’ll get the hang of it!

Maintenance

Try to hold that handstand for as long as you can.

Start with 5-10 seconds and gradually work your way up.

Every second counts, and trust me, it feels great to hold it longer each time.

Celebrate those little victories!

Controlled Descent

To come down, bend your knees and slowly lower your legs to the ground.

Return to that forward-bending position with control.

You’ve got this!

Remember, every fall is just part of the journey.

Enjoy the process and have fun with it!


Body Alignment

Proper-body-alignment-in-Handstand

Nailing that straight line from your wrists through your shoulders, hips, and legs is what makes a handstand go from shaky to rock solid.

Keeping your neck and head neutral—no peeping down or throwing your head back—helps keep your balance spot on and distributes your weight evenly.

A strong foundation is essential; it supports your handstand and ensures it looks and feels great.


Hand and Finger Positioning

Setting up your hands just right can make or break your handstand.

Here’s a quick guide to get it spot on:

Hand Width:

Think of placing your hands just a tad wider than your shoulders.

This sweet spot helps in spreading your weight evenly and keeps your base sturdy.

Too close or too far apart, and you’ll find balancing a lot trickier.

Finger Orientation:

Point those fingers straight ahead, right towards the front.

Spread your fingers a bit and engage them.

This way, you’re not just relying on your wrists to bear all the load.

Weight Distribution:

Here’s a pro tip—don’t let your middle fingers hog all the weight.

Spread it out evenly across all your fingers.

This balances the load and keeps you stable, minimizing the risk of tipping over or straining your wrists.


Correct hand and finger positioning require practice and awareness.

Take the necessary time to find the position that offers you the best sense of stability and control.


Core Stability

Nailing a handstand is all about core strength—it’s what keeps everything from your hands to your toes steady and strong.

Here’s how to tighten up that core to keep you steady and strong from your hands all the way up:

Engage the Abdominals:

Imagine your core as the central anchor of your handstand.

Really focus on contracting those abdominal muscles.

Pull your navel toward your spine to light up both the deep and surface abs.

Pelvic Floor Power:

Often overlooked, the pelvic floor muscles are key players in your core stability.

Think about tightening them up like you’re trying to stop yourself from peeing.

It might sound funny, but it works.

This simple action helps keep your pelvis stable and aligns everything from your belly button up.

Activate Your Torso:

It’s not just the front; remember your back muscles, obliques, and side abs too.

Keep these muscles tight to stop any wobbling or tilting.

This full-torso engagement works like a corset around your spine, keeping you rock steady.


Flexibility

To nail that handstand and achieve that sleek, straight body alignment, flexibility is key.

Seriously, don’t skip this part!

Focus on your shoulders, spine, and legs to make sure everything moves smoothly.

Here are some effective exercises to boost your flexibility and expand your range of motion:

Shoulder-Opening Exercises

These are a game-changer for handstands.

You want your shoulders to move freely and easily.

Incorporate shoulder rolls with a stick to gently extend that range of motion.

Arm rotations are another great move.

These exercises help open up your shoulder joints, making them more flexible and less prone to injury.

You’ll thank yourself later when you’re balancing like a pro!

Spinal Stretching Exercises

A flexible spine is crucial for that perfect vertical line.

Work on some spinal twists and forward folds to increase your spinal flexibility.

These stretches not only help loosen up your back but also promote better control and alignment.

You’ll stack your hips over your shoulders like it’s no big deal!

Hamstring and Calf Stretches

Tight legs can really mess with your handstand game.

To keep your legs straight and aligned with your body, focus on stretching those hamstrings and calves.

Try standing forward folds for a deep hamstring stretch.

Seated hamstring stretches are also fantastic—they allow you to gently pull closer to your legs, boosting flexibility over time.

Remember, the more flexible you are, the easier that handstand will feel!

Incorporate these exercises into your routine, and you’ll notice a huge difference in your handstand practice.

Flexibility might take time, but it’s totally worth it for that sweet balance!


Balance

Balancing a handstand is all about keeping your body steady, with your hands planted firmly on the ground.

Wobbling and toppling over?

Not the goal!

To improve your balance and master this awesome move, check out these tips:

Finding Your Center of Gravity

When you’re upside down, your center of gravity shifts right over your hands.

It’s super important to feel and manage that shift.

Start practicing your handstands against a wall or with a buddy to help you out.

This way, you can focus on aligning your center of gravity over your hands without stressing about falling.

It’s like having your own safety net!

Building Confidence and Skill

As you get more comfortable, challenge yourself by moving away from the wall.

Try testing out freestanding handstands!

This transition is a game-changer and really boosts your skill and confidence.

Trust me, there’s nothing like the feeling of holding a handstand without any support.

Strengthening Forearms and Shoulders

Strong forearms and shoulders are key to a solid handstand.

Incorporate exercises like planks and push-ups to build up your arm strength.

And don’t forget about weightlifting—it’s a great way to enhance your ability to support your body weight.

You’ll be amazed at how much this helps your handstand game!

Focusing on Shoulder Stability

For that extra edge in balance, work on stabilizing those shoulders.

Exercises like shoulder shrugs and scapular retractions are perfect for this.

They help ensure your shoulders are strong and stable, giving you a solid foundation for your handstand.

Keeping Calm with Regular Breathing

Never underestimate the power of controlled breathing.

Calm, regular breaths during your handstand help you maintain core stability and stay composed.

Plus, it keeps those nerves at bay!


Exercise Progression for Handstand

Piked Handstand

The piked handstand is a great way to build up your arm and shoulder strength.

Start by placing your hands on the ground and lift your legs until your body forms a 90-degree angle.

Hold this position for a few seconds while keeping your body aligned and your abs engaged.

It might feel challenging at first, but that’s where the magic happens!

As you gain strength, gradually increase how long you hold this position.

Wall Walks

Wall walks are awesome for building confidence and working on arm strength.

Start in a quadruped position with your feet close to a wall.

Then, walk your hands toward the wall, gradually lifting your feet until you’re in a vertical position with your legs against the wall.

Hold it for a moment, soak in that upside-down feeling, then return to your starting position.

Repeat this exercise, and try to increase the number of repetitions each time.

You’ll feel stronger and more confident in no time!

Assisted Handstand

The assisted handstand is a perfect way to experience the handstand position with a little support.

Grab a buddy or use a prop like a chair or a wall to help hold your legs up.

Sustain this position and gradually increase how long you hold it.

This will help you develop a sense of balance while still feeling secure.

Handstand Hold

Once you’re comfortable with the previous exercises, it’s time to work on holding the handstand without any support.

Lift yourself into the handstand position, keeping your body aligned and your core engaged.

Start with short holds, and aim to gradually increase the time you can stay up there.

Don’t forget to breathe regularly and focus on that core stability and body alignment.


Stretching Exercises to Prepare for Handstand

Wrist Stretch

Start by flexing your wrists up and down, using your other hand to apply gentle pressure.

Don’t forget to rotate your wrists clockwise and counterclockwise to get that joint flexibility going.

Hold each position for about 15-20 seconds.

Trust me, your wrists will thank you later!

Shoulder Stretch

Extend one arm straight in front of you and grab your elbow with your other hand.

Gently pull that arm toward your chest, feeling a nice stretch in your shoulder.

Hold this position for 20-30 seconds, then switch to the other arm.

It’s a simple move but so effective for opening up those shoulders!

Chest Stretch

Find a wall and stand facing it.

Place one forearm against the wall with your elbow bent at a 90-degree angle.

Slowly rotate your body in the opposite direction and enjoy that gentle stretch in your chest.

Hold it for 20-30 seconds, then switch sides.

You’ll feel the difference right away!

Leg Stretch

Sit on the ground with your legs extended in front of you, then bend one knee and bring your heel toward your groin.

Grab your foot with both hands and gently push your knee toward the floor.

Feel that stretch in the back of your leg and hold it for 20-30 seconds.

Repeat on the other leg. This one is a game changer for flexibility!

Core Stretch

Lie on your back and lift your torso off the ground, resting your hands on the floor.

Extend your arms overhead and stretch your body in both directions.

You’ll feel a great stretch in your core and upper body.

Hold this position for 20-30 seconds, and just breathe it all out!


Transition Exercises for Handstand

Transitions are key when it comes to handstands.

They let you move smoothly between positions while maintaining control.

Here are some exercises to help you master those transitions:

Tuck to Straddle

Start in a tuck handstand, with your knees bent toward your chest.

From here, extend your legs outward into a straddle position.

Focus on keeping everything stable and aligned as you move.

This transition is all about control, so take your time!

Pike to Straddle

Begin in a pike handstand, legs raised and your body making a 90-degree angle.

Now, open those legs into a straddle position.

Again, control is key here, so really focus on maintaining stability while you make the switch.

Straddle to Pike

Start in a straddle handstand with your legs spread out to the sides.

Then, bring your legs together into a pike position, raising them upward to form that 90-degree angle again.

Keep your body aligned and in control during this transition.

You’ll feel the burn, but it’s worth it!

Split Leg

This one’s fun! Involves opening your legs into a split position while in the handstand.

You can practice either a lateral split or a front split.

Focus on core stability and keeping your body aligned as you transition.

It might take some practice, but you’ll get it!

One Leg Extended

For this transition, raise one leg into an extended position while keeping the other leg bent.

Try alternating legs throughout the exercise to engage both sides effectively.

It’s a great way to challenge your balance and strength!


How much time and effort does it take to make progress in Handstand?

Nailing a handstand is all about practice, practice, practice!

I’ll be honest—it took me months to feel solid upside down.

How fast you’ll see progress depends on a lot of things: your strength, flexibility, balance, and how much time you’re putting into it.

For me, it wasn’t just about strength, but also getting comfortable with the feeling of being inverted.

If you’re serious about getting good at this, aim for 2-3 handstand sessions a week.

That’s what I did, and those sessions were key for improving my moves, building strength, and just getting used to the whole upside-down thing.

The more you stick with it, the more progress you’ll see.

Focus on nailing the basics—keeping your body straight, engaging your core, and making sure your hands are positioned just right.

And yeah, sometimes improvement feels slow.

But every little win, like holding the position for a few seconds longer, is a reason to celebrate.

It’s all part of the fun, so enjoy the process!


Boosting Your Handstand Hold Time: Tips for Success

Holding your handstand longer isn’t about sheer power—it’s about focusing on the right skills and sticking to regular practice.

I know from experience!

If you want to take your handstand to the next level, here’s what you should focus on:

Refining Balancing Skills

Balance is everything when it comes to a solid handstand.

Adding a little yoga into your routine can work wonders.

Poses like “Tree” and “Warrior III” are awesome for honing balance, and honestly, any single-leg pose will make a big difference.

These moves help train your body to find and maintain its center of gravity, which is *so* important when you’re upside down.

Practice Short Time Intervals

Don’t push yourself to hold your handstand for too long too soon—slow and steady wins the race!

Start small by aiming for 5 or 10 seconds and see how it feels.

The key is to practice regularly and gradually increase your hold time as you improve.

It might not sound like much, but those seconds add up fast!

Perform Multiple Repetitions

Try incorporating multiple handstand attempts into each training session.

Personally, I like to do 3-5 sets of 10-second handstands.

It helps build endurance and gets your body used to holding that position longer.

Don’t forget to rest between sets to avoid burning out—your arms will thank you later.


READ ALSO:>>> How Long Does It Take to Achieve Full Planche Progression?


Conclusion

Mastering a handstand is different for everyone.

For beginners, it might take 1 to 3 months to get that balance and stability.

But honestly, for some people, it can take over a year—and that’s totally okay!

Start with the basics: planks and wall-assisted handstands.

These are perfect for building the foundation.

Once you’ve got those down, gradually work your way up to the more challenging stuff.

Focus on strengthening your forearms and shoulders.

Get comfortable with balancing, and work on that all-important spatial awareness—knowing exactly where your body is in space when you’re upside down is key!

If you really want to speed things up, consider taking handstand-specific classes or working with an instructor.

Having an expert guide you can seriously make a difference.

Just keep practicing, and trust me, you’ll get there.

Every little bit of progress counts, and before you know it, you’ll be holding that handstand like a pro!


FAQS 

What is the minimum time required to learn handstand?

There is no definite time range to learn handstands as it depends on various factors such as strength, balance, flexibility, and consistent practice. Some individuals may make significant progress in a few weeks, while others may require months of practice to fully master the skill. The important thing is to be consistent, follow a gradual progression, and work on alignment, core strength, and balance to build a strong foundation for the handstand.

What are the benefits of a handstand?

Handstand offers numerous benefits for the body and mind. It helps develop core strength, arm strength, and shoulder strength and improves balance and body awareness. Additionally, handstands can increase self-confidence, improve concentration, and promote proper posture.

Can anyone learn to do a handstand?

With patience, practice, and possibly guidance from a qualified coach, most people should be able to learn a handstand. However, individuals with certain health conditions or injuries may need to avoid this activity. Always consult a healthcare provider before starting any new exercise regimen.

How do I know when I’ve mastered the handstand?

Mastery may be considered as being able to hold a straight and controlled handstand away from the wall for a significant amount of time, usually around 30 seconds to a minute.

Can yoga help in mastering a handstand?

Yes, yoga can help improve the flexibility, balance, and strength needed for a handstand. Certain poses like downward dog, crow pose, and others can be particularly beneficial.

Can I do weightlifting exercises to develop strength for the handstand?

Yes, weightlifting exercises like overhead presses and push presses can help develop arm and shoulder strength. Other useful exercises include planches, shoulder taps, scapular push-ups, pike push-ups, and handstand push-ups. These exercises target specific areas involved in the handstand and contribute to improving strength and balance.

Can I use aids such as a resistance band or wall support to assist me in a handstand?

Yes, using a resistance band or wall support can help you develop a sense of balance, improve your technique, and build strength during a handstand. Start with these aids and gradually reduce their use until you can maintain balance without them.

Can practice against a wall help in mastering a handstand?

Yes, wall handstands are a great way for beginners to get accustomed to the inverted position, build strength, and work on balance without the fear of falling.

What are some common mistakes beginners make when trying to learn a handstand?

Some common mistakes include not keeping the body tight, bending the arms, or not properly engaging the shoulder muscles. It’s also important not to kick up too hard when getting into the handstand position.

Recommended
Categories
Advanced Workouts BODYWEIGHT EXERCISES

How Long to Expect Before You Can Execute the Front Lever

Curious about how long it takes to master the Front Lever?

From my own experience, it took me over a year to feel confident in pulling off this impressive move.

During that time, I mixed in extra bodyweight exercises with my regular gym routine to build the strength and stability needed for the Front Lever.

In this article, we’ll break down the process of mastering the Front Lever and explore how long it typically takes to achieve this goal.


The Front Lever is like the holy grail of calisthenics moves—it takes a special mix of strength, balance, and serious muscle control.

I remember when I first started training for it; I thought, “How hard can it be?” Spoiler: *very hard*.

But if you’re brand new to the game, it’s going to take some time.

We’re talking months of solid work to build up the core strength and technique to even attempt it.

But don’t sweat it too much—every rep gets you closer.

With consistent practice and showing up for yourself, you could get there in 6-12 months.

However, if life gets in the way or your training isn’t quite on point (we’ve all been there), the journey could stretch out to 18 months, maybe even 2 years.

Now, if you’re already an advanced athlete with a solid core and some calisthenics experience under your belt, you might knock this out in 3-6 months. But even if it takes longer, don’t stress.

The feeling when you finally hit that full Front Lever—yeah, it’s worth every drop of sweat.


Definition of the Front Lever: What It Is and Why It’s Impressive

Front-Lever

The front lever is one of those moves that looks straight-up superhero-level cool.

I remember the first time I saw someone hold it—I couldn’t help but stare in awe, wondering if I’d ever get there myself.

Picture this: your body is completely parallel to the ground, arms fully extended, hanging from a bar or rings.

Sounds like something out of an action movie, right?

But the reality is, it’s not just about showing off pure strength.

To nail a front lever, your shoulders, abs, and pretty much everything else need to be firing at once.

You’ve got to keep your body locked in while gravity is doing its best to pull you down.

It’s the ultimate test of strength, control, and body awareness, and that’s what makes it so impressive.

When it comes to bodyweight training, the front lever is like the crown jewel.

It’s the kind of move that turns heads at the gym, and honestly, the feeling of finally getting there?

It’s worth every bit of effort.

But mastering it?

That’s a whole different beast.

You’ll need serious upper body strength, a rock-solid core, and the ability to sense every little movement your body makes.

It’s tough, no doubt, but that’s what makes the journey to mastering it so rewarding.


Front Lever: Understanding the Muscles and Skills Required

The front lever is no joke when it comes to the muscles it demands.

When I first started training for it, I had no idea how many different muscles had to work together just to keep my body from collapsing.

Your core takes center stage here, with the abs, spinal muscles, hip flexors, and shoulder stabilizers all putting in the work to keep you steady.

The abdominal muscles are especially crucial—if they’re not strong enough, gravity is going to win the battle.

I learned that the hard way after more than a few failed attempts.

They’ve got to stay contracted, almost like they’re in a constant tug-of-war with the floor.

Then there are the spinal muscles—think of them as the backbone of your form (literally).

Muscles like the erector spinae make sure your trunk stays extended and your posture doesn’t give out.

I’ve definitely felt the burn there after just a few seconds hanging!

Don’t even get me started on the hip flexors.

The iliopsoas plays a vital role in lifting your legs and keeping your body parallel to the ground.

It’s a muscle you might not give much attention to, but it’s essential for maintaining that perfect form.

I had no idea how restricted my iliopsoas was until I tried to get into a front lever and felt like my legs were super heavy.

Shoulder stability is another beast.

Without it, you’re just going to sag and lose control.

The delts, traps, and scapular stabilizers work together to keep your shoulders locked in place.

I’ve been there when the shoulders give out—definitely not fun!

You’ve got to learn how to distribute your weight and keep your position rock solid.

It’s kind of like learning to balance on a tightrope, only you’re horizontal and fighting gravity the whole time.


Factors Influencing Progression Time

Now, let’s break down what it will take to nail this move:

Strength and Fitness Level: If you’ve already been hitting the gym and have built up some upper body strength, you’re ahead of the game and might progress quickly.

But if you’re just starting out, don’t worry—consistent and targeted training will lead to real gains and noticeable improvements over time.

Body Control and Stability: If you’ve got a knack for controlling your body and keeping steady, you’ll probably pick up the Front Lever faster.

If not, no worries—this is something you can definitely develop with practice.

Training Smarts: How often and how well you train can really speed things up.

Set aside specific times for Front Lever practice, and stick to a structured plan that gradually ups the ante.

It’s like leveling up in a game—the more you play, the better you get.

Keep Calm and Train On: Patience is your pal here.

Mastering the Front Lever isn’t a quick trick. It’s about staying positive, grinding it out, and embracing the ups and downs.

Everyone progresses at their own pace, so focus on your own journey and celebrate your personal wins.


Evaluating Your Starting Point

Before you dive into mastering the Front Lever, it’s super important to figure out where you stand right now.

Getting a clear picture of your starting point will help you set achievable goals and make your training plan more effective.

Grip Strength: Let’s start with grip strength because, honestly, it’s crucial.

Try hanging from a bar with a dead hang or holding on statically.

See how long you can hold on before your grip starts to slip.

Core Strength: Next up, core strength—this is your powerhouse.

Give planks, leg raises, or even dragon flags a go.

Keep track of how long you can hold these positions with solid form.

Any shakes or wobbles?

Those are your tell-tale signs of where you need to amp up your strength.

Shoulder Flexibility: Don’t overlook your shoulders!

Exercises like shoulder dislocations (not as scary as they sound!) or wall presses can help you gauge flexibility.

Proper alignment and the ability to keep your shoulders open are must-haves for a smooth Front Lever.

Coordination Level: And of course, there’s coordination.

Try out some hollow holds or L-sits and watch for stable, smooth movements.

Struggling a bit?

That’s your cue on areas to focus on.


Visualization and Mental Preparation

Mental Prep Before Hitting the Bars:

Before you jump into your Front Lever workout, it’s worth hitting pause and getting your mind right.

I’ve learned the hard way that diving in without mental prep can mess with your performance.

So, take a minute, breathe deeply, and picture yourself absolutely crushing that Front Lever.

It may sound a little cheesy, but trust me, visualizing success actually primes your brain and gets you laser-focused.

You’ll feel more dialed in once you’re up there.

Stay Sharp While You’re Up There:

Once you’re hanging in that Front Lever, stay in the zone.

This is when your focus has to be on point.

I’ve found that if I tune into how my body feels—the muscle tension, the technique—everything just clicks better.

Block out the distractions, no thinking about what’s next or how long you’ve been up there.

It’s just you and the bar, fully connected.

That mental focus is the secret sauce that pushes you to your best performance, time and time again.


Choosing the Perfect Grip for the Front Lever: Supination or Pronation?

Choosing the right grip for your Front Lever can make a big difference in your performance and comfort.

Let’s compare the two main types of grips and see which might work best for you:

Supinated Grip (Reverse Grip):

In this grip, your palms face towards you.

Contrary to what might seem intuitive, this grip is highly advanced and extremely challenging.

It taxes the forearms significantly because the extensors and flexors are unable to apply the usual pressure on the bar, unlike more conventional grips.

This position may feel less natural and requires greater forearm strength and flexibility.

Pronated Grip:

Here, your palms face away from you as you grip the bar.

This is the more common and initially recommended grip for learning the front lever.

It primarily challenges the biceps and forearms but is generally considered more manageable than the supinated grip for beginners.

This grip relies on more typical use of arm and shoulder strength, making it a good starting point for those new to the exercise.


Various Strategies to Enter the Front Lever Position

Mounts, or entry strategies, play a crucial role in achieving mastery of the Front Lever. 

Let’s explore a variety of approaches that will help you master these mounts and progress towards your ultimate goal.

Mount 1 – Controlled Elevation (Lever Up): Start from a hanging position and focus your energy on lifting your legs upward.

Use a combination of pulling strength, abdominal contraction, and hip flexion to gradually bring yourself into the Front Lever position.

This approach requires coordination, muscle control, and a good dose of determination.

Mount 2 – Progressive Descent (Lever Down): Begin from an elevated position above the bar and, with controlled movement, lower your body towards the Front Lever.

Focus on abdominal contraction, shoulder stability, and body alignment throughout the entire movement.

Remember to perform the descent gradually to gain more control and strength over time.


Mount 3 – Defying Gravity: This approach involves a combination of pulling and pushing.

Start with a powerful pull toward the chest, then use the accumulated energy to push the body upward into the Front Lever position.

Focus on coordinating the movements and synergistically utilizing the muscles of the upper limbs and core.

Mount 4 – The Power of Balance:

This strategy utilizes balance and weight distribution to enter the Front Lever.

Use your balancing and control skills to position yourself properly on the bar and create the necessary equilibrium to extend the body horizontally.

Progressively refine your technique to achieve a stable and controlled position.

Mount 5 – Your Unique Mount: Every individual has a unique body and a different combination of strength, flexibility, and muscle control.

Experiment with various mounts and discover which one suits your abilities and preferences best.

Customize your progression journey by making small adjustments and seeking the approach that provides you with the highest performance.


Experiment, adapt, and personalize your mount progression journey to achieve mastery in the Front Lever. 


Front Lever Progression Exercises

Tuck Lever Hold: Start by bending your knees and bringing your thighs towards your chest.

Grip the bar or rings with your arms extended, then lift your hips and legs until you achieve an inverted “L” shape.

Hold this position for the desired time, focusing on engaging your abdominal and shoulder muscles.

Advanced Tuck Lever Hold: After mastering the Tuck Lever Hold, you can progress to the Advanced Tuck Lever.

In this variation, further bend your knees, bringing your chest closer to your thighs.

Keep your arms extended and aim to keep your body as parallel to the ground as possible.

Focus on the strength of your abs and shoulders as you maintain the position.


Single Leg Front Lever: Once you feel confident in the Advanced Tuck Lever, you can start working on the Single Leg Front Lever progression.

Extend one leg forward while keeping the other leg bent towards your chest.

Aim to maintain balance and stability as you lift your body with a single extended leg.

Alternate legs to work on both sides of the body.

Straddle Front Lever: The Straddle Front Lever variation requires a wider leg opening.

From a tuck lever or advanced tuck lever position, separate your legs and move them away from your body, creating an inverted “V” shape.

Focus on the strength of your abs and shoulders as you keep your body parallel to the ground.


Full Front Lever: The final progression is the Full Front Lever, where the body is fully extended horizontally and parallel to the ground.

Achieving this position requires significant upper-body strength and excellent activation of the abdominal muscles.

Continue working on the various progressions and gradually increase the duration and precision of your Front Lever.


Common Mistakes in The Front Lever:

To truly master the Front Lever, it’s essential to work through common pitfalls that can hold you back.

Here’s how to tackle these roadblocks and boost your performance:

Weak Grip and Forearms:

If your grip strength isn’t up to par, holding the Front Lever is going to feel impossible.

I’ve been there—hanging on for dear life when my forearms were just done.

To fix this, start working in grip-strengthening exercises.

Hang from a bar for as long as you can, and gradually increase the time.

You can also use grip tools to target those forearms specifically.

Trust me, as your grip improves, so will your Front Lever hold.

Improper Body Alignment:

One of the biggest issues I’ve faced is keeping my body straight.

Dropping your legs or letting your hips sag can mess up your whole form.

Focus on keeping your body fully extended and parallel to the ground.

This takes a lot of strength and control, so stay aware of how your body is positioned throughout the move.

A little tweak here can make a huge difference in your overall execution.

Too Rapid Progression:

It’s tempting to jump ahead and try more advanced versions of the Front Lever too soon, but that’s a quick way to hit a wall (or worse, get injured).

I’ve learned to embrace slow, steady progress.

Start with the basics—like tuck or straddle variations—and gradually add more difficulty as you get stronger.

Respect your body’s pace.


Conclusion

The quest to master the Front Lever isn’t a sprint—it’s a marathon, and I can tell you from experience, it’s all about patience and persistence.

It’s taken me longer than I expected, and there have been plenty of moments where I felt stuck.

But that’s just part of the journey. It’s about learning to adapt, trying new progressions, and figuring out what works for your body.

When you’re grinding through each progression, take the time to focus on form.

Every movement should feel like you’re laying down another brick in your foundation.


FAQs

Do I need a gym to start with Calisthenics?

No! Calisthenics is an activity that can be practiced anywhere, even without a gym.

What is the average time required to learn the Front Lever?

The time it takes to learn the Front Lever varies from person to person. As mentioned at the start of the article, some individuals may achieve proficient mastery of the exercise within six months to a year, while it may take longer for others. This duration is influenced by various factors such as core strength, flexibility, and previous training experience. Persistent practice and focused training are the keys to success in the Front Lever.

What to do if you’re stuck or not making progress in the Front Lever?

If you’re feeling stuck or struggling to make progress in the Front Lever, don’t lose motivation. Seeking the help of an experienced coach or calisthenics instructor to assess your technique and offer personalized advice can be beneficial. Additionally, explore different training strategies such as varying exercises, adding overload, or utilizing specific training methodologies. Remember that progress in the Front Lever takes time and patience, so maintain determination, and you’ll continue to make progress.

What are some advanced skills in Calisthenics besides the Front Lever?

  • Back Lever
  • Human Flag
  • Planche
  • One-Arm Pull-Up
  • Handstand Push-Up
  • Muscle-Up

What Makes the Back Lever More or Less Challenging Than the Front Lever?

The difficulty between the Back Lever and the Front Lever can vary depending on individual abilities, but generally, the Back Lever requires more control and precision in body positioning, while the Front Lever requires good leg movement coordination and a strong grip.

How many times a week should I train to achieve the Front Lever or other calisthenics skills?

If you’re a beginner in Calisthenics, you should exercise 2-3 times a week. This will allow you to gradually adapt to the exercises and give your body time to recover between training sessions. More advanced athletes may consider a training frequency of 4-5 times a week to maintain progression and challenge.  

Recommended
Categories
Advanced Workouts BODYWEIGHT EXERCISES

How Long Does It Take to Achieve Full Planche Progression? Get Ready to Smash Your Goals!

If you’re the kind of person who loves pushing your limits, you’ve probably heard of the planche.

It’s a jaw-dropping move where you hold your body parallel to the ground, balanced solely on your hands.

I remember the first time I saw someone nail a planche; it looked like pure magic!

I can guarantee, once you’ve mastered this skill, the payoff is huge.

Breaking down the planche into manageable progression steps was a game-changer for me.

Each step builds on the last, gradually increasing your strength and stability until you’re ready to take on the full move.

In this article, I’m excited to walk you through each of these progression steps.

I’ll share specific exercises and variations that have helped me—and countless others—move closer to achieving the full planche.


When the Planche is Not Suitable for You: Considerations to Keep in Mind

When-the-Planche-is-not-suitable-for-everyone

So, you’re eyeing that epic planche move—awesome ambition!

It’s a killer display of strength and balance, no doubt.

But before you start practicing like a circus performer, let’s talk about when the planche might not be the right fit for you.

Health Hiccups? Play It Safe

I remember trying the planche for the first time and immediately feeling strain in my shoulders.

If you’ve got nagging shoulder pain, a sensitive spine, or any other health issues, don’t ignore those warning signs.

Chat with a healthcare pro or physical therapist before attempting the planche.

It’s better to stay injury-free than to push through and regret it later.

New to the Fitness Game? Build Up First

When I started my fitness journey, I was so eager to master advanced moves like the planche.

Spoiler alert: it didn’t happen overnight!

If you’re just starting out or haven’t built a solid foundation of core, shoulder, and upper body strength, the planche might feel like climbing Everest.

Focus on basic exercises like push-ups, planks, and dips to build that strength first.

Rome wasn’t built in a day, and neither is a planche!

Limited Mobility? Stretch It Out

Flexibility played a huge role in my planche progress.

A good planche demands flexibility in your shoulders, wrists, and hips.

Feeling tight in these areas?

Incorporate some mobility and stretching routines into your workouts.

Think yoga, dynamic stretches, or foam rolling.

Healing from an Injury? Take a Breather

I learned the hard way that pushing too soon can set you back.

If you’re nursing an injury, patience is key.

Jumping into intense moves like the planche can slow down your recovery.

Follow your physical therapist’s advice and give your body the time it needs to heal fully before tackling advanced skills.

Different Fitness Goals? Choose Your Path

Not everyone’s fitness journey includes mastering the planche, and that’s totally okay!

When I decided to focus on muscle growth and endurance, the planche took a back seat.

If you’re aiming for muscle gains, weight loss, or improving cardio, tailor your workouts to those goals.

The planche is amazing, but it’s just one piece of the fitness puzzle.

Busy Schedule? It Might Take a Back Seat

Life gets hectic, and sometimes there’s just no time to dedicate to mastering such a demanding skill.

I’ve had weeks where squeezing in planche practice was impossible.

If your schedule is packed, focus on exercises that offer the most bang for your buck.

The planche can wait until you have the time and energy to commit properly.


Fundamentals for Planche Progression

When it comes to learning the planche, I’ve always thought of it like building a house—if the foundation isn’t solid, everything’s going to fall apart when you try to tackle the advanced stuff.

I used to think wrist strength wasn’t that big of a deal, but I quickly realized how wrong I was.

Without properly training my wrists, they were the first thing to give out.

Exercises like planche leans and fingertip push-ups became a game-changer for me, especially when I stopped rushing and allowed my wrists time to adapt.

Progress takes patience, but it’s worth avoiding setbacks.

Let’s talk shoulders, another crucial area.

I always thought shoulder strength was the main thing, but once I understood the importance of mobility, it completely changed my approach.

Simple moves like push-ups and dips build that necessary power, but shoulder dislocates and wall slides are what really helped me improve my flexibility and stability—both essential for advancing in the planche.

And then there are the pseudo-planche push-ups and tuck planche.

These exercises were eye-openers for me.

Pseudo-planche push-ups hit differently by forcing you to shift your hands forward, which really engages the front muscles.

The tuck planche, where your knees are bent and feet off the floor, seemed easy at first glance, but man, it demands serious strength and control.

It’s all about finding that balance between core power and body control.


Progression from Tuck Planche to Advanced Tuck Planche

How-to-get-the-Advanced-Tuck-planche

The Tuck Planche is an advanced exercise that requires strength and stability, engaging the entire body with a focus on the shoulders, core, and upper limbs.

During the execution of the Tuck Planche, the body is in a position similar to a squat, but with the legs lifted off the ground.

The knees are bent, and the hips are lifted, while the hands are placed on the ground with the fingers pointing forward.

Maintaining proper body positioning during the Tuck Planche is essential to maximize the benefits of the exercise and prevent injuries.

Here are some key points to keep in mind:

  • Shoulders and arms: The shoulders should be activated and engaged, with elbows extended and hands positioned directly under the shoulders. Avoid collapsing the shoulders or pushing them forward.
  • Core: The core plays a crucial role in the Tuck Planche. Keep the abdominal muscles engaged and lift the hips to form a straight line from the hips to the shoulders. Avoid dropping or excessively lifting the hips.
  • Legs: The legs are bent in a tucked position, with the feet lifted off the ground. Try to keep the legs parallel to the floor and avoid letting them drop or open too wide.
  • Breathing: Breathe regularly during the exercise, avoiding holding your breath. Proper breathing supports stability and correct form.


Now let’s move on to the progressions from Tuck Planche to Advanced Tuck Planche:

  • Tuck Planche on parallel bars: Start by performing the Tuck Planche on parallel bars, which provides greater freedom of movement. Place your hands on the parallel bars, lift your legs into a tucked position, and maintain proper form. Focus on fully extending your arms and maintaining solid stability.
  • Tuck Planche on the floor: After achieving good stability on the Tuck Planche on parallel bars, try performing the exercise directly on the floor. Maintain the same tucked position with lifted legs and strive for a solid and stable form.
  • Advanced Tuck Planche: Once you can maintain good form in the Tuck Planche on the floor, you can progress to the Advanced Tuck Planche. In this progression, extend one leg at a time while keeping the other leg bent in the tucked position. This increases the difficulty and requires greater strength and stability.


To gradually improve form and hold duration, here are some practical tips:

  • Train regularly: Practice the Tuck Planche and its progressions at least 3-4 times a week to ensure consistent progression. Repeat the exercises consistently and dedicate the necessary time to develop the required strength and stability.
  • Progressively develop strength: You can use complementary exercises to develop the necessary strength for the Tuck Planche. For example, working on push-up variations such as close-grip push-ups or diamond push-ups will help strengthen the shoulders and core, providing a solid foundation for the planche progression.
  • Focus on proper form: Before working on hold duration, ensure you have a solid form. You could start with shorter holds, focusing on achieving the correct position and maintaining body alignment. As you gain strength and stability, gradually increase the hold duration.
  • Gradually increase difficulty: Once you feel comfortable with a progression, move on to the next one. For example, once you can maintain a solid Advanced Tuck Planche, you can try extending both legs simultaneously to progress to the straddle Planche. Progression by progression, you will advance towards the full planche.
  • Work on mobility: The Tuck Planche requires good shoulder, wrist, and hip mobility. Dedicate time to stretching exercises and mobility training to improve your range of motion and facilitate the execution of the exercise. You could include exercises like shoulder rotations, wrist extensions, and hip openers in your training routine.
  • Maintain a balanced training approach: Don’t solely focus on the Tuck Planche, but also include other exercises for the core, upper body, and legs in your training program. A well-rounded workout will help improve overall strength and muscle support for the Tuck Planche.
  • Be patient and consistent: Mastering the Tuck Planche and its progressions takes time and dedication. Be patient with yourself and maintain a consistent practice. Every little progress counts and will bring you closer to your goal.


Advanced Challenges to Strengthen Your Planche

Once you’ve nailed the Tuck Planche and Advanced Tuck Planche, it’s time to step things up and take on more advanced challenges.

These next progressions are not only going to test your strength and stability but also help you build the endurance you need to conquer the Full Planche.

Straddle Planche:

This was a real turning point for me.

The Straddle Planche felt like a milestone because it’s a step up from the tuck, but it still gives you a bit of balance help with the wider leg position.

Your legs form a “V” shape, which is great for working on both strength and control.

My advice: ease into it by gradually widening your legs from the Advanced Tuck Planche while keeping everything tight and stable.

I remember it took a bit of patience, but once you find that balance, it feels incredible.

Planche Negative:

This exercise is a killer for strength building.

The Planche Negative was one of those moves that humbled me real quick.

Starting from the Tuck Planche, you slowly lower your body while extending your legs.

It’s all about controlling the descent, which helps build that muscle endurance and strength you’ll need later for the Full Planche.

It might feel brutal at first, but trust me, it’s worth it.

You really feel every muscle working, and over time, it starts to feel more controlled and powerful.

Planche Push-ups:

Now, these are a whole new level of intense.

If you thought regular push-ups were hard, Planche Push-ups will definitely test your limits.

When I first tried them, I could barely move, but that’s the beauty of progress, right?

Starting from the Tuck Planche, you perform a push-up while staying parallel to the ground.

It requires crazy shoulder and core strength, so start small with partial reps and slowly work your way up.

Progressive Full Planche:

This is the big one. Once you’re comfortable with the Straddle Planche, you can start inching closer to the Full Planche by gradually bringing your legs together.

Focus on keeping your form clean and your body aligned.

Take it slow, and you’ll eventually find yourself holding that Full Planche, and let me tell you, it’s worth every second of hard work.


Planning and Training Tips for Planche Progression


  • Set a goal: Before starting your Planche progression, establish a clear and realistic goal. For example, you may want to achieve the Tuck Planche in two months and the Straddle Planche within six months. Having a defined goal will help you stay motivated and track your progress.
  • Create a training program: Develop a specific training program for Planche progression. As mentioned earlier, make sure to include strength exercises for the shoulders, upper body, and core. Schedule dedicated sessions for practicing the various Planche progressions. Follow a gradual approach, increasing intensity and difficulty as you gain strength and stability.
  • Work on technique: Proper technique is crucial for effectively and efficiently performing the Planche. Pay attention to body alignment, shoulder positioning, muscle contraction, and core control. Work on form from the early stages of progression and aim to continually improve your technique.
  • Monitor your progress: Keep track of your progress along the way. Measure the hold times, take note of form variations, and record exercises you can complete. This will allow you to see improvements over time and keep you motivated to continue working towards the Planche.
  • Body awareness: Being aware of your body during Planche execution is essential. Listen to your body’s sensations and limits, avoid forcing movements, and give your body time to adapt and develop gradually.
  • Utilize coach or community support: If possible, consider working with a coach or joining an online or gym community that shares your interest in the Planche. This will provide you with expert guidance, the support of like-minded individuals, and the opportunity to learn from others.


Developing a Strong Core to Overcome Planche Challenges

The Planche is all about strength and stability, and one thing I’ve learned firsthand is that engaging your core is absolutely key to holding that horizontal position.

Your core acts as the central stabilizer, keeping your hips and torso in check so that your shoulders and arms can support your body weight properly.

Without that solid core engagement, you’ll either sag or overcompensate, and trust me, that’ll throw off the whole movement.

A strong core is what helps you maintain that perfect alignment—keeping your hips from dipping too low or lifting too high—so you can hold that straight line from your shoulders to your hips.

Moves like planks, sit-ups, and leg raises are essential for building up the strength and endurance you need for the Planche.

For me, leg raises really did the trick, as they mimic that body line you’re aiming for in the Planche.

It’s all about consistent training and gradually increasing difficulty, but once your core is locked in, you’ll notice a big difference in how steady and controlled your Planche feels.


Balance Training for the Planche

Balance is an essential component for successfully executing the planche.

In addition to including specific core exercises such as abdominal, oblique, and lower back exercises, you can integrate specific balance training exercises into your workout routine.

The following exercises will help improve your ability to maintain a stable and controlled position, especially if you are a beginner in the world of Calisthenics:

  • Static Plank: The static plank is a fundamental exercise for training balance in the planche. Start by assuming the traditional plank position, keeping your body in a straight line parallel to the ground. Focus on maintaining a stable balance, distributing the weight evenly between your hands and toes.
  • Elevated Surface Planche: Use sturdy support such as blocks or parallel bars to elevate your hands off the ground during the planche. This will help reduce the difficulty and focus on balance, allowing you to progressively raise your hands to different heights.
  • Assisted Planche with Resistance Bands: Use a resistance band to assist you in the balance phase during the planche. Wrap the resistance band around your shoulders and support it with your feet or fixed support. This will provide you with additional support as you develop the necessary balance and strength.
  • Balance on Unstable Surfaces: Experiment with balance on unstable surfaces such as a Bosu ball, a fitness ball, or a cushion. These tools require increased stabilization effort and will help improve overall body balance.
  • Gradual Progression: Remember to follow a gradual progression in balance training for the planche. Start with simpler exercises and gradually increase the difficulty as you develop the necessary strength and stability.


From Beginner to Full Planche: An Example of a Progressive Training Journey


PHASE 1: FUNDAMENTALS

  • Tuck Planche Hold: 3-4 sets of 10-15 seconds hold. Rest for 60-90 seconds between sets.
  • Close-Hand Push-Ups: 3-4 sets of 8-10 repetitions. Rest for 60-90 seconds between sets.
  • Plank Hold: 3-4 sets of 30-45 seconds hold. Rest for 60-90 seconds between sets.
  • Hollow Hold: 3-4 sets of 20-30 seconds hold. Rest for 60-90 seconds between sets.

PHASE 2: PROGRESSION TOWARD ADVANCED TUCK PLANCHE

  • Tuck Planche Hold on Parallel Bars: 3-4 sets of 10-15 seconds hold. Rest for 60-90 seconds between sets.
  • Pike Push-Ups: 3-4 sets of 8-10 repetitions. Rest for 60-90 seconds between sets.
  • L-Sit Hold: 3-4 sets of 10-15 seconds hold. Rest for 60-90 seconds between sets.
  • Tuck Planche Hold on the Floor: 3-4 sets of 10-15 seconds hold. Rest for 60-90 seconds between sets.

PHASE 3: PROGRESSION TOWARD FULL PLANCHE

  • Advanced Tuck Planche Hold: 3-4 sets of 10-15 seconds hold. Rest for 60-90 seconds between sets.
  • Diamond Push-Ups: 3-4 sets of 8-10 repetitions. Rest for 60-90 seconds between sets.
  • Straddle Planche Hold: 3-4 sets of 10-15 seconds hold. Rest for 60-90 seconds between sets.
  • One-Leg Extended Planche Hold: 3-4 sets of 10-15 seconds hold per leg. Rest for 60-90 seconds between sets.
  • Advanced Progression: Once you have achieved good stability in the Full Planche, you can increase the duration of the holds and work on more advanced variations such as Planche Press, Planche Push-Ups, and Planche Dips.

This is just a general guide, and progression times may vary from person to person.

Always consult a fitness professional or qualified coach before training and for further personalized advice and adjustments.


RELATED:>>> Mastering the Handstand: How Long Does It Take for Beginners?


Conclusion

The Planche is a challenging goal that takes time and dedication.

It’s all about building strength, mastering proper form, and advancing gradually.

Rushing through it can lead to setbacks, so patience is essential throughout the process.

I’ve noticed that having a good training partner or seeking advice from someone more experienced can really make a difference.

With consistent effort and the right guidance, you’ll be amazed at how far you can progress.


FAQs

Is being very strong necessary to perform the planche?

To perform the planche, it is necessary to have a good foundation of strength, especially in the upper body. The strength of the shoulders, triceps, and abdominal muscles are crucial for maintaining the planche position. However, with proper progression and regular training, it is possible to develop the strength required to perform this advanced exercise.

Is it true that it can take months or even years to learn the planche?

Yes, learning the planche takes time and dedication. The planche is a highly advanced exercise that requires high strength and stability. The ability to perform a planche will depend on the initial fitness level and the frequency and quality of training. For some athletes, it may take only a few months, while for others, it may take years of consistent practice.

Can the Front Lever be compared to the Planche in terms of difficulty?

The Front Lever is another advanced skill that requires significant body strength and control. Although both exercises require high core and triceps strength, the planche involves more shoulder engagement and precise body balancing control. Therefore, while both are challenging exercises, the planche can be considered slightly more difficult than the Front Lever.

Should I perhaps learn another skill before achieving the planche, which will help me in executing it?

It is not necessary to learn another specific skill before working on the planche. However, there are complementary exercises that can help develop the necessary strength and stability to perform the planche. For example, working on push-up variations, such as close-grip push-ups or diamond push-ups, can help strengthen the shoulders and core, which are crucial for the planche. It is important to focus on gradual progression and improvement of the skills required to properly execute the planche.

Recommended
Categories
BODYWEIGHT EXERCISES Training Insights

21 Unique Benefits of Gymnastics Explained: Learn More About This Fitness Option!

If you’re already hitting the gym or dabbling in calisthenics, have you ever thought about adding a dash of gymnastics to your routine?

Trust me, It’s like upgrading an already great playlist—it adds variety, excitement, and challenges that keep things fresh.

While gymnastics shares the precision and control of calisthenics, it ups the ante with flexibility and coordination that would make even a cat jealous.

I’ve tried my hand (and probably my entire body) at a few fundamental gymnastics techniques, and let me tell you, it’s a game-changer.

This sport enhances complex physical skills in such an enjoyable and disciplined way that you might forget you’re even working out.

So before you dive headfirst (literally) into flips and jumps, let’s explore what gymnastics has to offer.

I promise, it’s not just about medals and trophies—it’s about a transformation that reaches far beyond the gym.


What Science Says About Gymnastics

Gymnastics-A-Science-Based-Approach

Before we jump into the 21 benefits, let’s talk science for a moment.

A study published on ResearchGate examined how gymnastics impacts cognitive functioning and health.

Spoiler alert: it’s all good news!

The study showed that regular gymnastics practice can enhance cognitive functions like attention, memory, and information processing.

Who knew flips and handstands could be brain boosters?

But that’s not all.

Gymnastics also contributes to overall health by improving muscle strength, flexibility, and balance.

It’s like a one-stop shop for physical well-being.

(Benefits of Gymnastics on Cognitive Health and Functioning)


1. Improved Body Strength

Gymnastics-increases-overall-strength

Jumping into gymnastics might seem as intimidating as walking a tightrope over a canyon.

Trust me, I’ve been there, staring at gymnasts flipping effortlessly while I could barely manage a forward roll.

But here’s the secret: you don’t need to be Hercules to start.

The beauty of gymnastics is that it builds your body strength over time.

Every muscle group gets a workout, and before you know it, you’re stronger than you ever imagined.

In the beginning, some routines might make you feel like a wet noodle.

Don’t get discouraged!

Even 20 minutes is a fantastic start.

Take breaks if you need to—no shame in catching your breath.

Each week, try adding five more minutes to your routine.

I remember when I could barely hold a handstand for a second, but with persistence, I saw improvements in less than a month.

Imagine where you’ll be in a year if you take that first leap (pun intended) into consistent gymnastics workouts!


2. Increased Flexibility

Gymnastics-increases-flexibility

When I first thought about gymnastics, the image of bending like a pretzel came to mind.

If you’re thinking, “I’m about as flexible as a wooden plank,” you’re not alone!

But here’s the good news: you don’t have to be a human rubber band to start.

Gymnastics is famous for boosting flexibility, and it meets you where you are.

Through a series of stretches and routines, you’ll gradually increase your muscles’ range of motion.

Sure, some moves might make you feel like you’re auditioning for the circus, but with consistent practice, you’ll be touching your toes—and maybe even doing the splits—in no time.

I was amazed at how quickly I started to feel more agile and less like the Tin Man from “The Wizard of Oz.”


3. Improved Balance and Body Control

Ever trip over thin air or wobble while standing still?

I used to joke that gravity had a personal vendetta against me.

That’s where gymnastics comes in.

Balance and body control improve with practice, and gymnastics offers plenty of that.

As you learn different routines—like cartwheels or trampoline jumps—you’ll enhance your coordination and body awareness.

Over time, this newfound balance becomes second nature.

You’ll find yourself navigating life with the grace of a cat (minus the nine lives, unfortunately).


4. Cardiovascular Health

Gymnastics isn’t just about strength and flexibility; it’s also a fantastic cardio workout.

When I first started, I thought, “How hard can it be?”

Spoiler alert: it’s a heart-pumping blast!

Diving into a gymnastics routine gets your heart racing and lungs working overtime—in a good way.

You’re not just moving; you’re boosting your heart rate, burning calories, and improving your circulation.

The best part?

You can tailor gymnastics to your fitness level.

Start slow, let your body adapt, and before you know it, you’ll be tackling stairs or running errands without even breaking a sweat.


Gymnastics for Seniors: Lowering Blood Pressure and Cholesterol

Gymnastics-for-Seniors

Here’s something that might surprise you: a recent study found that gymnastics can significantly lower blood pressure and cholesterol levels in women over 65.

Yes, you read that right!

In the study, a group of senior women participated in weekly gymnastics sessions over three weeks.

The results?

They saw a significant drop in blood pressure and total cholesterol compared to those who didn’t participate.

This shows that gymnastics isn’t just for the young and nimble; it’s a fantastic way for seniors to improve cardiovascular health and reduce the risk of heart disease.

So whether you’re 16 or 60, it’s never too late to start flipping your way to better health!

(PubMed ID: 8976894)


5. Self-Discipline and Commitment

If patience isn’t your strong suit, gymnastics might just teach you a thing or two.

Even though I was already into calisthenics, my first attempt at a proper back bridge was eye-opening.

My shoulders felt tighter than I’d expected, and holding the position without cramping was a challenge on its own.

But sticking with it showed me the power of persistence—how small progress adds up and teaches you to embrace the process, even when it’s tough.

Gymnastics instills discipline that carries over into every corner of life—work, relationships, and even those moments where you just need to keep going.

It’s a sport that keeps giving back in ways you don’t see coming!


6. Reduced Risk of Diseases

Regular gymnastics doesn’t just make you feel like a superhero; it helps keep the villains of disease at bay.

Consistent physical activity can prevent a range of health issues.

By promoting a healthy body weight, gymnastics helps reduce the risk of conditions like type 2 diabetes, heart disease, and even some cancers.

I used to think of exercise purely in terms of fitting into my jeans, but now I see it as a shield against future health problems.


7. Improved Posture

Do you often find yourself slouching or hunching your shoulders?

I was guilty of the “text neck” myself.

Gymnastics might be the solution.

This sport places great emphasis on proper posture and body alignment, both during routines and at rest.

As your strength and flexibility increase, you may notice an improvement in your posture.

Good posture not only makes you appear more confident but can also prevent a range of health issues, including back pain and even respiratory problems.


8. Enhances Bone Health and Prevents Osteoporosis

Gymnastics doesn’t just build muscles; it strengthens your bones too.

High-impact exercises put positive stress on your bones, stimulating the formation of new bone tissue.

This helps reduce the risk of fractures and prevents osteoporosis—a condition where bones become brittle.

Regular practice influences hormonal balance, preserving bone density.


9. Develops Self-Esteem

Do you sometimes doubt your abilities?

I used to think, “There’s no way I can do that.”

But gymnastics can help you overcome these challenges.

Mastering new skills and seeing your progress gives a tremendous boost to your self-esteem.

Every little success is a reminder of what you’re capable of.

Plus, the supportive environment often found in gymnastics can make you feel appreciated and valued.


10. Stress Management

Life can be as stressful as trying to solve a Rubik’s Cube blindfolded.

Finding healthy ways to cope is crucial, and gymnastics might just be your new favorite outlet.

When you practice, you’re focused on movements and routines, allowing you to escape everyday worries.

Plus, physical activity releases endorphins—the “feel-good” hormones.

So if you’re looking to flip your stress away, gymnastics could be the perfect fit!


11. Improves Social Skills

Are you a bit on the shy side?

Or maybe you’re looking to expand your social circle?

Gymnastics could be your ticket.

Beyond developing physical abilities, gymnastics offers opportunities to improve social skills.

Many programs promote collaboration and mutual encouragement.

The discipline and respect taught in gymnastics can help you interact more effectively in various social settings.


12. Development of Concentration and Focus

In today’s fast-paced world, staying focused can be a real challenge.

Gymnastics requires a significant amount of focus, as movements need to be executed with precision.

By practicing, you’ll develop skills that help you concentrate not only during training but in other areas of your life.

Whether it’s studying, working, or simply listening, enhanced focus can take you far.

It’s like mental gymnastics for your brain!


13. Improved Sleep Quality

Sleep may seem like the easiest thing in the world, but quality sleep can be elusive.

Intense physical activity like gymnastics can help regulate your circadian rhythms.

After a good gymnastics session, you’ll be physically tired, making it easier to fall asleep and stay asleep.

Tossing and turning becomes a thing of the past when your body gets the movement it needs.


14. Encourages a Healthy Lifestyle

When you dive into gymnastics, something funny happens—you start taking your health way more seriously.

Suddenly, I’m the guy checking labels at the grocery store, swapping late-night binges for early bedtime, and stretching in the kitchen while my coffee brews.

Who even am I?

But here’s the cool part: you’re not just leveling up your own life—you’re inspiring others too.

When people see you flipping, laughing, and putting in the work, they can’t help but think, “Maybe I should give that a try.”

Healthy living?

It’s surprisingly contagious.

And let’s be honest, it’s way more fun when you’ve got a squad joining in on the action.


15. Enhanced Core Strength

A strong core is essential for supporting and stabilizing your body during exercise and daily activities.

Gymnastics challenges your core’s endurance and capacity.

The benefits go beyond athletic performance.

With a stronger core, you can maintain proper alignment and reduce the risk of injuries.

I noticed that even simple tasks like carrying groceries became easier.

Who knew planks and hollow holds could be so rewarding?


16. Acquire Transferable Skills to Excel in Other Sports

When you train in gymnastics, you’re not just building muscles; you’re enhancing skills that are valuable in other sports too.

Improved coordination, balance, and body awareness can help you shine whether you’re playing basketball, swimming, or even dancing.

Tackling tough routines builds resilience and teaches you to stay cool under pressure.

Plus, gymnastics emphasizes teamwork and communication—skills everyone needs.


17. Improved Reflexes and Reaction Time

Gymnastics’ quick and agile movements boost your brain’s speed and make you more responsive.

Flipping, jumping, or twisting trains your body to react quickly and efficiently.

Improved hand-eye coordination is essential wherever fast responses are needed.

Whether you’re catching a falling object or dodging that unexpected puddle, your reflexes will thank you.


18. Development of Planning Skills

Gymnastics is a great way to learn planning and organization while staying active and engaged.

Every session means setting goals, picking routines, and figuring out how not to look like a flailing octopus mid-air.

I’ll admit, the planning doesn’t instantly make me a coordination wizard, but it definitely helps me focus and stay on track.

But the real magic?

Long-term planning.

Setting goals, adapting to curveballs, and learning to roll with it (sometimes literally) builds skills that go way beyond the gym.

It’s like multitasking boot camp—except way more fun and with better outfits.


19. Increased Endurance

Let’s talk endurance—the magic that keeps you going when you’d rather stop.

Gymnastics is a great way to build it up, one routine at a time.

I’ll admit, at first, I felt like I was running on fumes way faster than I expected.

But don’t sweat it—it’s all part of the process.

With consistent training, your body adapts, and suddenly, you’re going longer and feeling stronger.


20. Enhances Problem-Solving Skills

Think about it: problem-solving is an inevitable part of life.

It’s a skill that can be improved, and gymnastics can be an unexpected way to do so.

Wondering how?

Let me explain.

Gymnastics isn’t just about physical strength; it requires a great deal of critical thinking.

When you’re trying to perform a new move, you need to figure out how to move your body effectively and safely.

This process of learning and adapting can help develop your problem-solving skills, which can be transferred to other areas of your life.


21. Improves Spatial Awareness

Ever wonder how gymnasts always seem to know where their limbs are—even when they’re upside down?

I used to think it was some kind of superhero power, but it’s all about learning to feel your body in space.

When you’re spinning and flipping, you get pretty good at figuring out which way is up (and avoiding faceplants).

Perfecting those landings?

It’s like playing a game of “match the puzzle pieces” between your vision and your movements—except the stakes are a little higher.

Gymnastics practice sharpens this coordination faster than a cat landing on its feet.

Every new apparatus throws you a curveball, challenging you to adapt on the fly and conquer unfamiliar territory.

And let’s talk about body control.

Every move feels like a test in precision—one wrong step, and you’re learning the floor’s texture a little too closely.

All that awareness doesn’t just stay in the gym.

It spills over into everyday life, making you feel balanced, confident, and a little more ninja-like wherever you go.


Conclusion

To sum it all up, gymnastics builds strength, coordination, and flexibility. But it doesn’t stop there.

It boosts confidence, sharpens focus, and clears your mind.

Everyday life?

It gets easier—and more exciting.

But don’t go diving into flips just yet.

Start with the basics and, if possible, get guidance from someone experienced.


FAQs

Is gymnastics suitable for all ages?

Yes, gymnastics can be practiced by people of all ages. There are specific programs for children, teenagers, adults, and even seniors.

What are the physical requirements to practice gymnastics?

There are no specific physical requirements to start gymnastics. You can begin at any fitness level and gradually improve over time.

Is previous experience necessary to start gymnastics?

No, previous experience is not necessary. Gymnastics classes are structured to accommodate different abilities and levels of experience.

What are the psychological benefits of gymnastics?

In addition to the physical benefits, gymnastics can improve self-confidence, concentration, stress management, and promote a more balanced and positive mindset.

Can gymnastics be practiced at home?

Yes, there are many options for home gymnastics training, such as stretching exercises, strength exercises, and specific routines. However, it’s important to follow safety guidelines and consult a qualified professional.

Can gymnastics cause injuries?

Like any physical activity, there is a risk of injuries during gymnastics practice. It’s important to follow the instructor’s instructions, use safety equipment, and properly warm up before starting.

Does gymnastics require special equipment?

Gymnastics can be practiced using specific equipment such as parallel bars, trampolines, trapeze, mats, etc. However, you can start with basic exercises that don’t require special equipment.

Can gymnastics help with weight loss?

Yes, gymnastics is a comprehensive physical activity that can help burn calories and promote weight loss, especially when combined with a balanced diet.

How long does it take to see results from practicing gymnastics?

Results vary from person to person, but with consistent and dedicated practice, improvements in strength, flexibility, and gymnastic skills can be noticed within a few weeks or months.

Can I practice gymnastics if I have health issues or injuries?

Before starting any physical activity, it’s advisable to consult a doctor or healthcare professional to assess individual conditions and determine if gymnastics is suitable or if specific modifications are needed to fit personal needs.

Recommended
Categories
BODYWEIGHT EXERCISES Training Insights

Calisthenics vs. Gymnastics: Which Is Better for Full Body Strength and Flexibility?

Selecting the right physical activity can feel like searching for a needle in a haystack.

With countless options out there, it’s tough to find the perfect match that aligns with your goals and keeps you motivated.

Two disciplines that often come up in this quest are Calisthenics and Gymnastics.

Both focus on strength, flexibility, and coordination, but they offer different approaches to training.

But which one is the right choice for you?

I’ve tried both, and let me tell you—they each have their own set of perks and challenges.

So, let’s dive deep and see which one suits your aspirations best!


Calisthenics: The Discipline that Takes Training to a New Level

Calisthenics-a-revolutionary-workout

Calisthenics is all the rage these days, and for good reason.

It’s a game-changer that pushes your workout to new heights without the need for fancy equipment.

By using your own body weight as resistance, it challenges you in ways you never thought possible.

When I first began, just managing to hold a plank felt like a big achievement.

But over time, the progress was undeniable.

With each new skill I learned, the sense of accomplishment grew, making it hard to step away from the next challenge.

That’s the beauty of Calisthenics—it’s versatile and adaptable to any fitness level, making it accessible to everyone.

Whether you’re a seasoned athlete looking to switch things up or a newbie just starting out, Calisthenics helps you improve strength, flexibility, and balance.

Plus, there’s something incredibly empowering about mastering your own body weight.

There’s no better feeling than realizing your body is the only piece of equipment you need to get stronger!


The Journey of Calisthenics

Did you know that “Calisthenics” comes from the Greek words “Kalos,” meaning beautiful, and “Sthenos,” meaning strength?

Pretty cool, right?

This discipline has roots that go back to ancient times.

Greek soldiers used Calisthenics to get battle-ready, honing their physical prowess without the need for equipment.

Over the years, Calisthenics has evolved and taken on various forms.

It found its way into schools as part of physical education, became a staple in military training, and now, it’s a global fitness phenomenon.

People love it for its emphasis on functional, full-body workouts that build endurance and practical strength.

From day one of Calisthenics, the progress was real—I saw results way faster than I thought I would.

It’s a huge win when you crush that first pull-up or knock out more dips than you ever expected.


Gymnastics: The Perfect Combination of Strength, Flexibility, and Coordination

Gymnastics-training

Gymnastics is an athletic discipline with a long and respected history.

It’s the perfect mix of strength, flexibility, and coordination, offering a holistic approach to fitness.

Through targeted exercises and routines, gymnastics not only shapes your body but also sharpens your mind.

It requires focus, discipline, and a commitment to mastering complex movements.

No matter your age or fitness level, gymnastics offers a structured environment to improve.

Whether you’re aiming to be a professional athlete or just want to stay fit and agile, gymnastics provides you with the tools to reach your goals.

And let’s be honest—who hasn’t been amazed watching gymnasts perform seemingly impossible feats with grace and ease?


The Birth of Gymnastics

Gymnastics also hails from ancient Greece, where it was more than just a sport—it was a way of life.

It was a key part of education and was used to prepare young people for warfare and citizenship.

But modern gymnastics owes a lot to Friedrich Ludwig Jahn, a 19th-century German educator.

He’s often called the “father of modern gymnastics.”

Jahn was passionate about physical fitness and nationalism.

He created equipment like parallel bars, horizontal bars, and rings—gear that’s still fundamental in gymnastics today.

He founded the first outdoor gymnastics club, emphasizing strength, flexibility, and coordination.

Over time, gymnastics evolved into an Olympic sport and spread worldwide.

Today, it encompasses everything from floor exercises to vaulting, balance beam routines, and rhythmic gymnastics.

It’s a sport that demands not just physical strength but also mental resilience.


Calisthenics vs Gymnastics: Which Offers Greater Benefits?

Both Calisthenics and Gymnastics offer unique benefits while also sharing many similarities.

Pro: Accessibility

Calisthenics is super accessible.

No gym membership?

No problem!

You can work out in your living room, backyard, or at the local park.

All you need is a bit of space and maybe a pull-up bar if you’re feeling fancy.

On the road for work or vacation? You can keep up your routine anywhere.

I love how I can squeeze in a quick Calisthenics session during my lunch break or even while waiting for dinner to cook.

Gymnastics, on the other hand, is more equipment-heavy.

You’ll need access to specialized gear like mats, bars, and beams.

However, gymnastics facilities are quite common, and many gyms offer classes for different age groups and skill levels.

If you enjoy a structured environment with professional coaching, gymnastics might be up your alley.

Pro: Building Overall Body Strength

Both disciplines are fantastic for building overall body strength.

Whether you’re nailing a routine on the rings in gymnastics or doing pull-ups at the park in Calisthenics, you’re engaging multiple muscle groups.

Gymnastics helps keep your muscles balanced, ensuring you don’t have any weak spots.

Calisthenics targets your whole body through compound movements, ensuring well-rounded muscle development.

I’ve found that incorporating both into my routine has helped me overcome plateaus in my strength training.

Pro: Flexibility and Coordination

Gymnastics is a goldmine for boosting your flexibility and coordination.

The sport requires you to move your body in complex ways, improving your range of motion and proprioception.

Calisthenics also enhances flexibility and body awareness, albeit to a slightly lesser extent.

By performing a variety of movements, you become more agile and less prone to injuries in daily life.

I used to struggle with tight hamstrings, but after incorporating gymnastics stretching routines, I’ve seen significant improvements.

Trust me, being flexible makes a world of difference—not just in sports but in everyday activities too.

Con: Risk of Injuries

Let’s be real—both sports come with their risks.

Calisthenics is generally gentler on the joints compared to high-impact sports, but improper form or overexertion can still lead to injuries.

I once tweaked my shoulder by adding too much weight to my pull-ups without a proper warm-up.

Lesson learned!

Gymnastics is a bit more daring.

With flips, jumps, and high-flying maneuvers, the potential for injury increases.

That’s why proper coaching and safety measures are crucial.

Always listen to your body and don’t rush into advanced moves before you’re ready.

Con: Required Commitment

Gymnastics isn’t just fun and games—it’s a serious commitment.

Perfecting those moves takes time, patience, and practice.

You’ll need to dedicate regular hours to training, often under the guidance of a coach.

Calisthenics also demands your time to master and build strength.

Both disciplines require consistency to see real progress.

But here’s the thing—the rewards are absolutely worth it.

There’s nothing quite like the satisfaction of finally landing that backflip or achieving a muscle-up after weeks of hard work.

It’s a testament to your dedication and perseverance.


Main Differences between Calisthenics and Gymnastics

Nature of Training: 

Calisthenics focuses on body strength and endurance using your body weight as resistance.

Exercises are often multi-joint movements that engage multiple muscle groups.

It’s all about functional fitness that translates well into everyday activities.

Gymnastics is a competitive sport requiring not just strength but also flexibility, coordination, balance, and precise body control.

It includes both acrobatic and non-acrobatic exercises, often using specialized equipment.

If you’re someone who enjoys competition and structured routines, gymnastics might be more appealing.

Training Structure:

Calisthenics workouts are free-flowing and adaptable to your individual needs.

You can tailor your routine based on your fitness level, goals, and even mood.

Feeling energetic?

Amp up the intensity.

Need a lighter day? Focus on form and flexibility.

Gymnastics workouts have a stricter structure.

There are specific exercises and sequences you need to perform, often with precise techniques.

This can be both a pro and a con.

On one hand, it provides clear goals and progression.

On the other, it may feel restrictive if you prefer a more flexible approach.

Equipment:

One of the beauties of Calisthenics is that it requires minimal to no equipment.

Your body is your gym.

Maybe you’ll use a pull-up bar or some parallel bars, but even those aren’t strictly necessary.

Gymnastics, however, often requires access to specific equipment like balance beams, rings, vaulting horses, and mats.

This means you’ll likely need to go to a gym or training facility to practice.

If you enjoy the simplicity of equipment-free workouts, Calisthenics has the edge.

Competition:

Gymnastics is recognized as an Olympic sport with specific rules, scoring systems, and a global competitive scene.

If you’re competitive by nature and dream of medals and championships, gymnastics offers that pathway.

Calisthenics is gaining popularity as a competitive discipline, especially with the rise of Street Workout competitions.

However, it doesn’t have the same official recognition or established competitive framework as gymnastics.

Focus:

While both focus on body strength, Calisthenics emphasizes functional strength and endurance.

It’s about improving your ability to perform everyday tasks and enhancing overall fitness.

Gymnastics emphasizes not just strength but also flexibility, balance, and precise movement execution.

It’s an art form as much as it is a sport, requiring a high level of skill and finesse.


How to Get Started with Calisthenics and Gymnastics

Starting with Calisthenics or Gymnastics might seem intimidating, but trust me, it’s entirely doable.

Mastering the Basics

In Calisthenics, foundational exercises like push-ups, sit-ups, squats, and pull-ups are key.

These moves build the groundwork for more advanced techniques.

Focus on form and gradually increase your reps and sets.

When I started, it felt like I barely had the strength to lift my own body.

But with consistency and a little patience, I gradually built up my strength.

In Gymnastics, you’ll begin with basic skills like jumps, rolls, and handstands.

Mastering these foundational movements is crucial before moving on to complex techniques like flips and aerials.

Don’t rush the process—enjoy the journey!

Equipment Needs

Calisthenics might require items like pull-up bars or parallel bars, but you can often improvise with what’s available.

If you’re serious about gymnastics, consider enrolling in a class or hiring a coach to guide you.

Having professional supervision not only accelerates your progress but also ensures you’re performing moves safely.

Setting Realistic Goals

Whether you’re a beginner or looking to level up, setting clear, achievable goals keeps your training on track.

Maybe you want to do 10 consecutive pull-ups or master a back handspring.

Break down your big goals into smaller, manageable milestones.

Celebrate your progress along the way.

I keep a training journal to log my workouts and note improvements.

It’s motivating to look back and see how far you’ve come.


Basic Calisthenics Exercises

Basic-Calisthenics-Exercises

PUSH-UPS

Strengthen the upper body—chest, shoulders, triceps.

Focus on maintaining a straight line from head to heels.

If standard push-ups are too challenging, start with knee push-ups.

PULL-UPS

Target the back, biceps, and shoulders.

Great for grip strength.

If you can’t do a full pull-up yet, try negative pull-ups or use resistance bands for assistance.

SQUATS

Train the lower body—glutes, quads, hamstrings.

Ensure your knees track over your toes and keep your back straight.

Add a jump at the top for an extra challenge.

PLANK

Develop a strong core.

Improve posture and balance.

Hold for as long as you can while maintaining proper form.

Side planks are great variations to target obliques.

DIPS

Boost upper body strength—triceps, chest, shoulders.

You can perform dips on parallel bars or even using a sturdy chair.

BURPEES

Activate nearly all muscle groups.

Great for cardio, strength, and endurance.

They’re tough but effective!

LUNGES

Work the lower body.

Enhance balance and symmetry.

Try walking lunges or add weights for increased difficulty.


Basic Gymnastics Exercises

Bridge-pose

Gymnastics also has its set of basic exercises that are essential for learning more complex techniques:

FORWARD ROLL

Develops body awareness and balance.

It’s a basic tumbling move that’s fun to practice.

HANDSTAND

Builds upper body strength, balance, coordination.

Start against a wall for support.

It’s a fantastic way to challenge yourself.

BRIDGE

Stretches the back, strengthens the core.

Requires spinal flexibility.

Great for improving posture and alleviating back stiffness.

CARTWHEEL

Improves balance, coordination, upper body strength.

It’s a classic move that always impresses.

Practice makes perfect!

ROUNDOFF

Similar to a cartwheel but lands with both feet together.

Enhances balance and core strength.

It’s often a precursor to more advanced tumbling moves.

TUCK JUMP

Develops leg strength and body control in the air.

Pull your knees to your chest while jumping.

It’s harder than it looks!

BACK HANDSPRING

An advanced move that builds power and coordination.

Definitely requires professional guidance to learn safely.

It’s a thrilling skill to add to your repertoire.


Integrating Calisthenics and Gymnastics in Your Workout Routine

Ever thought about combining Calisthenics and Gymnastics in your exercise plan?

It’s a fantastic way to mix things up and enhance your overall performance.

Here’s an easy way to integrate them without getting overwhelmed: spread them throughout the week.

Maybe try Calisthenics on Mondays, Wednesdays, and Fridays, and save Gymnastics for Tuesdays, Thursdays, and Saturdays. Sundays?

Take it easy and rest up.

Consider your goals too. If you’re aiming for strength, focus more on Calisthenics but add a dash of Gymnastics for flexibility and agility.

If it’s agility and flexibility you prefer, make Gymnastics your main focus but keep some Calisthenics in the mix to maintain strength.

Keep your routine interesting by adding new challenges or aiming to beat your personal records—whether it’s nailing a new Gymnastics move or increasing your reps in Calisthenics.


Top Calisthenics Skills

Top-Calisthenics-Skills

As you progress, you’ll be ready to tackle some advanced Calisthenics skills:

Planche

Balancing your body parallel to the ground, supported only by your hands.

Requires significant upper-body strength and balance.

It’s a showstopper!

Front Lever

Performed while hanging from a bar, with your body held straight and parallel to the ground.

Targets the back and core intensely.

Muscle-Up

Combines a pull-up and a dip into one fluid motion.

It’s a challenging move that requires both strength and technique.

When I finally nailed my first muscle-up, I felt like I could conquer the world!

Human Flag

Holding your body horizontally while gripping a vertical pole.

It’s a true test of strength and stability.

I’ve been working on this one, and it’s a tough but rewarding challenge.

One-Arm Pull-Up

An advanced variation that demands incredible upper-body strength.

It’s a real badge of honor in the Calisthenics community.


Top Gymnastics Skills

Top-Gymnastics-Skills

Gymnastics offers a range of impressive skills:

Handstand Walk

Taking the handstand to the next level by walking on your hands.

It requires balance, strength, and coordination.

Aerial Cartwheel

A cartwheel without hands touching the ground.

It’s a dazzling move that shows off your agility.

Back Tuck (Back Flip)

A backward somersault in the air.

It’s a staple in gymnastics routines and looks incredibly impressive.

Giants on the Bar

Full rotations around the high bar with straight arms and legs.

This skill requires timing, strength, and a bit of courage!

Split Leap

A leap where the legs split into a full 180-degree angle in the air.

Great for showcasing flexibility and grace.


Conclusion

Choosing between Calisthenics and Gymnastics isn’t that hard—and honestly, you don’t have to pick just one.

Both have their perks and can actually complement each other.

If you like minimal equipment and want to build strength anywhere, Calisthenics is perfect.

I love how I can work out at the park or even on vacation with just a pull-up bar.

It’s great for those busy days when I don’t have time to hit the gym.

On the other hand, if you’re after flexibility, coordination, and balance,

Gymnastics might be more your style.

Learning handstands was a game-changer for me—it not only built strength but also boosted my body control.

Can’t decide?

Mix them up! Alternating between the two keeps things fresh and helps improve strength, flexibility, and agility.

The key is to stay motivated and enjoy the process.

After all, the best workout is the one you actually do!


FAQs

Which is the more challenging exercise Calisthenics and Gymnastics?

The difficulty level of an exercise can vary depending on individual abilities and training experience. In Calisthenics, movements like the muscle-up or front lever are considered among the most complex. In Gymnastics, exercises like the flic-flac or somersault are among the most challenging due to the level of strength, coordination, and technique required.

Which discipline contributes more to muscle strength development?

Both Calisthenics and Gymnastics are excellent for muscle strength development. However, Calisthenics tends to focus more on functional strength and endurance, while Gymnastics emphasizes strength along with flexibility, balance, and precision.

Can Gymnastics be practiced outdoors?

Gymnastics can be practiced outdoors, provided you have suitable equipment and a safe environment. However, most gymnastics exercises are more commonly practiced in a gym setting under the supervision of a coach.

Can Calisthenics and Gymnastics be combined in one’s workout regimen?

Absolutely yes. Combining Calisthenics and Gymnastics can lead to a well-rounded and comprehensive workout. Both disciplines offer unique benefits, so integrating both can help improve overall strength, flexibility, balance, and coordination.

Are there similarities between Calisthenics and Street Workout?

Calisthenics and Street Workout are very similar. Both focus on using body weight as the primary resistance and can be practiced in outdoor environments. Street Workout, however, tends to include more acrobatics and creative movements.

Is Gymnastics the best choice for improving flexibility?

Gymnastics is well known for its effectiveness in improving flexibility, thanks to its variety of stretches and movements that lengthen the muscles. However, even Calisthenics, if practiced correctly, can help improve flexibility.

Recommended
Categories
BODYWEIGHT EXERCISES Training Insights

Is Jumping Rope a Part of Your Calisthenic Workout Routine?

Ever thought about adding a jump rope to your workout routine?

If not, it’s time to jump on that opportunity!

After 10 years of using a jump rope, I can tell you it’s one of the simplest and most effective ways to level up your sessions.

All you need is a little space and a rope—no fancy equipment required.

In the world of calisthenics, where your body weight is your gym, a jump rope fits right in.

It goes beyond childhood games and boxing training; it’s a powerhouse exercise anyone can take on, regardless of fitness level.

It spices up your workouts with spectacular cardio intervals while improving coordination and agility.

Whether you’re into calisthenics or just looking for something new, jump rope adds a zesty challenge to any routine.

Now, it’s a staple in my workouts for that extra push.

Together, we’ll analyze the benefits of incorporating jump rope into your calisthenics routine, and I’ll share some quick tips to help you kickstart your practice.


How to Start Jumping Rope

Get-Started-With-Jump-Rope

Picking the perfect jump rope might seem straightforward, but it’s the key to getting the most out of your workout.

Aim for a rope where, when you stand in its middle, the handles reach about your armpits.

For newbies, a heavier rope can be a game-changer since it’s easier to feel its swing.

When it comes to form, keep it tight and right.

Your feet should be buddies—not too far apart—and you should be popping just high enough to clear the rope.

Keep those elbows snug by your sides and let your wrists do the work, not your arms.

Have you just started?

Stay relaxed and take it slow.

Try to maintain a steady rhythm for at least 20-30 seconds

As you get more comfy, you can ramp up the speed and stretch out those sessions.

Watch out for rookie mistakes like sky-high jumps, arm-heavy swings, and flat-footed landings.

Stay light on the balls of your feet and keep your gaze forward, not down.

It’s normal if, at first, you find yourself jumping too high or struggling to keep your elbows close to your torso—I’ve been there too!

It took me a few weeks to refine my jumps and technique.

But you’ll see, over time, the coordination between your mind and body will start to feel automatic.

Just stay consistent, and you’ll gradually improve.

How often should you jump?

It depends on your goals, but kicking off with 5 minutes, three to four times a week is a solid start.

As you build stamina, you can up the ante on how long and how often you jump.

And remember, keep it playful!

Switch up your jump styles or crank up a killer playlist to keep your sessions fresh and fun.


The Benefits of Jumping Rope

Jumping rope may seem like a simple and perhaps even mundane exercise, but the benefits it brings are remarkable and diverse:

Cumulative effect:

If you’ve been leading a sedentary lifestyle, committing to regular jump rope sessions can create a ripple effect of positive changes.

When I first started, I could barely last two minutes before I was completely out of breath.

But don’t be discouraged!

Even just 5 minutes of jumping rope is a fantastic start.

Take breaks if you need to, but aim for at least those 5 minutes.

Each week, try adding another five minutes to your total time.

Once you get going, you’ll notice a real boost in your energy levels.

The progress might seem small at first, but trust me, you’ll start seeing results in less than a month.

Imagine where you could be in a year if you take that first step toward consistent rope workouts.

It’s amazing what a little dedication can do!

Easy to carry around:

One of the best things about a jump rope is how lightweight and portable it is.

It’s seriously the most travel-friendly piece of workout gear you can own.

I always toss mine into my gym bag, backpack, or even suitcase when I’m on the move.

This little rope lets you squeeze in a workout wherever you are—gym, home, a hotel room, the beach, you name it.

No need to hunt down special equipment or find a dedicated workout space. Just whip it out and start jumping!

I’ve even jumped rope in some pretty unconventional places.

Once, I was stuck in an airport during a long layover, and guess what?

Out came the rope, and I got a quick session right there (got a few funny looks, but totally worth it).

The beauty of the jump rope is its accessibility and practicality.

It’s there when you need it, making it super easy to keep up with your fitness routine no matter where life takes you.

Efficient and fun warm-up:

Jumping rope is a highly efficient and enjoyable way to warm up before starting your calisthenics workout.

A quick 5-10 minute jump rope session not only gets my heart pumping, but it also wakes up every muscle in my body, preparing me for the workout ahead.

The best part?

It’s way more fun than your standard stretches.

You can crank up some energetic music, find your rhythm, and suddenly it feels less like warming up and more like a mini dance party.

Before you know it, you’re breaking a sweat, boosting blood circulation, and priming your muscles for action.

Honestly, when you enjoy the process, it makes the entire workout feel easier.

So why not have a little fun with it?

Memory enhancement:

Feeling like your brain is in a fog?

Jumping rope will help awaken it!

Studies show that moderate-intensity exercises like jump rope can improve memory and cognitive learning performance across all age groups, including older individuals.

There is also a mind-body connection during the workout that keeps you focused on your body and movements.

By focusing your attention on the muscles that should be engaged, and maintaining balance with proper form, you create a heightened sense of awareness that will accompany you throughout the day.

Improved cardiovascular health:

One of the most fascinating aspects of jumping rope is its significant impact on cardiovascular health.

Like any aerobic exercise, it gets your heart pumping at a faster rate, thereby stimulating its strength and efficiency.

Jumping rope can reduce the risk of cardiovascular diseases, a benefit that should not be underestimated.

Conditions such as heart attack or stroke, which are linked to heart health, can be prevented with regular physical activity, and jump rope serves as an excellent tool in this regard.

Additionally, this type of exercise is excellent for improving lung capacity.

When you jump rope, your lungs have to work harder to supply the necessary oxygen to your muscles.

This extra work can strengthen the lungs over time, enhancing their efficiency and overall endurance.

It is an extraordinary fat burner:

One of the most celebrated benefits of jumping rope is its remarkable ability to burn fat.

And trust me, I was surprised too when I first realized just how effective it is.

Depending on how intense you go, you could be burning anywhere from 10 to 20 calories per minute.

That means in just 30 minutes, you’re looking at 300 to 600 calories burned.

It may seem hard to believe, but jumping rope burns an impressive number of calories in a short period.

According to various studies, jumping rope for an hour can burn up to 1000 calories!

Now, I’m not saying you’ll be jumping for an hour straight (I sure wouldn’t), but even shorter sessions add up quickly.

Of course, the exact number depends on things like your body weight, workout intensity, and technique.

What really makes jump rope a fat-burning powerhouse is something called the post-combustion effect, or EPOC (excess post-exercise oxygen consumption).

Basically, your body continues burning calories after your workout is done, thanks to the increased oxygen consumption from that high-intensity effort.

So, even if you finish your workout in the morning, your body keeps torching those calories all day long, helping with weight loss and muscle toning.

Pretty cool, right?


Although jumping rope is an excellent fat-burning exercise, it’s not a magic wand. To achieve significant results, it should be paired with a healthy and balanced diet.


Increased happiness:

When you’re in the midst of an intense rope workout, you may not necessarily feel happy.

But the activity of releasing stress through exercise is enormous, especially when you finish.

The increased blood flow to the brain releases serotonin—the happiness hormone—that can alleviate depression and mood swings.

All those feel-good endorphins put you in a good mood, which is something we all need.

Another aspect to consider is the boost in self-esteem that you’ll gain from the physical changes resulting from weight loss and muscle toning.

Boosting the Immune System:

It is well-known that physical exercise, in general, has a positive effect on the immune system.

But how specifically does jump rope work?

Jumping rope is an aerobic exercise, which means it improves blood circulation throughout the body.

This increased blood flow means that more oxygen and nutrients can reach various parts of the body, including the cells of the immune system.

This can help enhance immune function, making you less susceptible to diseases and infections.

Additionally, rope jumping is also a stress-reducing activity.

It is widely recognized that stress can hurt the immune system, making you more vulnerable to illnesses and infections.

Jumping rope can, therefore, help reduce stress levels, contributing to improved immune health.

Enhancing Coordination and Agility:

When I first picked up a rope, I underestimated how much coordination it really takes.

You’ve got to sync your hands and feet perfectly, and trust me, that doesn’t always come naturally.

The way you have to time your hand movements to spin the rope and your feet to jump at just the right moment is a challenge that sharpens your coordination.

Agility, too, gets a serious upgrade with jump rope.

The quick changes in jump speed and height force your body to adapt on the fly, improving your reactivity and movement speed.

Over time, I’ve noticed how much quicker and more fluid my movements have become, both in workouts and everyday life.

So, while it might look like child’s play, jumping rope is actually a full-on coordination and agility booster that keeps you on your toes—literally!


Jumping rope for weight loss: How many minutes per day are necessary?

I’ve been there—looking for an exercise that gets results but doesn’t feel like a chore.

Just 15-20 minutes a day can seriously ramp up your metabolism and get that heart rate climbing, which is key for burning those calories.

When I first started, I couldn’t go all-out for long.

If you’re just starting or find your stamina is a bit low, no worries—begin with short 5-10 minute sessions.

That’s what I did, and trust me, it works! As your endurance builds, you can slowly push those sessions longer.

It’s not about going all-in right away but steadily increasing your pace.

Consistency is where the magic happens. I aim for 3-5 jump rope sessions a week, and it really keeps things on track.

If you’re looking to trim down, sticking with it is your best bet.

And for a little extra challenge, mix in some cycling or weight training to keep your body guessing.

Not only does it keep things interesting, but it also helps hit different muscle groups and really boosts your weight loss journey.

So, lace up your sneakers, throw on your favorite playlist, and get jumping!

I promise—it’s as fun as it is effective!


The most common injuries associated with jumping rope

Jumping rope is a fantastic workout, but like any exercise, it comes with its own set of risks if not done properly.

Here’s a quick rundown of common injuries to watch out for and how to dodge them:

Ankle Injuries:

It’s easy to land the wrong way or lose your balance, especially if you’re jumping on a hard or uneven surface.

I’ve had a few close calls myself!

To keep your ankles safe, make sure you’re landing softly and, if possible, jump on a mat or a more forgiving surface.

Knee Injuries: Your knees can take a beating, especially if you’re bouncing around on concrete.

I used to jump rope on hard surfaces, and my knees weren’t too happy about it.

Now, I stick to softer surfaces like grass or an exercise mat, and I always wear shoes with good shock absorption.

Foot Injuries: The repetitive jumping can lead to issues like plantar fasciitis.

Trust me, I learned the hard way—proper footwear is key.

Look for shoes with great arch support and cushioning to protect your feet.

Back Injuries:

Jumping with bad posture can strain your back.

To avoid this, keep your posture straight and engage your core while jumping.

It not only saves your back but also makes the exercise more effective.

Hand and Wrist Injuries:

Gripping the rope too tightly or using your arms instead of your wrists to turn the rope can lead to pain.

Keep a relaxed grip and focus on using your wrists for the rotation.


Jumping rope is classified as both a strength exercise and an aerobic activity.

Let’s break it down:

Aerobic training:

Jumping rope is primarily considered an aerobic exercise.

This means it is a type of physical activity that uses large muscle groups continuously and rhythmically, challenging the cardiovascular and respiratory systems.

When I really get into the groove, it feels like my heart is dancing along with me, delivering just the right amount of oxygen to fuel my muscles.

Over time, it’s amazing to see how much my endurance has improved.

Strength training:

Although it’s not its main characteristic, jumping rope also involves strength training.

When you jump rope, you are working against the force of gravity to lift yourself off the ground.

This requires a significant amount of strength in your core, legs, and feet muscles.

Additionally, the rhythmic movement of rotating the rope can help strengthen the muscles in your arms and shoulders.


Muscle Groups Engaged in Jumping Rope

When you grab that rope and start hopping, you’re giving a bunch of muscle groups a serious workout.

Here’s who’s getting in on the action:

  • Leg Muscles: Your calves, quads, and hamstrings are the stars of the show here. Each jump powers up these muscles, helping to strengthen and tone them.
  • Core Muscles: It’s not just your legs doing the heavy lifting. Your core—which includes your abs, obliques, and lower back—plays a crucial role in keeping you stable and balanced as you bounce along.
  • Arms and Shoulders: Think your legs are getting all the workout? Think again! Your arms and shoulders get in on the action, too. The constant motion of turning the rope works your deltoids and forearms, making sure they’re not left out of the fun.
  • Glutes: Yep, your glutes are also working hard. Every jump and land calls on these muscles to help stabilize and keep your movements smooth.


Jumping rope is a great exercise to engage and strengthen a variety of different muscle groups throughout the body.

As part of a regular workout routine, it can help improve muscle strength, endurance, and toning.


How to incorporate jump rope with Calisthenics

Jumping rope is such an easy way to mix up your calisthenics routine and boost your cardio.

Here’s how you can work it in without much effort:

Warm Up: I usually kick things off with 5-10 minutes of jumping rope. It gets my heart pumping and my muscles warmed up fast. Plus, it’s way more fun than doing the same old stretches!

Intervals: To keep the workout intense, I like to toss in some jump rope between exercises. For example, after a set of push-ups, I’ll jump rope for a minute. It keeps me moving and makes the workout feel more dynamic.

Mix It Up: Sometimes I create a little circuit—jump rope, then push-ups, back to the rope, then squats. It’s a fun way to keep my body guessing and avoid boredom.

Finish Strong: If I have the energy, I like to end with a longer jump rope session, maybe 20-30 minutes. It’s the perfect way to wrap things up and feel like I’ve really pushed myself.


Calisthenics for Beginners: A Journey of Pros and Cons

Calisthenics is a powerhouse for enhancing strength and flexibility.

As a beginner, you might not be cranking out pull-ups or handstands on day one, but trust me, you’ll be amazed at how quickly your body learns and adapts.

Each session brings you closer to mastering moves you once thought were out of reach.

Pro: Skill Surge

Starting from scratch opens up a world of new skills and techniques.

There’s a real thrill in mastering your own body weight, and every new move feels like a mini victory.

I remember the rush I felt the first time I nailed a move that seemed impossible—it’s a game-changer for your confidence!

Pro: Mental Clarity

Let’s not forget the mental perks. Calisthenics isn’t just about building muscle; it’s a fantastic stress buster.

I often find that pushing through those demanding routines leaves me feeling mentally refreshed and resilient.

It’s like a reset button for my brain!

Con: Injury Risks

However, it’s not all smooth sailing.

With the physical gains come potential strains.

The risk of injury is real, especially if you push too hard too soon.

I’ve had my share of close calls, and I can’t stress enough how crucial proper form and technique are.

Having a knowledgeable coach can make a huge difference in keeping you safe.

Con: Commitment Required

Ready to commit?

Calisthenics demands your time—and sometimes your wallet.

Regular classes might be necessary to get the hang of things, and investing in some basic equipment could also be part of your journey.

Just make sure it fits into your lifestyle and budget before diving in.

Con: Tough All Over

Prepare for a challenge that’s both physical and mental.

The workouts can be intense, and the discipline required to progress can be tough to handle at times.

It took me a while to adjust, but I found the rigorous journey incredibly rewarding.


When will I start seeing results with Calisthenics training?

Diving into a new calisthenics routine brings up a big question: when will I start seeing results?

The timeline can vary widely based on a few key factors, like your starting fitness level, how hard and often you train, and your diet and lifestyle habits.

Typically, you can start to notice some exciting changes within just a few weeks.

You might find that you can crank out more push-ups, pull-ups, or squats than when you started.

That boost in strength and endurance is a fantastic early sign that your body is responding!

As for your physique, you may begin to see your muscles becoming more defined and your body leaning out as excess fat starts to shed.

I remember the thrill of catching my reflection and noticing those first signs of definition—it’s a huge motivator!

These visual changes often take a bit longer, so patience is key.

Everyone’s journey is unique, and progress isn’t always linear.

There will be ups and downs, but that’s part of the process.

It’s crucial to stay consistent with your workouts and maintain a balanced diet.

Celebrate the small victories along the way—they’re proof that your effort is paying off.

Keep pushing, and those results will come!


Three Examples of Weekly Calisthenics Workouts (Including Jump Rope)


1# FOR BEGINNERS:

Day 1:

  • Warm-up: 5-10 minutes of light cardio (e.g., jogging in place, jumping jacks)
  • Jump rope: 3 sets of 1 minute each, with 1 minute of rest between sets
  • Push-ups: 3 sets of 8-10 repetitions
  • Squats: 3 sets of 10-12 repetitions
  • Plank: 3 sets of 30 seconds each
  • Rest: 1-2 minutes between sets
  • Cool-down: Full-body stretching

Day 2:

  • Warm-up: 5-10 minutes of light cardio
  • Jump rope: 3 sets of 1 minute each, with 1 minute of rest between sets
  • Assisted pull-ups or inverted rows: 3 sets of 8-10 repetitions
  • Step-ups on a bench or chair: 3 sets of 10-12 repetitions per leg
  • Side plank: 3 sets of 30 seconds each per side
  • Rest: 1-2 minutes between sets
  • Cool-down: Full-body stretching

Day 3:

  • Warm-up: 5-10 minutes of light cardio
  • Jump rope: 3 sets of 1 minute each, with 1 minute of rest between sets
  • Assisted dips or knee push-ups: 3 sets of 8-10 repetitions
  • Lunges: 3 sets of 10-12 repetitions per leg
  • Mountain climbers: 3 sets of 30 seconds each
  • Rest: 1-2 minutes between sets
  • Cool-down: Full-body stretching


2# INTERMEDIATE:

Day 1:

  • Warm-up: 5-10 minutes of light cardio
  • Jump rope: 5 sets of 1-2 minutes each, with 1 minute of rest between sets.
  • Push-ups: 4 sets of 8-10 repetitions
  • Pistol squats (single-leg squats): 4 sets of 6-8 repetitions per leg
  • Leg raises with plank: 4 sets of 10-12 repetitions per side
  • Rest: 1-2 minutes between sets
  • Cool-down: Full-body stretching

Day 2:

  • Warm-up: 5-10 minutes of light cardio
  • Jump rope: 5 sets of 1-2 minutes each, with 1 minute of rest between sets
  • Pull-ups: 4 sets of 8-10 repetitions
  • Bulgarian split squats: 4 sets of 6-8 repetitions per leg
  • Russian twists: 4 sets of 10-12 repetitions per side
  • Leg raises: 4 sets of 10-12 repetitions
  • Rest: 1-2 minutes between sets
  • Cool-down: Full-body stretching

Day 3:

  • Warm-up: 5-10 minutes of light cardio
  • Jump rope: 5 sets of 1-2 minutes each, with 1 minute of rest between sets
  • Dips: 4 sets of 8-10 repetitions
  • Assisted handstand push-ups or elevated push-ups: 4 sets of 6-8 repetitions
  • Hanging leg raises: 4 sets of 10-12 repetitions
  • Rest: 1-2 minutes between sets
  • Cool-down: Full-body stretching.


3# ADVANCED:

Day 1:

  • Warm-up: 5-10 minutes of light cardio
  • Jump rope: 5 sets of 2-3 minutes each, with 1 minute of rest between sets
  • Muscle-up or advanced pull-ups: 4 sets of 6-8 repetitions
  • Handstand push-ups: 4 sets of 6-8 repetitions
  • Pistol squat with a, jump: 4 sets of 8-10 repetitions per leg
  • Planche progression: 4 sets of 10-15 seconds
  • Rest: 1-2 minutes between sets
  • Cool-down: Full-body stretching

Day 2:

  • Warm-up: 5-10 minutes of light cardio
  • Jump rope: 5 sets of 2-3 minutes each, with 1 minute of rest between sets
  • Advanced push-ups (such as diamond push-ups or elevated push-ups): 4 sets of 6-8 repetitions
  • L-sit or V-sit: 4 sets of 10-15 seconds
  • Front lever progression: 4 sets of 10-15 seconds
  • Bar muscle-up or muscle-up with different grip: 4 sets of 6-8 repetitions
  • Rest: 1-2 minutes between sets
  • Cool-down: Full-body stretching

Day 3:

  • Warm-up: 5-10 minutes of light cardio
  • Jump rope: 5 sets of 2-3 minutes each, with 1 minute of rest between sets
  • Advanced pull-ups (such as wide grip pull-ups or assisted one-arm pull-ups): 4 sets of 6-8 repetitions
  • Advanced dips (such as weighted dips or ring dips): 4 sets of 6-8 repetitions
  • Dragon flag or advanced leg raise: 4 sets of 8-10 repetitions
  • Planche push-up progression: 4 sets of 6-8 repetitions
  • Rest: 1-2 minutes between sets
  • Cool-down: Full-body stretching.


RELATED:>>> How Long Does It Take to Achieve Full Planche Progression?


Final Thoughts

Jump rope is a versatile and effective addition to any Calisthenics workout routine.

It offers tons of benefits, like boosting your cardiovascular conditioning, improving coordination, burning calories, and enhancing agility.

Seriously, it’s a win-win!

Incorporating this exercise adds diversity and intensity to your workouts, plus it’s just plain fun.

I love how it breaks up the monotony and keeps things exciting.

Whether you’re a beginner or a seasoned calisthenics pro, this exercise can take your training to new heights.

It’s a challenge worth embracing!

So, go ahead—enjoy the benefits and make jump rope a key part of your calisthenics journey.

You won’t regret it!

Recommended
Categories
BODYWEIGHT EXERCISES Training Insights

Calisthenics as a Tool for Building Muscle Mass: Myth or Effective Strategy?

Nearly everyone who has delved into physical training has come across calisthenics, a form of exercise that uses body weight as resistance.

Many have tried different styles of training with varying levels of success.

Some have discovered that bodyweight exercises are the perfect approach that made a difference, and they never looked back.

Calisthenics is a training method that relies on bodyweight exercises aimed at developing strength, endurance, flexibility, and coordination.

But the question that many ask is: can calisthenics be an effective tool for building muscle mass, or is it just a myth?

In this article, we will analyze the pros and cons of this discipline as a method for increasing muscle mass.


Calisthenics: Efficiently Increasing Strength

Calisthenics-exercises-aim-to-improve functional strength

Strength development is a crucial aspect of physical training, and calisthenics has proven to be very effective in achieving this goal.

By using body weight as resistance, calisthenics exercises aim to enhance functional strength and muscular endurance.

These exercises focus on natural movements that engage multiple muscle groups simultaneously, which I’ve found beneficial not only in workouts but also in everyday activities.

Training methods like calisthenics involve push-ups, pull-ups, and squats, which significantly increase core, arm, and leg strength.

I can assure you that embracing these exercises will not only make you stronger but also more resilient in other sports and physical tasks.

One of the greatest advantages of calisthenics is its versatility.

Since it relies primarily on body weight, you can adapt exercises to your current strength and skill level.

As you get stronger, you can introduce more complex variations or increase the number of repetitions to continually challenge your body and enhance your strength.


Calisthenics: Developing Muscles Using Your Bodyweight

Developing-muscles-using-your-bodyweight

Calisthenics aims to engage different muscle groups in each exercise, promoting balanced and harmonious muscle development.

This training approach can lead to a proportionate and athletic physique without the overly bulky appearance that can sometimes result from weightlifting-focused training.

While calisthenics can contribute to muscle building, the rate of growth may not be as rapid as with other training methods like weightlifting.

Weightlifting exercises provide greater resistance and the opportunity to isolate specific muscle groups, factors that contribute to accelerating muscle growth.

However, with proper programming and progression, calisthenics can still deliver significant results in terms of muscle development.

Another aspect to consider is that calisthenics may have limitations in the muscle growth potential for some individuals, especially those who have already reached an advanced level of strength and muscle development.

In these cases, the introduction of weightlifting exercises or additional resistance may be necessary to continue stimulating muscle growth and overcoming any plateaus.


Calisthenics vs. Weightlifting: A Comparison for Muscle Growth


>>CALISTHENICS<<

ADVANTAGES:

  • No expensive equipment required: Calisthenics relies on body weight and requires little to no equipment, making it cost-effective and accessible.
  • Functional training: Calisthenics exercises involve natural body movements that can improve balance, coordination, flexibility, as well as muscle strength.
  • Adaptability: This can be tailored to various skill and fitness levels, with modifications available to increase or decrease exercise difficulty.
  • Lower risk of injuries: With more natural movements and the absence of additional weights, calisthenics can reduce the risk of injuries compared to weightlifting.

DISADVANTAGES:

  • Limits in load progression: Calisthenics relies on body weight, which can make it more challenging to progressively increase resistance and further stimulate muscle growth.
  • Focus on specific muscle groups: Some muscles may not be optimally stimulated, making it more difficult to develop balanced muscle growth.


>>WEIGHTLIFTING<<

ADVANTAGES:

  • Facilitated load progression: Weightlifting allows for easy resistance increase by adding more weight, thereby promoting continuous muscle growth.
  • Muscle isolation: Enables isolation and focuses on specific muscle groups, allowing for greater customization of training and targeting weak points.

DISADVANTAGES:

  • Equipment requirement: Requires equipment such as barbells, dumbbells, and exercise machines, which can be costly and require space.
  • Higher risk of injuries: Lifting heavy weights can increase the risk of injuries if proper form is not used or if attempting to lift too much weight too quickly.


Factors to Consider in Choosing a Training Method 

Goals: Consider whether you want to focus on functional strength, flexibility, and balance (calisthenics) or specific muscle isolation and growth (weightlifting).

Access to equipment: Evaluate whether you have access to the necessary equipment for weightlifting or if you prefer a training method that requires less equipment.

Experience level: Take into account your level of experience and proficiency in both training methods. You may want to start with calisthenics and transition to weightlifting as you become stronger and more confident in your movements.

Combination of both: For many, the ideal solution may be to combine calisthenics and weightlifting in a balanced training program. This approach allows you to leverage the benefits of both training methods and achieve a well-rounded and comprehensive fitness level.


How Calisthenics Stimulates Muscle Growth

Calisthenics stimulates muscle growth through several mechanisms, including:

  • Mechanical tension: Calisthenics exercises, such as push-ups and pull-ups, apply mechanical tension to the muscles. This tension stimulates the adaptation and growth of the muscle fibers.
  • Metabolic stress: During calisthenics workouts, muscles consume energy and produce metabolites, such as lactic acid. This metabolic stress contributes to muscle hypertrophy as the body seeks to adapt to become more efficient in handling such conditions.
  • Muscle damage: As mentioned earlier, training causes microtears in the muscle fibers. Calisthenics is no exception, and when performed correctly, it can cause sufficient muscle damage to stimulate growth and repair.


Stimulating Hypertrophy and Building Muscles

Creating the ideal conditions for hypertrophy, which is the increase in muscle cell volume, is no small feat.

This process requires a perfect balance of training, nutrition, and recovery.

In terms of training, it is crucial to engage in an exercise program that adequately stimulates the muscles.

This means lifting weights or performing bodyweight exercises that are challenging enough to cause micro-trauma to the muscle fibers.

These small damages are the signal for the body to initiate the process of repair and growth. Hypertrophy occurs when the rate of muscle protein synthesis exceeds the rate of protein degradation.

However, training is only one part of the equation.

Nutrition also plays a fundamental role in creating the conditions for hypertrophy.

To build new muscle proteins, the body needs an adequate intake of protein and a positive energy balance, which means calorie intake should exceed energy expenditure.

Finally, recovery is often overlooked but essential for hypertrophy.

During rest, the body has time to repair and build new muscle fibers.

Therefore, ensuring adequate sleep and taking rest days between intense workouts is crucial to achieving the best results.


Developing Skills and Musculature with Calisthenics: A Holistic Approach to Training

Rather than solely focusing on increasing muscle mass, Calisthenics promotes a holistic approach to training, where functional strength, balance, agility, and coordination play equally important roles.

The complex and dynamic movements of Calisthenics, such as pull-ups, push-ups, dips, and planks, require the use of multiple muscle groups simultaneously.

This type of bodyweight training promotes the development of harmonious and proportionate musculature, unlike some forms of weightlifting that tend to isolate specific muscle groups.

But there’s more. With Calisthenics, you’re not just building muscles, you’re also building skills.

As you learn and practice movements like the planche, front lever, or handstand, you’re developing motor skills that require great concentration, precise body control, and an unparalleled mind-body connection.

So, if your goal is to build muscles while also acquiring skills that enable you to perform spectacular and impressive movements, then Calisthenics might be the right choice for you.


The Importance of Progression and Variation in Calisthenics Training

In the context of calisthenics, progression can be achieved by increasing the difficulty of exercises.

Additionally, you can adjust the training volume, such as the number of sets and repetitions.

Adapting your training in this way allows you to continue challenging your muscles and stimulating their growth.

Variation in calisthenics training is important for several reasons:

  • Preventing monotony: Performing the same exercises every day can become boring and demotivating over time. By introducing new exercises or variations of existing exercises, you keep your training interesting and stimulating.
  • Balanced muscle development: Variation in exercises helps ensure that all muscle groups are adequately trained, contributing to a more balanced and proportionate physique.
  • Reducing the risk of injuries: Variation can help prevent overuse and repetitive stress injuries, as it prevents continuously overloading the same muscles and joints.
  • Overcoming plateaus: Over time, your body adapts to training, and results may slow down. By introducing variations in exercises, you constantly challenge your muscles and maintain growth and adaptation.


Progression in Calisthenics: Methods and Techniques

Progression based on increasing repetitions: This is the most common form of progression. You start with a low number of repetitions for each exercise and gradually increase the number of repetitions over time. This method helps build both muscle strength and endurance.

Progression based on exercise difficulty: This involves adding more challenging variations of an exercise as you become stronger. For example, you may start with knee push-ups, then progress to regular push-ups, and eventually to one-arm push-ups.

Progression based on reducing rest time: By reducing the rest time between sets, you can increase the intensity of your training and stimulate muscle growth.

Adding weight: This technique is often referred to as weighted calisthenics or progressive overload training. When you become strong enough to perform many repetitions of an exercise with ease, you can increase the difficulty and further stimulate muscle growth by adding weight. You can do this with a weighted vest, ankle weights, or even a weightlifting belt with attached weights. (For example, if you can do 20 pull-ups with your body weight, you could try doing pull-ups with a weighted vest or with a weight attached to a belt. This allows you to continue challenging your muscles and promoting muscle growth)

Changing body angle: This is a commonly used progression method in calisthenics. This technique is often employed to increase the difficulty of an exercise without adding external weights. For example, when performing push-ups, you can change the angle of your body relative to the ground to increase resistance: the more you incline forward (until reaching a vertical position, like in a handstand push-up), the greater the load on the chest, shoulders, and triceps muscles. Similarly, during pull-ups, changing the body angle can modify the exercise intensity and the specificity of the targeted muscle. This progression method, like others, should be introduced gradually, following safety principles and appropriate physical preparation.

Eccentric training: Eccentric training focuses on the lowering phase of a movement when the muscle lengthens under tension. This type of training can be particularly useful for increasing muscle strength and stimulating muscle growth.

Progression based on execution speed: This method of progression involves changing the speed at which you perform an exercise. For example, you may start by performing an exercise slowly and controlled, then progress to a faster pace once you have gained enough strength and control. This can help improve both muscle strength and endurance and can also have benefits for coordination and motor skills.


Calisthenics and the Mind-Body Connection

Calisthenics-and-physical-benefits

In addition to the physical benefits it offers, calisthenics can also strengthen the mind-body connection, improving body awareness, concentration, and mental well-being.

Increased body awareness:

By regularly practicing calisthenics, you learn to better understand your body, its limits, and its capabilities.

During exercises, it is crucial to pay attention to alignment, breathing, and activation of the correct muscles.

This process helps develop greater body awareness and improves coordination and balance.

Improved concentration:

Calisthenics requires a significant amount of concentration and mental control.

To properly perform exercises, you need to focus on each movement and the coordination between various muscle groups.

This mental training can translate into increased concentration and focus in daily activities as well.

Stress reduction:

Calisthenics can help reduce stress and promote mental relaxation.

During training, the physical activity and concentration required help free the mind from worries and negative thoughts.

Additionally, exercise promotes the production of endorphins, the so-called “happiness hormones,” which contribute to improving mood and reducing stress.

Development of mental discipline:

Calisthenics requires commitment, dedication, and discipline to achieve significant results.

This practice can help develop greater mental discipline and self-determination, qualities that are useful in many areas of life.


Calisthenics at home: Essential equipment for training

Calisthenics-at-home

Calisthenics at home is an ideal solution for those who want to train without having to go to a gym or invest in expensive equipment.

Thanks to the nature of calisthenics, which is based on using body weight to perform exercises, you can create an effective training program with minimal equipment:

  • Pull-up bar: A pull-up bar is an essential element for those who want to practice calisthenics at home. It can be installed in a doorway or outdoors and allows you to perform a wide range of upper body exercises such as pull-ups and muscle-ups.
  • Parallettes: These are useful for exercises that require an elevated grip from the ground, such as push-ups, dips, and planches. They are available in various heights and materials and can be easily stored when not in use.
  • Exercise mat: An exercise mat is important to provide comfort and cushioning during floor exercises. A good-quality mat can help prevent injuries and make workouts more enjoyable.
  • Suspension straps:  For example, TRXs are a great addition to home calisthenics equipment. They allow you to perform a wide range of full-body exercises, increasing difficulty and muscle engagement.
  • Gymnastic rings: These are another useful tool for home calisthenics. They offer a wide range of upper body exercises such as muscle-ups, planches, and dips, and can be easily adjusted in height and position.


How core strength impacts the effectiveness of calisthenics

Calisthenics-strengthens-the-core

A strong core is key to mastering many advanced calisthenics exercises such as planches, muscle-ups, and levers.

Core strength is crucial for maintaining proper posture during these movements and effectively transferring force between the upper and lower body.

In calisthenics, core strength encompasses more than just the abdominal muscles. It also includes the muscles of the back, hips, and pelvic floor.

Training all these muscle groups in a balanced manner is essential for achieving optimal core stability and strength.

To develop a strong core in calisthenics, it’s important to include specific exercises in your training program.

Some examples of exercises that target core strength include planks, hollow body holds, leg raises, arch holds, and dragon flags.

Additionally, focusing on proper technique and body alignment during the execution of these exercises is crucial for optimal results and injury prevention.

Core strength in calisthenics is closely linked to muscular endurance.

Many exercises require maintaining isometric positions or performing high-intensity repetitions for extended periods.

Training core endurance can lead to improved stamina, reduced fatigue, and a better ability to perform more complex exercises.


Calisthenics and building a bodybuilder physique

While calisthenics training can certainly contribute to the development of a toned and athletic physique, it is not the most direct path to building a bodybuilder physique, which focuses on maximizing muscle building and definition.

This is achieved through weight training, high protein intake, and a highly specific dietary regimen.

Additionally, bodybuilders tend to focus on developing specific muscle groups, often isolating them during training to maximize growth and definition.

Calisthenics, on the other hand, emphasizes overall body movement and artistic performance.

Training tends to be more cardiovascular and endurance-based rather than focused on muscle hypertrophy. As a result, while Calisthenics will certainly have a strong and toned physique, they will not have the same muscle mass or definition as a bodybuilder.


Calisthenics: Perceived Difficulty and Reality of Training

Hardest-Calisthenics-movement

Calisthenics may appear extremely challenging at first glance.

Observing athletes performing complex movements like planches or muscle-ups might lead to the perception that this discipline is reserved for a highly trained elite.

However, the reality is quite different. Calisthenics, like any other form of training, is based on gradual progression.

It starts with basic exercises and progresses to more challenging variations as strength and endurance improve.

The key is to start with what you can do and consistently work to improve.

Every small progress is a victory, and over time, these small steps forward add up to significant changes.

So yes, calisthenics can be difficult, but it is not “too” difficult.

Like anything worth doing, it requires commitment, dedication, and consistency.

But with these ingredients, anyone can achieve their goals in calisthenics.


Advanced Calisthenics Training Strategies for Muscle Enhancement

Circuit Training:

A circuit is a series of exercises performed one after the other with little to no rest in between.

You could start with a set of push-ups, followed by pull-ups, then bodyweight squats, then dips, and finally sit-ups.

Repeat the circuit for the desired number of sets.

Superset:

A superset involves performing two consecutive exercises that work for opposing or complementary muscle groups.

An example could be doing a set of push-ups (which primarily work the chest and triceps), immediately followed by a set of pull-ups (which primarily work the back and biceps).

Skill-based Routine:

You could also combine exercises based on the skill you are trying to develop.

For example, if you’re looking to improve your core strength, you could do a combination of planks, leg raises, and dragon flags.

Pyramid Training:

This involves increasing and then decreasing the number of repetitions from one set to the next.

For example, you could start with 5 pull-ups, then do 10, then 15, go back to 10, and finally to 5.


Testimonials and Results

There are numerous cases of people who have achieved remarkable muscle development through calisthenics.

For example, Frank Medrano, Chris Heria, and Hannibal for King are high-level calisthenics athletes who have built impressive physiques using primarily or exclusively bodyweight exercises.

Their success stories demonstrate that calisthenics can be an effective method for developing quality muscles.

Although most studies on muscle hypertrophy focus on weightlifting, there is research that supports the effectiveness of calisthenics in muscle building.

One example is a 2018 study published in the Journal of Strength and Conditioning Research, which compared the effects of calisthenics and weightlifting on physical performance.

The study found that both groups showed significant improvements in strength and muscle mass, suggesting that calisthenics can be a valid alternative to weightlifting for muscle development.

Many calisthenics practitioners argue that while the results may be slower compared to weightlifting, the muscle growth achieved through calisthenics is more functional and sustainable in the long term.

(However, Calisthenics has a limit regarding the pure increase in muscle mass it can produce.)


Isolating Muscles with Calisthenics: Is it Possible?

isolate-specific-muscles-during-calisthenics

Many beginners wonder if it is possible to isolate specific muscles during calisthenics training, as one would do with weightlifting.

The answer is yes but with some important considerations.

You can select and edit exercises to target specific muscle groups during your workout.

This is a common approach to achieving specific goals, such as developing a particular muscle group or improving performance in a certain area of ​​the body.

However, some modifications can be difficult or require a lot of practice, especially when it comes to exercises that involve only one limb, such as one-arm pull-ups.

These exercises require considerable strength and good muscle coordination to perform properly.

Another aspect to consider is that although calisthenics can be used to isolate muscles, it may not offer the same range of resistance and progression found in weightlifting.

Therefore, if the main goal is muscle mass development in a single muscle group, it may be beneficial to integrate calisthenics with weightlifting or other training methods.


Ideal Weekly Frequency for Calisthenics

Beginners: If you’re new to calisthenics, you may start with 2-3 training sessions per week. This will give you time to get accustomed to the exercises and allow your body to properly recover between sessions. Make sure to include a rest day between workouts to promote muscle recovery and prevent injuries.

Intermediate: If you already have some experience with calisthenics, you could increase the frequency to 3-4 sessions per week. At this level, it’s important to focus on exercise progression and varying your training program to continue challenging your muscles and promoting muscle growth.

Advanced: If you’re an experienced calisthenics practitioner, you could train 4-6 times per week, depending on your goals and recovery capacity. At this level, it’s crucial to listen to your body and allow for adequate rest days to avoid overtraining and injuries.


Optimal Recovery Times to Promote Muscle Growth in Calisthenics

Rest Between Sets: Aim for 60-90 seconds of rest between sets during your calisthenics sessions. This time helps in muscle energy recovery.

Rest Between Workouts: To ensure full muscle recovery, rest for at least 48 hours before targeting the same muscle group again. For example, after a heavy upper body workout, focus on your lower body or light recovery activities the next day.

Deloading Weeks: Incorporate a deloading week after intense training cycles. During this week, reduce both the intensity and volume of your workouts to help your body recover and adapt, minimizing injury risks.

Active vs. Complete Rest Days: Mix active rest days with complete rest days. Use active rest days for gentle activities like walking or stretching. On complete rest days, take it easy and let your body fully recuperate.


RELATED: Can I do Calisthenics every day?


Conclusion

In conclusion, calisthenics is a compelling option for muscle growth and improved functional strength, offering the added benefit of convenience—anywhere, anytime.

While it may not build mass as quickly as weightlifting, its advantages make it a valuable addition to any workout regimen.

Don’t hesitate to integrate this training method and discover if it’s the right strategy for you.

Recommended
Categories
BODYWEIGHT EXERCISES Training Insights

Lose Weight With Calisthenics: 11 Exercises To Burn Fat

If you’re on the hunt for a fresh, effective way to shed pounds and sculpt your muscles, Calisthenics might just be your ticket.

What I love about this workout style is that it’s so simple.

No gym, no expensive gear—just your body weight working as your own personal resistance machine.

And the best part?

You can do it literally anywhere.

I’ve done calisthenics in my living room, at the park, and even in my backyard.

It’s perfect when you want to squeeze in a workout without leaving home.

Sure, calisthenics helps you shed pounds and carve out muscles, but here’s where it gets even better—it’s also fantastic for building strength, boosting endurance, and really improving your stamina.

You start feeling fitter, stronger, and more capable after each session.

If you’re ready to challenge yourself and put in the work, these 11 calisthenics exercises are a great place to start.

They’ll help you reach those fitness goals without needing a gym.


How to burn fat and lose weight with Calisthenics exercises

I get it, you want to know exactly how many calories you’re burning with calisthenics.

Trust me, I’ve been there, too, trying to calculate every little thing.

But here’s the truth: it’s tricky to pin down an exact number.

It depends on how hard you’re pushing yourself and how long you’re at it.

That said, experts say you can expect to burn around 250 to 400 calories per hour—pretty solid for a workout you can do literally anywhere!

If you’re looking to up that calorie burn, crank up the intensity or shorten your rest breaks.

And don’t forget the basics: the American guidelines recommend at least 30 minutes of aerobic activity daily and strength training twice a week.


Calisthenics training is a great way to build strength.

You don’t need to spend hours in the gym, start with these 11 exercises…


1. Burpees

Burpees

Have you ever heard of the Burpee exercise?

It’s a full-body exercise that is very effective for burning fat.

To do a Burpee, start by standing with your feet shoulder-width apart.

Then, lower your body into a squat position.

Next, place your hands on the ground in front of you and kick your legs back so that you’re in a push-up position.

Lower your body to the ground and press back to the starting position.

Repeat this exercise as many times as you can in 30 seconds. Wait, do you think that’s too easy?

Increase run time up to 1 minute!

The posture of the burpee is simple, but it’s a very effective exercise for losing weight.

The fat starts to burn quickly with this exercise, especially if you do it for longer.


2. Squat Jumps

Squat-Jumps

Do you have excessive fat around your thighs and hips?

If so, then you should try doing Squat Jumps.

This exercise is very effective for toning your lower body.

To do a Squat Jump, stand with your feet shoulder-width apart.

Then, lower your body into a squat position.

Next, jump up as high as possible and land softly on your feet. Immediately squat down again and jump up again.

Squat Jumps are like regular squats but with a little jump in between.

Do 3 sets of 10 reps. Your legs will thank you, and your fat will disappear, transforming your body into a smart, fit, and healthy one.


3. Lunges

Lunges-Calisthenics

Lunges are a great way to tone your legs and butt while also burning fat.

To do Lunges, stand with your feet shoulder-width apart and take a large step forward with your right leg.

Bend your right knee until it’s at a 90-degree angle and your left leg is parallel to the floor.

Hold this position for a second, then push off your right foot to return to the starting position. Repeat with your left leg.

Keep your upper body upright and use your core muscles to stabilize yourself. You can also add dumbbells to this exercise to make it more challenging.

Start with three sets of 10 Lunges and work your way up to three sets of 20. You’ll be feeling the burn in no time.


4. Sit Ups

Sit-Ups-Calisthenics

Many people suffer from bad posture and a weak core.

This can be improved by doing Sit-Ups.

Sit-ups are great for toning your abdominal muscles and for improving your posture.

Lie down on your back with your knees bent and uplift your feet flat over the ground to do a sit-up.

Straighten your arms in front, stretch your muscles, and then slowly come back.

Some Calisthenics experts recommend doing 100 Sit-Ups a day for the best results.

However, if you’re starting, you can do fewer sit-ups and gradually increase the number as you get stronger.


5. Push-Ups

Push-Ups-to-lose-weight

Push-ups are one of the most effective exercises for burning fat and toning muscle.

They involve the chest, shoulders, arms, and core, making them a great full-body workout.

And they can be done anywhere, anytime.

Start in a plank position with your hands shoulder-width apart and your feet hip-width apart.

Bend your elbows and lower your chest toward the floor.

Once your chest touches the floor, press back up to the starting position.

That’s one rep! Aim for 3 sets of 10 reps.

If you want to challenge yourself, try variations on the standard Push-Up.

For example, you can try elevating your feet on a step or chair, doing a One-Armed Push-Up, or doing a Clap Push-Up (explosively pressing up so that your hands leave the ground and you can clap in between).

The possibilities are endless, so get creative and have fun.


6. Pull-Ups and Chin-Ups

Pull-Ups-Chin-Ups-to-burn-fat

Here’s another exercise that targets multiple muscle groups at once and supercharges your fat-burning game.

Let me introduce you to the dynamic duo of fitness: Pull-Ups and Chin-Ups.

These aren’t just exercises; they’re your ticket to a total body transformation.

Picture this: with every Pull-Up or Chin-Up, you’re engaging your back, core, and arms.

It’s like getting a full workout with just one movement.

And guess what? When you work multiple muscles together, your body burns more fat.

That’s right – more gains, less time.

Now, let’s talk about technique. For Pull-Ups, you’ll grip the bar with your palms facing forward.

This grip zeros in on your lats, giving you that strong, V-shaped back. Flip your grip around for Chin-Ups, and voilà, you’re now focusing on those biceps.

Hello, sleeve-busting arms!

Here’s the deal: lift your body until your chin clears the bar, then lower back down until your arms are almost fully extended.

The goal?

Work up to 10 reps.

It might sound challenging, but that’s where the magic happens.

It’s all about progression.

Start where you are, and aim to add one more rep each session.

Incorporate these exercises into your routine and watch your body transform.

So what are you waiting for?

Grab that bar and show it who’s boss!


7. Plank

Plank-to-lose-weight

Let me introduce you to the Plank – not just any exercise, but a powerhouse move that targets your entire core, including those abs you’ve been dreaming about, your obliques, and your lower back.

Imagine doing a pushup, but instead of resting on your hands, you’re on your forearms.

That’s your starting point.

The goal is to maintain this position, creating a straight line with your body, for 30 seconds to a minute.

It sounds simple, but the results are extraordinary.

And once you’ve mastered the basic Plank, the sky’s the limit!

Try lifting a leg, moving your arms, and adding some dynamic movements – these variations aren’t just about keeping your workouts fresh; they’re about pushing your body to new limits and seeing the changes you’ve been craving.


8. Reverse Crunches

If you’re looking for a way to burn fat and tone your abs simultaneously, Reverse Crunches are the perfect exercise.

Unlike traditional crunches targeting the rectus abdomens muscle, reverse crunches emphasize the oblique muscles.

Lie with your knees bent and your feet flat on the ground to perform the exercise.

Place your hands behind your head and lift your hips off the ground, using your abs to curl your hips towards your chest.

Reverse the motion and lower your hips back to the starting position.

Repeat for 15-20 repetitions.

Not only will this exercise help you to burn fat, but it will also give you a killer workout.


9. Bench Dips

Bench-Dips-Calisthenics

Do you want to tone your arms and get rid of those pesky love handles?

Then it would help if you started doing Bench Dips.

The bench dip is a great exercise to add to your workout routine if you want to burn fat.

This move targets your triceps, the muscles on the back of your upper arms, as well as your chest and shoulders.

To do a Bench Dip, start sitting on the edge of a bench with your hands gripping the edge of the seat behind you.

Straighten your legs out in front of you, then shift your weight forward so that your butt is off the bench.

Lower your body down until your upper arms are parallel to the ground, then press back up to the starting position.

You can add weight to this exercise as you get stronger by placing a weight plate on your lap.

You can also increase the challenge by elevating your feet onto another bench or stability ball.

Give it a try and see how many fat-burning reps you can do.


10. Mountain Climbers

Mounting-Climbing

Mountain Climbers do not mean climbing a mountain, but it requires some upper-body strength.

This exercise works your biceps, triceps, and shoulders.

It also engages your core muscles to help you maintain balance and also does a great job on other areas including, your thighs, lower back, and glutes.

Mountain Climbers combine cardio and strength, helping to improve agility and full-body fitness.

Through the rapid movement of the legs, the heart rate increases and this facilitates weight loss.

To perform the exercise, get into a plank position.

Push your right knee into your chest as far as possible.

Then repeat with the left knee. Don’t arch your back and try to move as fast as possible.

To burn calories, your initial goal should be at least 25-30 alternating reps for each leg. (4 sets)


11. Inverted Row

Inverted-Row-exercise-11

Are you ready to kickstart your journey to a stronger back and a healthier you, but feeling a bit intimidated by the classic pull-up?

Don’t worry, the Inverted Row is here to save the day!

This exercise is a game-changer, especially if you’re just starting or have a significant amount of weight to lose.

Think of the Inverted Row as the friendlier cousin of the pull-up.

It’s an exercise that packs a punch, targeting your back muscles effectively while being much more doable.

You’re lifting less of your body weight, making it the perfect stepping stone to build up your strength.

Here’s the best part: not only does the Inverted Row help you shed pounds and tone up, but it also works wonders for your posture.

In a world where we’re constantly hunched over screens, this exercise is a powerful tool to combat slouching and build a stronger, more confident stance.

Getting started is simple.

Grab the bar with an overhand grip, keep your body straight as an arrow from head to heels, and pull yourself up until your chin clears the bar.

Lower back down and repeat.

Aim for 3 sets of 12 reps.

And hey, if it feels a bit tough at first, no sweat!

You can easily modify the exercise by placing your feet on a bench or a stability ball.

This small tweak still lets you enjoy all the benefits of the exercise while tailoring it to your current level.


Can Calisthenics replace cardio?

When it comes to burning fat, there are a variety of exercises you can try.

But which one is best for you?

That’s the million-dollar question, right?

Is calisthenics more effective at burning fat compared to traditional cardio workouts?

First off, hats off to calisthenics—it’s a powerhouse when it comes to building strength and sculpting those muscles.

I’ve personally observed how it can transform the body using nothing but body weight exercises.

If you’re all about getting toned and strong, calisthenics is your go-to.

But here’s the kicker: while it’s a fantastic ally in your weight loss journey, it doesn’t quite match up to the calorie-torching, heart-pumping intensity of good old-fashioned cardio.

I know, cardio gets a bad rap.

It’s often viewed as too strenuous, and I get it—who really *loves* slogging through endless miles on a treadmill?

Still, cardio plays a crucial role in fat loss.

It gets your heart racing and keeps it there, burning calories like there’s no tomorrow.

It’s that sustained, high-intensity effort that cranks up your calorie burn, something that short bursts of calisthenics might not always achieve.

Now, before you think it’s an either-or situation, why limit yourself to one when you can benefit from both?

That’s what I love to do—mix it up!

Mixing calisthenics with cardio is like creating a supercharged, fat-burning cocktail that caters to all your fitness needs.

You get the muscle-building magic of calisthenics and the calorie-burning prowess of cardio—it’s a win-win!

Imagine starting your workout with some dynamic calisthenics, getting those muscles fired up and ready to go.

Then, switch gears into a heart-thumping cardio session.

It’s my favorite combo when I want to feel like I’ve really *earned* my post-workout shake.

By the end of it, you’ll have worked every angle of your fitness, from strength to endurance, and you’ll be burning fat like a furnace.


Wrap Up

Now, remember, achieving that dream body with Calisthenics isn’t a walk in the park.

It requires grit, determination, and consistency.

But believe me, the sweat and effort are worth it.

You’ll be amazed at the transformation your body undergoes when you commit to this journey.

If you’re carrying a few extra pounds, starting with some light cardio is a smart move.

It’s like laying the groundwork for the more intense Calisthenics exercises to come.

You’ll shed some weight and prepare your body for the upcoming challenges.

But hey, a little disclaimer here: while I’m here to guide and inspire you, this isn’t a substitute for professional medical advice.

It’s super important to chat with a healthcare expert, especially if you’ve got specific medical concerns.

They can give you the green light and tailor advice to your unique situation.


FAQs

What are the benefits of calisthenics?

Calisthenics has many benefits, including weight loss, increased muscle definition, and improved cardiovascular health. Additionally, Calisthenics can be performed anywhere with little to no equipment required.

Can I take supplements alongside my calisthenic workouts?

Like any other workout routine, you should focus on getting the proper nutrients from food to support your activity. This means eating a balanced diet with plenty of fruits, vegetables, and lean protein. If you need an additional boost, consider taking a multivitamin.

How often should I do calisthenics to lose weight?

There is no magic number, but consider 3-5 times per week for the best results. Remember to focus on quality over quantity; your workouts should be intense and challenging to see results.

Is daily exercise necessary to lose weight?

Yes, some form of exercise is necessary for weight loss. However, you don’t have to do hours of cardio every day to see results. Too much cardio can lead to weight gain. Instead, focus on a mix of cardiovascular and strength-training exercises like calisthenics.

Can I eat whatever I want and still lose weight with Calisthenics?

Unfortunately, no. Even if you’re working out regularly, you won’t see results if you’re eating an unhealthy diet. To lose weight, you need to eat fewer calories than you burn. This means choosing healthy, nutrient-rich foods most of the time and limiting processed, sugary, and fatty foods.

Recommended
Categories
Advanced Workouts BODYWEIGHT EXERCISES

How to Increase Pull-Up Repetitions – 14 Effective Tips

Hello, workout warriors!

Let’s chat about the mighty pull-up, a true titan in the workout world.

Having spent a multitude of years in the fitness industry, I can affirm that pull-ups go beyond showcasing strength; they’re a full-body powerhouse, reshaping your physique and enhancing your performance.

But hey, I get it, pull-ups can be daunting.

It’s like looking up at a mountain and wondering, “How the heck do I climb that?”

Here’s some food for thought: pull-ups aren’t just flexing a couple of muscles; they’re a symphony of movement, bringing together your shoulders, arms, and core.

But it’s not solely about showing off in the mirror.

It’s all about functional fitness – the type that can elevate your performance in sports like climbing, rowing, and even swimming.

So, what if you find yourself hanging there, feeling miles away from that elusive bar?

No need to stress!

I’m here to share 14 powerful tips to skyrocket your pull-up performance.

Whether you’re just starting or aiming to master pull-ups like a pro, these tips are your secret weapon.

Get ready to reach new heights at the bar!


The Muscular Harmony of Pull-Ups and Chin-Ups

Alright, fitness friends, let’s unpack the muscle mechanics behind pull-ups and chin-ups.

It’s like a backstage pass to understanding what goes on when you’re pulling yourself up to that bar.

Front and center, we’ve got the lats, short for latissimus dorsi, leading the show.

These bad boys are the rockstars of pull-ups.

But that’s not all – we’ve also got a supergroup of supporting muscles: the biceps, forearms, core, deltoids, and rhomboids.

Yep, it’s a full band jamming up there!

Now, here’s where it gets interesting.

The secret sauce?

It’s all in your grip. Swap grips, and you change the whole tune of the exercise.

With a wide prone grip, we’re talking a back-blazing workout – hello, lats!

But twist those palms around for a supine grip (yep, chin-ups), and suddenly, it’s bicep city.

Some folks find chin-ups a bit easier since it’s like calling in extra muscle buddies for help.

So, whether you’re on a mission to sculpt your back or pump up those arms, the grip is your DJ, mixing up the beats.

Stick around as we dive into more ways to use these key grip techniques to your advantage, ramping up those pull-up and chin-up numbers.


The Three Pillars of Pull-Up Proficiency

Let’s chat about the three golden rules of pull-up mastery.

With years of experience in the fitness and calisthenics realm, I’ve pinpointed these vital factors that will elevate your pull-up performance.

Eager to learn more?

Let’s jump right into it!


1# Frequency: The Key to Muscle Mastery

Consistency is your secret weapon – think of it as honing each skill step by step.

Commit to include back, shoulder, and arm exercises in your routine 3-4 times a week.

Spice things up with exercises like Lat Pulldowns and Dumbbell Rows, and don’t overlook the importance of those bicep curls!

Your mission is to forge an unshakable foundation of strength while injecting your regimen with excitement and constant improvement.

Picture the pull-up bar as your conquerable summit, and each workout as a step closer to victory.


2# Progress: The Level-Up Challenge

Did you get the basics mastered?

Awesome!

Now it’s time for the next step.

If you find assisted pull-ups becoming too easy, it’s time to go solo.

And if those standard pull-ups are becoming a walk in the park, why not add some weights?

Grab a handlebar, strap on a weighted vest, or swing a Dip Belt.

This isn’t just about upping the rep count; it’s about pushing your muscles to new territories.

Who knows, maybe the one-arm pull-up is just around the corner for you!


3# Recovery: The Secret Ingredient

Here’s the deal – training hard is just half the battle.

The real magic?

It happens during recovery. It’s like letting the dough rise.

You gotta find that sweet spot between workout and rest.

Feeling a dip in your pull-up performance?

Maybe it’s time to hit pause and recharge.

Muscles grow and get stronger when they rest, so don’t shortchange your recovery time.

Here you have it – frequency, progress, and recovery, your three pillars of pull-up excellence.

Keep these in mind, and you’re not just boosting those reps; you’re building a stronger, more stable upper body.


14 Strategies to Elevate Your Pull-Up Reps 

Alright, let’s get down to business!

If you’re on a mission to conquer your first pull-up or add a few more to your tally, you’re in the right place.

Here are the eagerly awaited 14 tips to enhance your pull-up skills.

This guide focuses on practical and effective methods for those genuinely dedicated to improving their pull-ups.

So, roll up your sleeves, and let’s get started on this journey to pull up greatness!


1. Boosting Grip Strength with Dead Hangs

Shifting our focus to a key element often overlooked in pull-up training: grip strength.

Dead Hangs, when done consistently, can elevate your grip game.

This involves more than simply hanging from a bar; it’s a solid workout for your shoulders, upper back, core, and the muscles in your forearms and wrists.

And it’s not just about mastering pull-ups – a robust grip plays a vital role in your overall mobility, a factor that gains importance as we age.

So, by integrating Dead Hangs into your weekly regimen, you’re setting the stage for stronger, more resilient muscles all around.

Let’s hang tight and strengthen up.


2. Hollow Hold: Core and Back Synergy

This move is a fantastic mimic of the pull-up hang, targeting your back and core muscles effectively.

By practicing the Hollow Hold, you can iron out some common pull-up mistakes, such as hip thrusting.

To do it, simply lie on your back, stretch your arms over your head, and then lift both your legs and arms off the ground.

It’s a deceptively simple exercise, but incredibly effective at strengthening those key muscle groups used in pull-ups.

Adding this exercise to your routine can make a significant difference in your pull-up performance.


3. Inverted Rows: A Safer Alternative to Traditional Rows

Inverted Rows are a fantastic alternative to traditional barbell rows, offering a solid back workout without the same level of stress on your back.

To get into this exercise, position yourself face up under a bar.

Grab it with a shoulder-width grip and pull your body upwards.

It’s crucial to keep your body tense, legs fully extended, and glutes contracted during the exercise.

This not only ensures proper alignment but also engages the key muscle groups that are essential for improving your pull-up performance.

Inverted Rows are a great way to build strength and stability, setting you up for pull-up success.


4. Bent-Over Row: A Comprehensive Back Exercise

Next up in our pull-up toolkit, let’s focus on Bent-over Rows, a powerhouse exercise for hitting those back muscles.

Think of this as your secret weapon for pull-up prep. Here’s how you do it:

Get into position with your feet shoulder-width apart, and a slight bend in your knees.

Hinge forward at the waist, keeping your back around a 90-degree angle, but make sure it’s nice and straight.

Now, grab a barbell, keeping those elbows snug against your torso.

Pull the barbell up towards your sternum or upper abdomen, all while squeezing your shoulders together and engaging your core.

This isn’t just another back exercise; it’s a direct line to strengthening those same muscles that are crucial for pull-ups.

So, adding Bent-over Rows into your routine is like giving your body a head start in mastering those pull-ups.

Let’s keep building that strength, one row at a time!


5. Single-Arm Rows: Isolating the Lats

This exercise is a champion at zeroing in on one side of your body at a time, giving your lats the kind of focused workout they don’t get from standard Bent-Over Rows.

Here’s how to nail this move:

Grab a dumbbell with a neutral grip, and stand up straight.

Then, lean forward just a bit, using your free hand for support on your thigh.

This is your starting position.

Now, it’s time to row: brace your core, and pull the dumbbell towards your body.

Focus on drawing your elbow back and squeezing that shoulder blade.

What’s great about Single-Arm Rows is the isolation factor.

It’s not just about hitting the lats; this exercise also contributes to hypertrophy in your elbow flexors, which is a big plus for your pull-up performance.

So by incorporating this into your routine, you’re dialing in on those key muscles that will help you dominate those pull-ups.

Let’s keep the momentum going.


6. Negatives Pull Ups: Dominate the Eccentric Phase

Negatives are a fantastic method for mastering the eccentric, or lowering, phase of the pull-up.

Here’s a step-by-step guide:

Start by jumping up to the bar, getting your chin above it.

Now, instead of just dropping down, take it slow.

Lower yourself gradually until your arms are fully extended and your feet are back on the ground.

The real magic of this exercise lies in controlling your descent.

Aim for a 10-20 second lower.

This controlled motion focuses on the eccentric contraction of your muscles, supercharging your pull-up performance by improving both control and execution.


7. Banded Pull-Up: Your Gateway to Unassisted Glory

View them as your trusty stepping stone to excelling at unassisted pull-ups.

These bands are a game-changer for gradually building up your strength.

Here’s how it works: loop a resistance band over the pull-up bar, step into it, and begin your pull-ups.

The band provides just enough assistance to make the movement manageable while still challenging your muscles.

As you progress, you’ll start to notice your strength increasing, and before long, you’ll be ready to take on pull-ups all on your own.

It’s an effective and satisfying way to take your pull-ups to the next level.


8. Partner-Assisted Pull-Ups: Teamwork for Success

When it comes to achieving the full range of motion in pull-ups, sometimes a little support goes a long way.

Having a training partner can make all the difference.

They’re there to give you that slight nudge upwards, helping you over the bar when you need it most.

It’s about more than just assistance; it’s like having a personal spotter who makes sure you’re maximizing every single rep.

This method not only helps build your strength but also boosts your confidence as you work towards unassisted pull-ups.

So grab a friend, and let’s tackle this together.


9. Bicep Power: Pump Up Those Arm Muscles

Strong biceps are a key player in the pull-up challenge.

Incorporating exercises that specifically target these muscles, like bicep curls and hammer curls, into your workout routine is essential.

They’re not just for show; these exercises actively contribute to enhancing your pull-up performance, giving you the arm strength you need to power through each rep.

So, give those biceps the attention they deserve!


10. Power Up with Extra Weight

Once you’ve got the hang of regular pull-ups, it’s time to add some weight.

Using a Dip Belt is like having your gravity: it adds that extra load, forcing your muscles to work harder and grow stronger.

It’s a game-changer for increasing both strength and muscle growth.

And hey, don’t forget about the weighted vest!

It’s another great tool for adding resistance.

Also, let me give a shout-out to Cameron Hörst’s training method – a 5×5 protocol twice a week. It’s not just fantastic for pull-ups but also boosts your climbing strength.

If you’re serious about upping your game, this strategy is a must-try!


11. Shedding Extra Pounds: Lighten Up for More Pull-Ups

Now, let’s get real for a moment.

Sometimes, the obstacle to nailing those pull-ups might just be those extra pounds.

If that’s the case, it’s time to focus on some cardio – running, swimming, jumping rope – you name it.

Combining aerobic exercises with a balanced diet can make a significant difference.

Remember, though, always consult with your doctor before starting any new exercise or diet regimen, especially if weight loss is a goal.

They can guide you on the safest and most effective path for your unique body and health conditions.


12. Embracing Wide-Grip Pull-Ups

Let’s broaden our horizons with wide-grip pull-ups!

These aren’t just your average pull-ups; they’re a game-changer for building those impressive lats.

By widening the distance between your hands, you’re putting extra emphasis on certain muscle groups, especially the lats.

This variation might require a bit more strength, but trust me, the results are worth it.

Remember, it’s all about the proper range of motion to reap the full benefits.


13. Scapular Pull-Ups: The Unsung Heroes

Now, let’s talk about a lesser-known but incredibly effective exercise: Scapular Pull-Ups.

These babies are key for strengthening those trapezius muscles, giving you an edge in your standard pull-ups.

Some experts even argue they’re superior to chin-ups for targeting this area.

Here’s how you do it:

Hang from the bar with a prone grip, let your shoulders relax down, and then pull up using just your shoulder blades.

Keep those arms straight and hold at the top for a few seconds.

It’s like giving your grip and lower traps a mini workout.

Incorporating these exercises into your routine can seriously level up your pull-up prowess.

Whether you’re working on widening your grip or focusing on your scapula, you’re on your way to becoming a pull-up champion.


14. Kneeling Lat Pulldowns: A Twist on the Classic

Let’s take a look at Kneeling Lat Pulldowns, a fantastic variation of the standard lat pulldown that brings a little extra to the table.

This exercise isn’t just about working your back; it’s a full-on party for your back, core, and arms.

And here’s the kicker: by kneeling, you’re engaging your glutes and core way more than in the usual lat pulldowns.

This means you’re not only getting a great back workout but also firing up those core muscles at the same time.

So, how do you do it?

First, you’ll need an adjustable rope machine with a lat pulldown bar.

Set that bar high up.

Now, instead of sitting, you’re going to kneel in front of the machine.

Grab the bar with a pronated grip – that’s palms facing away from you – keeping it about shoulder-width apart.

Start with your arms fully extended above you.

Here comes the fun part.

Lower that bar down by fully retracting your shoulders, bringing it right down to your chest. But wait, don’t rush it!

Hold it there for a good 2 seconds – feel that muscle engagement – and then smoothly return to your starting position.

Kneeling Lat Pulldowns is a stellar way to amp up your back routine, giving those muscles an extra challenge and helping you build strength in a whole new way.

It’s a small tweak to a classic move, but trust me, you’ll feel the difference.


Gradually Increasing Your Pull-Up Reps in Three Weeks: An Example

Here’s an effective three-week workout plan designed to help you significantly enhance your pull-up performance.

If you’re not starting from scratch, this plan can still elevate your abilities:


Week Day Workout
1 1 Warm-up, 5×5 Pull-Ups, Push-ups, Cool-down
1 2 Rest or light activity
1 3 Warm-up, 5×5 Pull-Ups, Bodyweight Rows, Cool-down
1 4 Rest or light activity
1 5 Warm-up, 3×5 Pull-Ups, Negative Pull-Ups, Cool-down
1 6-7 Rest or light activities
2 1-5 Follow the same routine as Week 1 but increase the Pull-Up Sets to 6 sets of 5 reps each.
2 6-7 Rest or light activities
3 1-5 Warm-up, 6×6 Pull-Ups, 3×8 Chin-ups, Cool-down
3 6-7 Rest or light activities

(The specific numbers in the table may vary depending on your starting point,)


Final Thoughts

Whether you’re tackling that first pull-up or aiming to up your rep count, the secret lies in a solid foundation of strength coupled with sharp technique.

I hope this guide helps you drastically increase your pull-up count.

Always keep in mind that progress is a journey, one that demands patience and unwavering commitment.

Stay dedicated, maintain your focus, and you’ll undoubtedly achieve exceptional results.

Your thoughts and questions are always valued, so don’t hesitate to share them!

Recommended