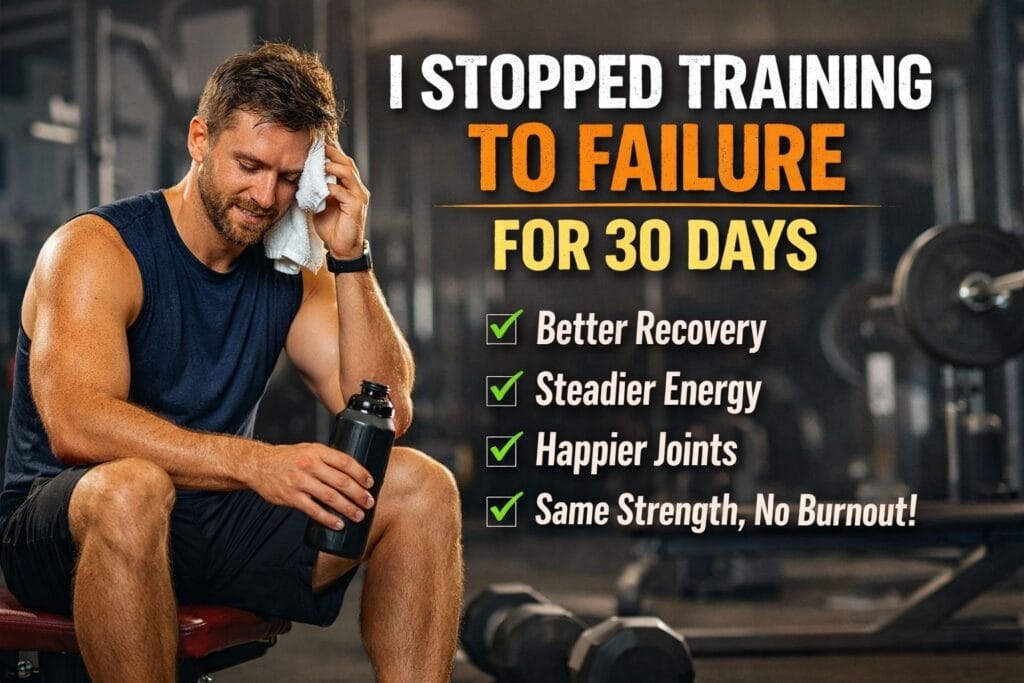
For years, training to failure felt like the most honest way to lift.
If the set didn’t end with that slow-motion, shaky last rep where the weight suddenly weighs as much as a small car, did it even count.
That mindset is fun until recovery starts acting like a grumpy roommate who refuses to do the dishes.
Energy drops, joints complain, sleep gets weird, and “rest day” turns into “existential dread day.”
So I ran a simple experiment on myself for 30 days.
| What Changed Most After 30 Days of Not Training to Failure (The Real Summary) |
|---|
| Recovery improved, but not in a magical way. |
| Soreness decreased, but that wasn’t the headline. |
| The big difference was consistency. |
| Workouts felt more repeatable. |
| Warm-ups felt smoother. |
| Daily energy became steadier. |
| Motivation rose because training stopped feeling like punishment. |
| Performance did not collapse. |
| If anything, it became easier to progress because I wasn’t constantly digging out of fatigue holes. |
| Training stopped being a heroic event. |
| It became a reliable practice. |
| That’s the kind of boring that builds impressive results. |
What “Training to Failure” Actually Means

Muscular failure is not “this is hard.”
Muscular failure is “the rep stops.”
That means you try to complete another repetition with good form, and your body basically replies: “Request denied.”
To be clear, that is different from quitting because it burns, or because you’re uncomfortable, or because you saw your life flash before your eyes on a squat.
Real failure is a mechanical limit.
The muscle can’t produce enough force to move the load through the required range of motion, even though you’re still trying.
Also, failure comes in flavors.
There’s technical failure, where form breaks down and the rep becomes a different exercise.
Then there’s true concentric failure, where even with decent form, the weight just stalls and you cannot finish the rep.
In this 30-day experiment, I avoided both.
Technical failure was a hard stop.
True failure was completely off-limits.
If I felt my form start bargaining with me, I ended the set.
How I Defined “Not to Failure” So I Could Actually Follow It

The biggest problem with “don’t train to failure” is that it sounds vague.
Vague rules get ignored the moment your playlist hits the good part.
So I used a simple system: Reps in Reserve, often written as RIR.
RIR means how many clean reps you could still do if you had to.
If a set ends and you think, “I could maybe grind one more,” that’s around 1 RIR.
If a set ends and you’re confident you could do two more with good form, that’s 2 RIR.
For this experiment, most sets lived at 2 RIR, sometimes 3 RIR on big compound lifts.
Compound lifts are exercises that use multiple joints and lots of muscle at once.
Think squats, deadlifts, presses, rows, pull-ups.
Isolation lifts are more “one main joint,” like biceps curls, triceps extensions, leg curls, lateral raises.
On isolation lifts, I sometimes went closer, like 1–2 RIR, because the fatigue cost tends to be lower.
That was the rule.
No guessing mid-rep.
No dramatic last rep where the weight stops halfway and I pretend it was “slow tempo.”
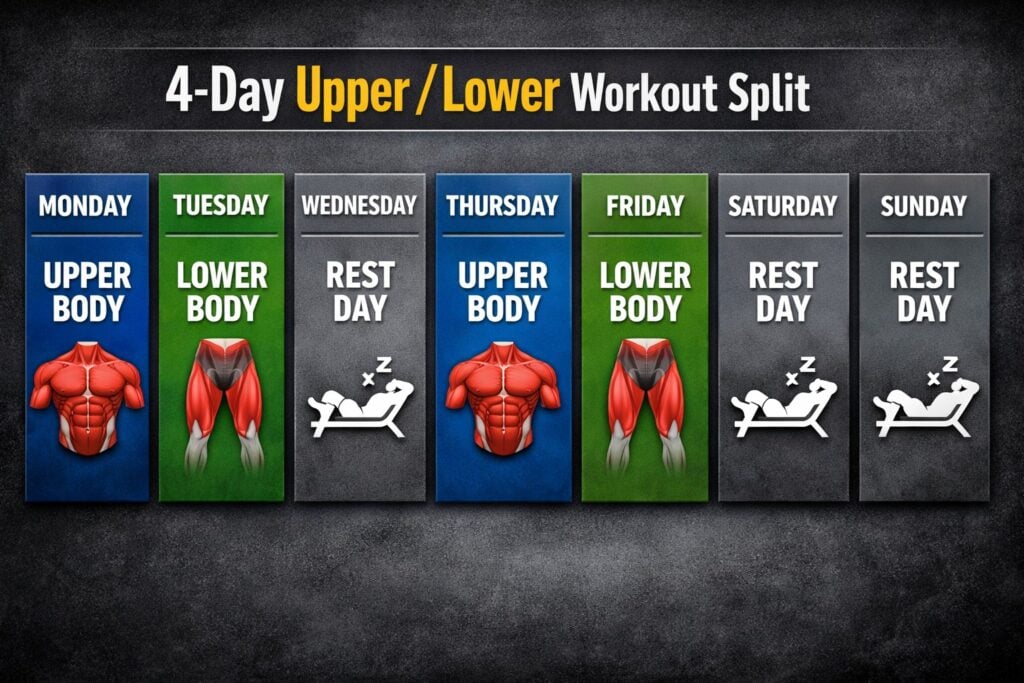
My Starting Point (Before Day 1) and Why It Mattered
I wasn’t coming into this fresh.
Training to failure had been my default for a long time, especially on the final set of most exercises.
The weekly structure looked like a pretty standard 4-day routine.
Upper body day, lower body day, rest, upper, lower, rest, rest.
Volume was moderate.
Intensity was “enthusiastic,” which is a polite way of saying I was flirting with fatigue all the time.
Sleep was okay but not consistently great.
Soreness was regular, especially legs.
Performance was not crashing, but it also wasn’t climbing smoothly.
Progress felt like trying to download a game update on bad Wi-Fi.
Some weeks it moved.
Other weeks it stalled for no obvious reason.
That’s the exact situation where this experiment makes sense.
If everything is perfect already, changing one variable won’t feel dramatic.
If recovery is borderline, the same change can feel like switching from hard mode to normal mode.
The Experiment Setup: What Stayed the Same, What Changed, and What I Tracked
![]()
The goal was simple.
Only one variable changes, or the results mean nothing.
So the program stayed almost identical.
I even tried to keep the same warm-up habits, because warm-ups can quietly change performance.
The only rule change was stopping sets before failure.
To make it measurable, I tracked a handful of “recovery signals.”
Sleep quality, because fatigue shows up there fast.
Morning energy, because the day after a hard session tells the truth.
Soreness, not as a badge of honor, but as a clue about tissue stress.
Workout performance, meaning reps and loads at similar effort.
Motivation to train, because burnout is real and it’s not always dramatic.
Joint and tendon annoyance, especially elbows and knees.
I also tracked one extra thing that surprised me later.
How long it took to feel “ready” during the warm-up.
That ended up being weirdly important.
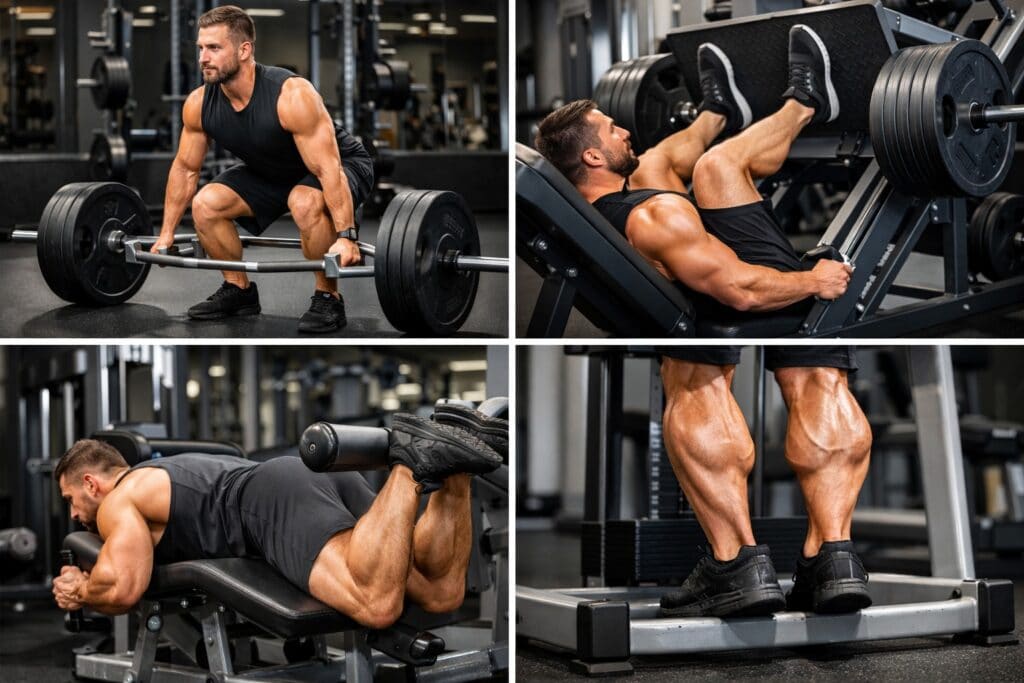
My Workouts: Exactly What I Did (With Exercise Explanations)
I’ll lay out the main lifts and the general approach.
Numbers will be realistic, but the exact weights matter less than the structure.
What matters is how the sets were performed, and where I stopped.
Upper Body Day A (Push + Pull Basics)

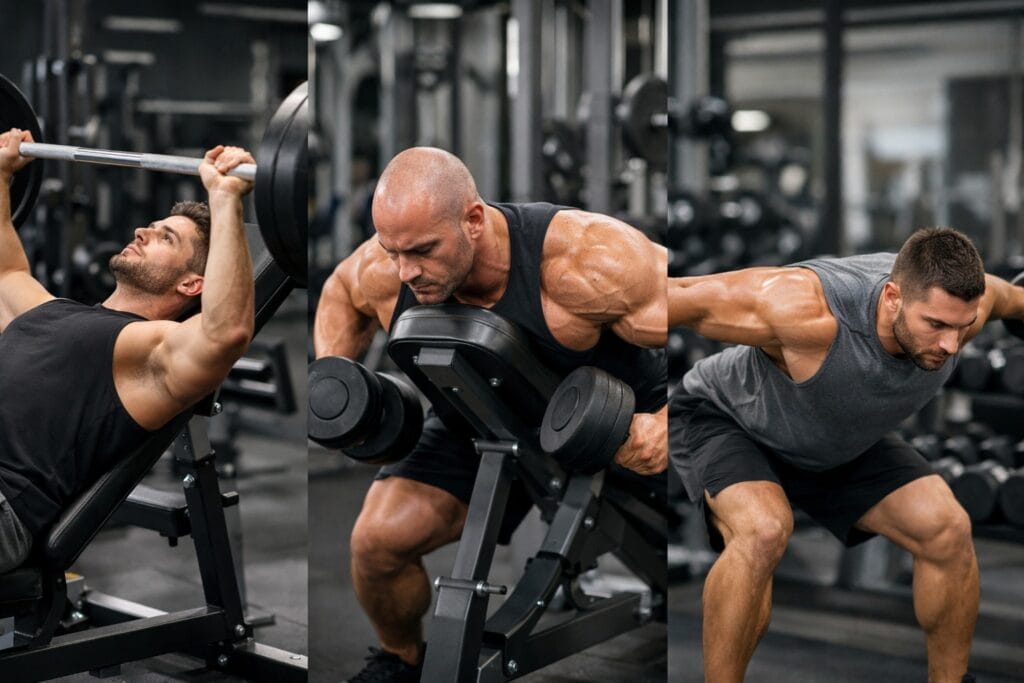
The first main movement was a flat dumbbell bench press.
That’s lying on a flat bench, holding a dumbbell in each hand, pressing them from chest level up to arms extended.
I kept shoulder blades slightly pulled back and down, like I’m trying to tuck them into my back pockets.
That stabilizes the shoulder and keeps the press from becoming a joint stress festival.
I used 3 working sets of 6–10 reps.
Instead of grinding the last rep, I stopped when I felt I could do two more clean reps.
Next came a one-arm dumbbell row.
That’s one knee and one hand on a bench, other foot on the floor, pulling a dumbbell from a hanging position up toward the hip.
The key cue is pulling the elbow back, not yanking with the biceps.
I used 3 sets of 8–12 reps each side.
Stopping at 2 RIR felt almost too easy at first, like I was leaving money on the table.
Then came an overhead press variation.
That’s pressing weight overhead, usually with dumbbells or a barbell.
The ribs stayed down, glutes lightly squeezed, and I avoided leaning back like I’m trying to turn it into an incline bench press.
I did 2–3 sets of 6–10 reps.
After that, I did lat pulldowns or pull-ups depending on the day.
A pull-up is hanging from a bar and pulling your chest up toward the bar.
A pulldown is the machine version where you pull the bar down to the upper chest.
I aimed for controlled reps, full stretch at the top, no swinging like a gym-themed playground.
Then isolation work happened.
Lateral raises, curls, triceps extensions.
Those stayed closer to 1–2 RIR, but never sloppy.
Lower Body Day A (Squat Pattern Focus)
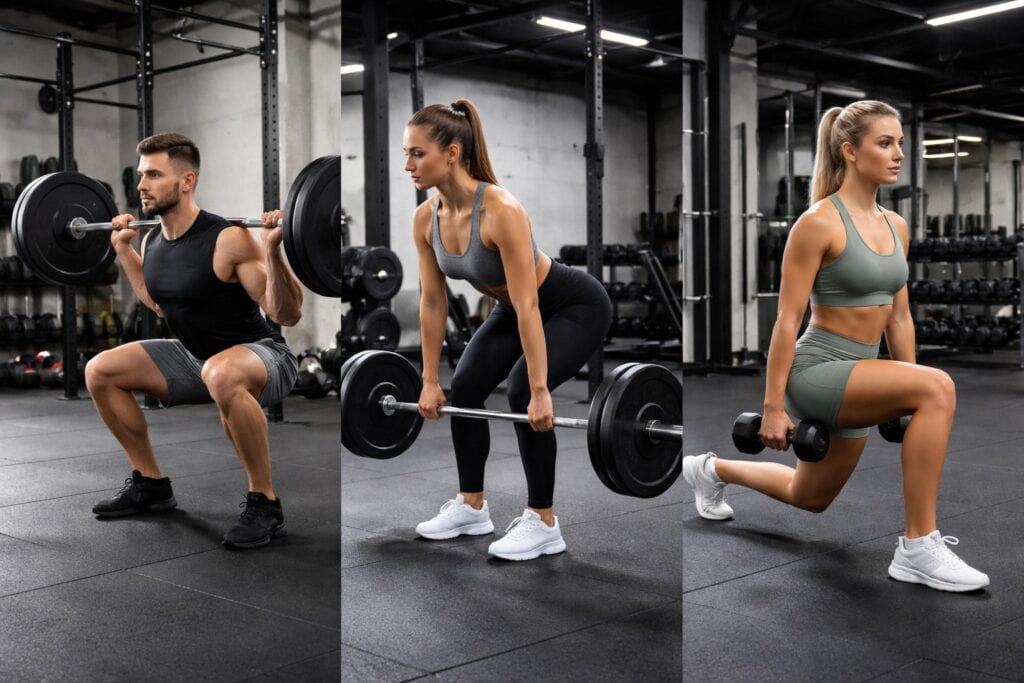
Main lift was a back squat or front squat depending on the phase.
A squat is bending at hips and knees to lower your body, then standing back up.
The difference is where the bar sits.
Back squat bar rests on the upper back.
Front squat bar rests on the front of the shoulders.
I kept stance consistent, braced the core like I’m preparing for a friendly punch, and descended under control.
I did 3 working sets of 5–8 reps.
Previously, I would often take the last set to the brink.
During the experiment, I stopped at 2–3 RIR.
Accessory lift was a romanian deadlift
That’s a hip hinge where you keep a slight knee bend and push the hips back while the torso leans forward.
The bar travels down the thighs and shins until hamstrings feel a strong stretch, then you stand back up by driving hips forward.
It’s not a squat.
It’s not bending the knees a lot.
It’s a hinge, like closing a door with your butt without using your hands.
I did 3 sets of 6–10 reps.
Then I added a split squat or lunge.
A split squat is a stationary lunge position where you lower and rise without stepping.
That one makes your legs feel like they’re buffering.
I kept those at 2 RIR because failure on single-leg work feels like watching your soul leave your body in HD.
Leg curls and calves finished the day.
Those were controlled and closer to 1–2 RIR.
Upper Body Day B (Different Angles, Same Principles)
Incline pressing replaced flat pressing.
Rows became chest-supported rows or cable rows.
A chest-supported row means you lie face down on an incline bench and row weights without using momentum.
That reduces lower back fatigue and keeps it more “back muscles doing the job.”
I also included some kind of chest-supported rear delt move.
Rear delts are the back part of the shoulder.
Neglecting them is a classic way to earn shoulder crankiness later.
Everything stayed 1–3 RIR depending on the movement.
Lower Body Day B (Hinge Pattern Focus)
This day emphasized a deadlift pattern.
Sometimes it was a conventional deadlift.
That’s picking a barbell up from the floor by pushing the floor away, bracing hard, and standing tall.
Other times it was a trap bar deadlift, which is often friendlier because the load is centered.
I still kept 2–3 reps in reserve.
That felt illegal at first.
Then I did squats or leg press as a secondary move, but not to failure.
Leg press is the machine where you push a platform away with your feet.
I kept the lower back stable and avoided letting hips roll up at the bottom.
Hamstrings and calves finished.
Again, closer but not sloppy.
Week 1: The Mental Drama Phase (And Why It Happens)
The first week was the hardest psychologically.
Not physically.
Mentally.
Stopping sets early made me feel like I was undertraining, even though the sets were still hard.
That’s because failure creates a clear endpoint.
It’s like a video game boss fight where you know you truly emptied the tank.
Without failure, your brain doubts whether the tank was emptied enough.
So I leaned on the rule.
If I could do two more clean reps, I stopped.
No negotiations.
No “just this once.”
Even when everything in me wanted to chase that last rep, I treated it like a lab protocol.
Week 1 recovery felt slightly better, but nothing dramatic yet.
Soreness was a little lower.
Sleep was slightly calmer, especially after leg days.
Motivation to train was already improving, which surprised me.
The gym felt less like a courtroom where I had to prove something.
Week 2: Warm-Ups Got Weirdly Easier
Something shifted in the second week that I wasn’t expecting.
Warm-ups felt better.
Not “I’m strong today” better.
More like “my joints are cooperating” better.
Usually, I need a few ramp-up sets before my body feels ready.
During this experiment, readiness showed up faster.
Bar speed was better on the early sets.
The first working set didn’t feel like I was waking up mid-set.
It felt like the engine warmed up sooner.
That matters because warm-up quality affects everything after.
If the warm-up is sluggish, you spend the session chasing the feeling you should have had at minute ten.
Less warm-up struggle also meant less emotional friction.
Training stopped being a fight to feel normal.
It became a planned effort that stayed within recoverable limits.
Soreness decreased another notch.
Not zero, but less “walking downstairs like a cowboy in a Western.”
Sleep continued to improve, especially the night after hinge days.
That was unexpected because hinge days used to wreck my nervous system a bit.
Now they didn’t.
Week 3: Performance Did Not Drop (And That Was the First Big Proof)
Here’s the fear most people have.
If I don’t train to failure, I’ll get weaker.
I watched my numbers like a hawk in week three.
Same loads.
Same rep ranges.
Same exercises.
What happened was not a decline.
Reps either stayed stable or slightly improved.
Some lifts felt easier at the same load, meaning my effort rating dropped even if the weight didn’t change.
That’s a quiet form of progress that people ignore.
If 8 reps used to feel like an 8.5 out of 10, and now it feels like a 7.5, you just bought future reps.
It also changed how I progressed.
Instead of forcing weight increases by suffering, I progressed by staying clean and consistent.
When the top of the rep range became solid at 2 RIR, I added a small amount of weight next week.
It was boring in the best way.
Like upgrading a PC by installing the right parts instead of overclocking until smoke appears.
Motivation kept rising.
Not hype.
More like steady willingness.
I wanted to train, even on days where life was heavy.
That’s a huge signal that the plan is sustainable.
Week 4: The Unexpected Recovery Changes I Didn’t Predict
By the fourth week, the experiment stopped feeling like an experiment.
It started feeling like a smarter default.
And a few changes showed up that I genuinely did not plan for.
1) Less “Background Fatigue” During the Day
This was the sneaky one.
I wasn’t just less sore.
I was less drained.
That low-grade fatigue that makes you want to sit down for no reason started fading.
It’s hard to describe unless you’ve felt it.
It’s like your battery is always at 62%, and you assume that’s normal.
Then one day it’s at 82% and you’re like, “Wait, this is what people mean by energy.”
2) Better Appetite Timing (Not Just More Hunger)
Training to failure used to either spike hunger aggressively or weirdly suppress it, depending on the day.
During the no-failure month, appetite felt steadier.
Meals hit better.
I didn’t get the “hunger chaos” where I’m starving at 4 PM and uninterested at dinner.
That matters for muscle growth because consistent fueling is easier when appetite behaves like an adult.
3) Fewer Joint “Whispers” Turning Into Complaints
Elbows and knees used to give little warning signals.
Not pain, more like whispers.
Those whispers didn’t escalate as often during this month.
That makes sense because failure reps often involve slower bar speed, longer grinding, and subtle technique breakdown.
That combination increases stress on connective tissue.
Muscles adapt relatively fast.
Tendons and joints are more like slow-moving bureaucracies.
They do not appreciate surprise overtime.
4) Better Technique Under Load
This surprised me because I assumed technique was “fine.”
Turns out, when you stop short of failure, reps look more consistent.
Bar paths stay cleaner.
Bracing stays more reliable.
Range of motion doesn’t shorten without you noticing.
Training to failure can teach you grit.
Stopping short of failure teaches you precision.
Precision adds up over months in a way grit alone doesn’t.
What I Learned About Failure: It’s a Tool, Not a Lifestyle
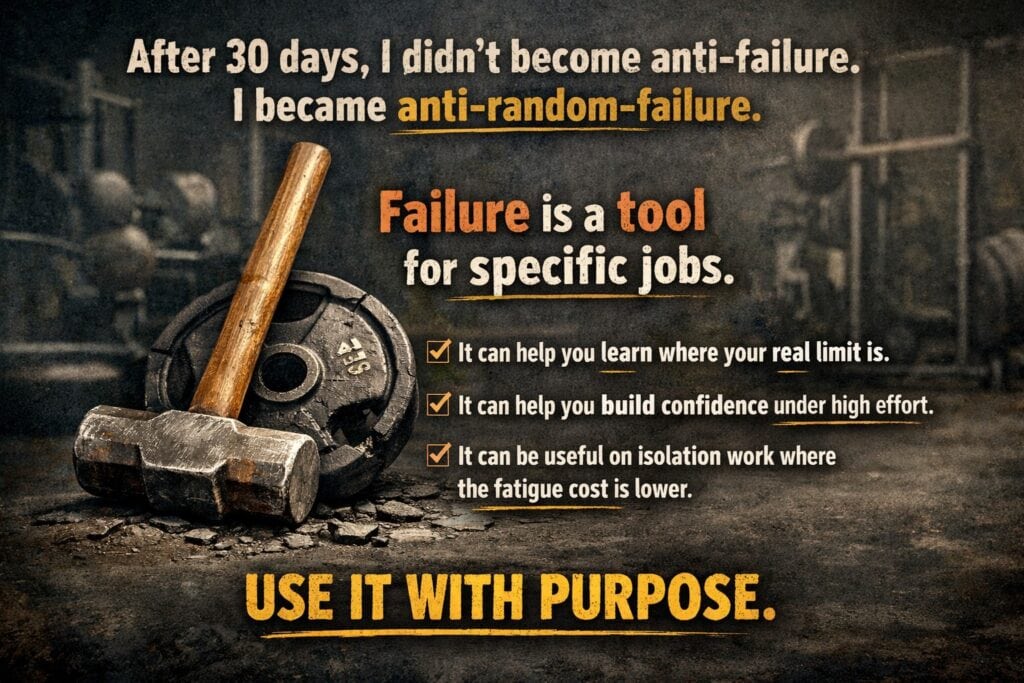
After 30 days, I didn’t become anti-failure.
I became anti-random-failure.
Failure is a tool for specific jobs.
It can help you learn where your real limit is.
It can help you build confidence under high effort.
It can be useful on isolation work where the fatigue cost is lower.
But using it constantly is like running every computer program as an administrator.
Sure, it works.
Also, something eventually breaks.
Most of the growth signal happens before failure anyway, especially if sets are taken close.
If you end sets at 1–3 reps in reserve, you still recruit a lot of muscle fibers.
You still create tension.
You still challenge the system.
You just don’t pay the “extra recovery tax” that failure often charges.
That recovery tax is not always worth it.
Especially if you train multiple days per week and want to show up strong again soon.
The Exact “Rules” I’m Keeping After This Month
This month gave me a structure I can actually live with.
Not perfect rules, but rules that keep me progressing without feeling like I’m constantly recovering from a minor car crash.
Most compound lifts stay at 2–3 RIR.
That means squats, deadlifts, presses, rows, pull-ups.
Isolation lifts can go to 1–2 RIR, sometimes 0–1 RIR if technique stays pristine and the movement is stable.
Stable means the body is supported and the risk of ugly compensation is low.
A leg extension machine is stable.
A heavy barbell squat is not stable in the same way.
I’ll use failure rarely, like a calibration tool.
Maybe once every couple weeks on a safe movement.
That helps keep my RIR estimates honest.
Because if you never test limits, your brain can start lying about how many reps you “had left.”
No-failure training still requires effort.
It’s not lazy training.
It’s controlled training.
There’s a difference.
How to Try This Yourself Without Guessing (A Simple 30-Day Template)
If someone reading this is thinking, “Okay, but how do I actually do it,” here’s a practical version.
Pick a routine you already do, or a simple 3–4 day plan.
Keep the exercises the same for the month.
Track something basic like reps and loads.
Use RIR rules like these:
- Compound lifts: stop with 2 reps left most of the time.
- Isolation lifts: stop with 1–2 reps left.
- If technique changes, stop immediately, even if the muscle “could” keep going.
Add progression through rep ranges.
If you can do all sets at the top of the rep range with the planned RIR, add a small amount of weight next time.
Small means small.
Progress that you can repeat beats progress that hurts your joints.
Also, choose one or two recovery signals to watch.
Sleep quality and warm-up readiness are great options.
If warm-ups feel smoother and sleep improves, you’re probably doing it right.
If performance stays stable and motivation rises, you’re doing it very right.
Where This Might Not Apply Perfectly
Some people genuinely love training to failure.
If it keeps you consistent and you recover well, that matters.
Beginners can also benefit from occasionally reaching technical failure because it teaches effort and skill.
That said, beginners often confuse discomfort with failure, so guidance helps.
Athletes in certain phases might use failure strategically for a short period.
Bodybuilders sometimes use failure on isolation work because it’s efficient for hypertrophy when managed well.
The keyword is managed.
If your sleep is trash, your joints ache, and your motivation is fading, failure isn’t proving toughness.
Failure might be stealing your progress.
That’s not a moral issue.
It’s just programming.
RELATED:》》》Why Slow Eccentrics Feel Weird on Tendons — Lessons From 2 Months of Training
Final Thought: Stronger Is Cool, but Repeatable Is Everything
One brutal session can make you feel like a warrior.
A month of repeatable training is what actually makes you stronger.
That’s the trade.
Stopping short of failure didn’t make me softer.
It made training more stable and easier to manage.
Results live there, quietly, like a save file that doesn’t get corrupted.
If recovery has been feeling off or unpredictable, this is worth trying for 30 days.
Nothing mystical.
Just a smarter use of effort.
And if your ego starts pushing back, remember that progress doesn’t need a dramatic soundtrack.
It needs well-executed sessions, proper recovery, and the ability to train again feeling ready.