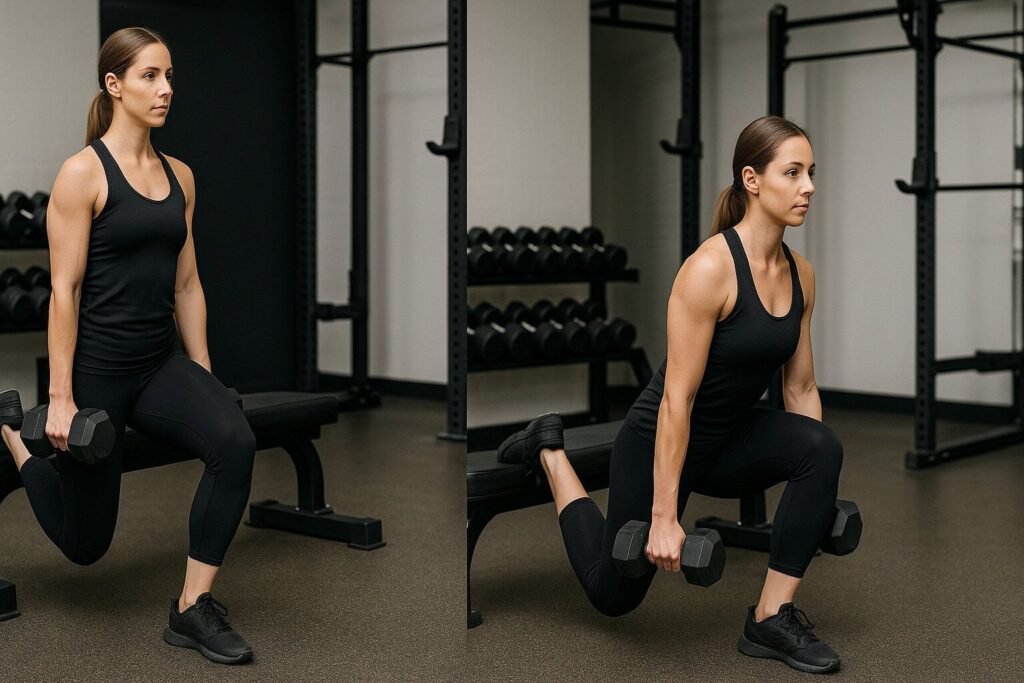
Categories
Shoulders STRENGTH BUILDING AND MUSCLE MASS

Is Training Delts Twice a Week Too Much or the Secret to Mass?

Let’s be honest for a moment…

If you’re like me, at least once you’ve stood in front of the mirror, twisted your torso, raised an arm, tilted your head…

And you’ve thought:

“Mmmh, not bad… but they could be way bigger.”

Yes, maybe from the front they even look “okay,” but we all know what we really want are round, full, arrogant shoulders that scream “I’m lifting serious weight” without saying a word.

And that’s where the fateful question arises:

“What if I trained them twice a week?”

Brilliant idea or recipe for disaster?

Spoiler: it depends.

Now I’ll explain everything, no sugarcoating.


Shoulders: The Hidden Heart of Your Entire Upper Body

Back-view-of-woman-training-shoulders-with-dumbbells

It seems everyone’s obsessed only with a big chest and pumped-up arms.

But the truth is that shoulders are the keystone of every serious upper-body movement.

Bench presses?

Pull-ups?

Even just grabbing the protein jar off the top shelf?

Guess who’s working?

Your poor, neglected shoulders.

And the fun (or rather, the not-fun) fact is that because they’re recruited in so many exercises, they often won’t grow unless you give them surgical attention.

A classic once-a-week session might simply… be too little.

­ ­

Science Doesn’t Lie: More Stimulus = More Growth

Here’s a cool fact you can show off with at the gym:

Muscle protein synthesis peaks within 24–48 hours after training.

Translation:

That photon-level pump you feel after crushing shoulders on Monday?

By Wednesday it’s already in “Netflix and couch” mode.

Muscle doesn’t stay actively building mass for days on end.

You need a new stimulus.

Training shoulders twice a week keeps the engine running, prevents them from settling into metabolic couch-potato mode, and multiplies growth opportunities.

More targeted input = more muscular output.

Pure bodybuilding math.

­ ­

Yes, But the Deltoid Is a Real Drama Queen

Anatomical-illustration-highlighting-deltoid-muscle

Now… before you storm into the gym determined to destroy your shoulders every 48 hours, listen up.

The shoulder complex is the most mobile joint in your body.

And—guess what—the least stable.

It’s like trying to carry a full glass of wine while running on a trampoline.

One small technical error, a bit too much enthusiasm on the load, and…

crack

Welcome to the nightmare of tendonitis, inflammation, and forced downtime.

Shoulders don’t forgive.

I’m telling you as a friend.

­ ­

How to Seriously Structure a Twice-a-Week Shoulder Routine

Training shoulders twice a week doesn’t mean copying your Monday workout and pasting it word-for-word on Thursday.

Beginner mistake.

If you really want your delts to explode (without exploding a rotator cuff…), you must think strategically.

Every session needs its own identity. A clear goal.

Not two photocopy days. Not two random beat-downs.

You need an intelligent mix of:

  • Different stimuli
  • Different angles
  • Different intensities

One day as a tank.

One day as a surgical sniper.

And now I’ll show you how.

­ ­

Day 1 – Raw Strength, Power, and Pure Volume

The first day is about building. Big muscle bricks.

Here we want serious loads, controlled movements, and explosive technique.

Example:

  • Overhead Press (Barbell) – 4 sets of 6 reps
    Start with the barbell resting on your clavicles, hands slightly wider than shoulder-width.
    Press the bar in a straight line overhead, bracing your core for stability.
    Lower under control, maintaining shoulder tension.
  • Arnold Press – 3 sets of 8 reps
    Seated, dumbbells at chin level, palms facing you.
    Rotate wrists during the press to finish with palms facing forward.
    Reverse the motion slowly.
  • Dumbbell Lateral Raises – 4 sets of 12 reps
    Standing or seated, dumbbells at your sides, elbows slightly bent.
    Lift dumbbells to shoulder height laterally.
    Move slowly—no swinging or torso cheating.
  • Cable Face Pull – 3 sets of 15 reps
    Set rope at eye level.
    Grip neutrally and pull toward your face, flaring your hands.
    Squeeze shoulder blades; focus on rear delts.

Focus:

Push hard, but always under total control. Never sacrifice technique on the heavy lifts.

Build strength and mass, don’t destroy yourself.

­ ­


Day 2 – Detail, Quality, and Maximum Muscle Engagement

The second day is a completely different movie.

Here weight isn’t the star. Mind-muscle control and monster pump are.

Example:

  • Drop-Set Lateral Raises – 4 sets (15/12/10 reps, decreasing weight)
    Standing, dumbbells at sides, elbows slightly bent.
    Raise to shoulder height without swinging.
    Immediately drop weight each set with minimal rest to crush every fiber.
  • Reverse-Fly at 90° – 3 sets of 15 reps
    Hinge forward with a flat back, dumbbells under chest.
    Open arms like wings, isolating rear delts—no traps.
  • Band Pull-Apart – 3 sets of 20 reps
    Hold band at shoulder-width, arms straight.
    Pull band apart, squeezing shoulder blades.
    Smooth, controlled movement to strengthen stabilizers.
  • Pike Press (Bodyweight) – 3 sets of 8–10 reps
    Inverted “V” position, hands and feet on floor, hips high.
    Bend elbows bringing head toward the floor, then push back up.
    Keep torso tight; focus on shoulders, not chest.

Focus:

Pump your delts like balloons. Short rests, maniacal technique, zero ego.

This day creates the roundness and symmetry that separates mediocre shoulders from ones that burst through your shirt.

­ ­


Smart Variations for Day 1 and Day 2 (Without Going Crazy)

Once your base is set, you can rotate in alternative exercises to stay fresh, hit new angles, and keep progressing.

Variations for Day 1 – Strength & Volume Focus:

  • Push Press instead of Overhead Press
    Like the barbell press, but with a slight leg drive for more load and explosive strength.
    (Don’t turn it into a vertical squat!)
  • Seated Military Press (Barbell)
    Same movement as overhead, seated with no back support.
    Removes leg drive, increasing pure shoulder tension.
  • Dumbbell Overhead Press
    Press two dumbbells overhead simultaneously, engaging more stabilizers.
  • Cable Lateral Raises instead of Dumbbells
    Use a low cable handle for continuous tension throughout the move.

Variations for Day 2 – Technical & Quality Focus:

  • Unilateral Lateral Raises
    One arm at a time for enhanced mind-muscle connection.
  • Cable Rear Delt Fly instead of 90° Raises
    Cross-cable setup for constant tension and perfect rear delt shape.
  • Band Face Pull instead of Cable Pull
    Same principle with a band—ideal for home workouts.
  • Wall Pike Press instead of Classic Pike
    Feet on a wall for stability, perfect when refining technique.

How to Choose Variations?

  • If you feel strong and want more load → choose heavy variations (Push Press, Military Press)
  • If you want quality and precision → choose technical variations (Cable Fly, Unilateral Raises)

Rotate every 4–6 weeks to keep growth constant without over-stressing the same chains.

The goal is always the same: hit the delts from every angle, with head and method.

­ ­


Key Points to Get It Right

  • Alternate a heavy day with a technical quality day—never two all-out PR attempts.
  • Balance anterior, lateral, and posterior deltoid work throughout the week.
  • Manage rest: 2–3 minutes between heavy sets, 30–60 seconds for pump sets.
  • Don’t chase the scale—chase perfect muscle tension.­ ­


Recovery: The Secret Weapon Everyone Underestimates

Training more doesn’t mean bombing more.

True training starts after the gym: while you sleep, eat, and even when you’re not thinking about weights.

If you sleep 5 hours a night and live off a single flatbread, you can train shoulders 7 days a week and see zero growth.

  • Sleep 7–9 hours minimum.
  • Eat enough protein.
  • Treat joint warm-ups like sacred ritual.

Shoulders won’t give you a second chance if you neglect them.

­ ­

My Experience (With a Little Humiliation Included)

When I first jumped into “delts twice a week,” I was convinced: I’ll be huge in 4 weeks.

Result?

By week two:

  • Pain everywhere.
  • Range of motion like a rusty robot.
  • Zero desire to see a barbell for months.

I’d done it all wrong: too much volume, zero logic, no load management.

Only after planning properly—mixing heavy and technical days, managing recovery, cutting volume on chest and back—did I start seeing real results.

And I swear: finally seeing shoulders explode not just from the side, but even from the front…

was one of those moments that reminds you why you love training.

­ ­

So… Secret Weapon or Potential Disaster?

Short answer?

Both.

Training shoulders twice a week is a growth powerhouse—if done right.

If you wing it, overload, neglect recovery, and eat like a hummingbird…

you doom yourself to inflammation and wasted months.

But if you organize like a true strategist—managing loads, recovery, technique, and nutrition—

I guarantee you’ll see your delts transform into living missiles.

And the best part?

Wider shoulders make you look instantly more massive, even without gaining weight on the scale.

(Old-school bodybuilder secret trick…)

­ ­

Common Mistakes When Trying to Train Shoulders Twice a Week

  • Thinking “more weight” = “more growth.”
    Delts respond better to continuous tension than to strongman-style heaves.
    Moderate loads with super-controlled reps win every time.
  • Forgetting the Rear Deltoids.
    Everyone pumps front delts with military press and front raises…
    And rear delts? Left thirsty like an unfed plant.
    If you ignore them, expect wonky posture and chronic pain.
    Solution: Always include at least one serious rear-delt exercise each week.
  • Training Shoulders Right After Heavy Chest/Back.
    Worst timing ever.
    If you bench 120 kg on Monday and hit shoulders on Tuesday, they’re already fatigued and inflamed.
    Shoulders need “smart days,” not improvised recovery sessions.
    Ideal: Heavy shoulder day away from chest day; light shoulder day amidst easier workouts.­ ­


How Much Volume Do You Really Need?

Roughly, for twice-weekly shoulders:

  • Total weekly volume: 12–20 working sets (split over two days)
  • Intensity: one heavy day (80–85% 1RM) and one medium-light day (60–70% 1RM)
  • Frequency: at least 72 hours between heavy sessions

You don’t have to annihilate yourself every time. You build piece by piece, like a patient craftsman.

­ ­

Ninja Tips to Prevent Shoulder Injuries

  • Dynamic Warm-Up: 10 serious minutes each time (internal/external rotations, band pull-aparts, scapular extensions)
  • Technique Over Load: Record your lifts occasionally. Don’t rely on feel alone.
  • Post-Workout Stretching: 5 real minutes of deep stretches, not Instagram shrug demos.
  • Manage Chest Volume: If you’re already doing 20 chest sets a week, consider dialing back.­ ­


When Not to Train Shoulders Twice a Week

Don’t do it if:

  • You already have shoulder pain or clear postural issues.
  • You’re a beginner with less than one year of serious training.
  • You can’t ensure proper recovery (little sleep, poor diet).
  • You have excessive weekly chest/back volume.

In these cases, build the foundation first—then hit the shoulders hard.

­ ­

And Training Shoulders More Than Twice a Week?

Some might think: “If twice works… then three or four times must be even better, right?”

It’s not that simple.

Training shoulders 3–4 times weekly can work, but only in very specific cases.

When It Makes Sense to Train 3–4 Times

  • Novices with Low Loads: Beginners recover quickly; small frequent doses boost motor learning and mind-muscle link.
  • Micro Technical Sessions: Not 3–4 sessions of 20 sets each, but 10–15 minute mini-workouts with 2–3 focused exercises.
  • Seriously Lagging Delts: If shoulders are chronically behind, you can prioritize them temporarily with higher frequency but managed loads.
  • Extraordinary Recovery Capacity: If you eat and sleep like a bear and bear, and have zero stress, you might handle extra stimuli.

How to Structure a 3–4-Day Shoulder Program

Reduce per-session volume; don’t multiply it.

Example:

  • Day 1 (Heavy): Overhead Press + Face Pull
  • Day 2 (Light): High-rep Lateral Raises
  • Day 4 (Moderate): Arnold Press + Band Pull-Apart
  • Day 6 (Optional Super Light): Bodyweight or Band Rear Delt Flys

Total weekly volume: max 15–20 sets.

Goal: spread stimuli without tissue massacre.

Golden rule: If technique drops or you feel joint discomfort → immediately cut frequency or volume.

­ ­

In Conclusion

Training shoulders twice a week can completely transform your aesthetics, strength, and posture

If you approach it as an athlete, not an amateur.

Those who build shoulders right build a physique that intimidates even in an oversized tee.

Those who underestimate programming end up counting physio bills instead of barbell plates.

So decide who you want to be. I’ve given you the map.

Now it’s your turn to pick up the barbell and write your own journey.

Let’s crush it!

Recommended
Categories
Shoulders STRENGTH BUILDING AND MUSCLE MASS

Can I still do shoulder workouts if my shoulder feels a bit impinged?

If you’ve ever felt that strange twinge in your shoulder during a workout and thought, “Can I really keep training?” you’re not alone.

You might lift weights like a superhero one day.

The next day, just raising a glass makes your shoulder scream for vengeance.

Welcome to the club.

Subacromial impingement isn’t just a fancy term doctors use to sound impressive — it’s real, it’s sneaky, and if you ignore it, it’ll bench you faster than a surprise disqualification.

Today we’ll look at which exercises you should avoid if you’re even feeling a hint of shoulder impingement.

And trust me: I’ve been there too, stubborn as a mule, and I got the full experience — ice packs, painkillers, and sleepless nights included.


What Exactly Is Subacromial Impingement?

Shoulder-Impingement-Syndrome

Imagine your shoulder joint as a super-busy intersection.

Tendons, muscles, bones — all trying to move at once without stepping on each other’s toes.

When the space between the humerus (upper arm bone) and the acromion (that little bony roof over your shoulder) shrinks, the rotator cuff tendons get pinched.

And that’s where impingement comes in.

At first it might just feel odd.

A little pinch.

You might think you slept wrong.

But if you keep ignoring it, it gets worse. Fast.


Other Types of Shoulder Impingement You Should Know About

Athlete-with-shoulder-injury-showing-signs-of-impingement

Okay, subacromial impingement is the most famous (and also the most common, especially among gym-goers).

But it’s not the only way your shoulder can start protesting.

If you really want to understand what can go wrong up there in the joint, here are the other types of impingement you should know:

Internal Impingement

It’s more common in athletes who do overhead sports like baseball, tennis, volleyball, or swimming.

Here the problem isn’t between the acromion and the humerus, but inside the joint itself: the head of the humerus irritates the glenoid labrum and the back of the rotator cuff.

You usually feel pain during extreme external rotation or when loading overhead.

It can be sneaky, because at rest it might not bother you… and then as soon as you throw or push hard, bam!

Coracoid Impingement

Less well known, but it can be very painful.

It occurs when the subscapularis tendon is compressed between the coracoid process (a small bony projection in front of the scapula) and the head of the humerus.

Pain is felt mainly in the front of the shoulder.

It worsens with forward-pressing movements or when you bring your elbows close to your body under load.


Exercises That Worsen Impingement (And Why You Should Steer Clear)

If you think a little discomfort is nothing, beware.

These exercises can turn it into a serious problem before you even notice.

  1. Barbell Military Press (Especially with Heavy Loads)
    Lifting a straight bar overhead when your joint space is already reduced is like trying to fit a pumpkin into a bottle. If you must press overhead, opt for light dumbbells, a neutral grip, or landmine presses.
  2. Upright Rows
    This old-school favorite forces your shoulder into internal rotation as you lift, mercilessly pinching the tendons. Replace it with face pulls or cable rows, and your shoulder will send you a thank-you postcard.
  3. Behind-the-Neck Movements
    Behind-the-neck presses, pull-ups, or lat-machine variations are brutal unless you’re as flexible as a contortionist. Stick to movements in front of your body instead.
  4. Deep Dips
    Deep dips look cool, but they force your shoulder into extreme extension. If your subacromial space is already under stress, you risk inflaming the whole system. If it hurts, reduce depth or switch exercises—no guilt.
  5. Heavy Lateral Raises
    When you load up lateral raises, your traps end up doing the work, not your delts. Meanwhile, your shoulder gets squished like an overstuffed sandwich. Stick to light weights, controlled motion, and stop at shoulder height.

Also Watch Out for Bodyweight Exercises

  • Push-ups that go too deep
  • Handstand push-ups (out-of-control vertical pressing)
  • Poorly executed bear crawls (uneven shoulder loading)

The trick is always controlling the movement.


What Can I Do to Keep Training Without Making It Worse?

Here’s the good news: you can (and should) keep training!

You just need smart modifications that reduce shoulder strain while maintaining progress.

Smart Modifications to Keep You Training:

  • Landmine Presses:
    Press the barbell diagonally overhead with your elbow close to your body—safer than strict overhead pressing.
  • Incline Dumbbell Press (Light):
    Use a 30–45° bench and press without letting your shoulders roll forward.
  • Partial Lateral Raises:
    Lift dumbbells only up to shoulder height, slow and controlled—no momentum.
  • External Band Rotations:
    Keep your elbow tucked in and rotate your forearm outward without shrugging.


The Secret Weapon: Scapular Strength

If your scapulae and upper back muscles are weak, your shoulder starts off at a disadvantage. Strengthening these stabilizers can be a game changer.

Top 3 Scapula-Focused Moves:

  • Face Pulls:
    Pull a rope or band toward your face with elbows high and shoulders down—great for rear delts and scapular control.
  • Scapular Push-ups:
    Do push-ups focusing only on moving your shoulder blades—no elbow bending.
  • Y-Raises:
    Lift your arms into a Y-shape using light weights or a band, keeping the motion smooth and controlled.


Before You Start: How to Warm Up Your Shoulders Like a Pro (5–7 Minutes)

Working out without warming up, especially with an angry shoulder, is like running a marathon with untied shoes.

You need to prepare your joints in an intelligent and targeted way.

Here’s a quick but super-effective routine I recommend always doing before workouts:

  • Thoracic Extension on Foam Roller:
    Lie with the roller under your shoulder blades and gently extend backward to open your chest.
    Objective: Boost thoracic mobility and prep your posture for safe pressing.
  • Band Pull-Aparts:
    Hold a band with arms extended in front of you, then pull outward while keeping your scapulae down and active.
    Objective: activate the upper back immediately
  • Mini-Band External Rotations:
    Place the band on your forearms, elbows tight at your sides, and rotate outward slowly without moving your shoulder.
    Objective: warm up the small but essential rotators
  • Arm Circles:
    Arms extended, start with small circles and gradually increase diameter—30 seconds forward, then 30 seconds backward.
    Objective: improve joint fluidity
  • Scapular Wall Slides:
    Back against the wall, slide your hands and elbows up and down without losing contact.
    Objective: scapular coordination and stability
  • Light Isometric Lateral Raises:
    Lift light dumbbells halfway, hold isometric for 1–2 seconds before lowering.
    Objective: engage the deltoid without stressing it


How to Manage Pain Without Losing Your Mind

Training poorly is the fastest way to end up crying in front of the ice spray.

To protect yourself, you need targeted recovery work as well:

  • Gentle Chest and Lat Stretches:
    Press your arm against a wall or door frame, rotate your torso to stretch your chest gently; for lats, raise your arm overhead and lean sideways.
  • Thoracic Extension on Foam Roller (Recovery Version)
    Same setup as in your warm-up, but now done slowly and passively to relieve tension.
  • Brief Passive Hangs for Decompression:
    Hang from a bar (pronated or neutral grip), relax your shoulders, and let your body weight naturally stretch the joints—no swinging.


When to See a Physical Therapist

  • After 2–3 Weeks with No Improvement
  • Pain That Wakes You at Night
  • Everyday Movements Cause Pain

Don’t hesitate: it’s better to get checked now while you still can, rather than regret months of downtime later.

In these cases, a physical therapist will not only help you reduce pain, but will also teach you specific exercises to safely reactivate your shoulder.

Here are some typical physical therapy exercises:

  1. External Rotations with a Band
    Elbow bent at 90° close to the side, pull the band by rotating your forearm outward.
    Goal: strengthen the external rotators and improve stability.
  2. Scapular Retractions with a Band
    Hold the band in front of your chest, pull by widening your arms while keeping your scapulae down and adducted.
    Goal: activate the middle trapezius and rhomboids, essential for shoulder protection.
  3. Scapular Setting
    Standing or seated, “set” your scapulae by pulling them slightly down and together without tensing your neck.
    Hold for 10–15 seconds.
    Goal: improve neutral position and scapular postural control.
  4. Bodyweight Shoulder Extensions
    Arms by your sides, extend them slightly backward without bending the elbows—small, controlled movement.
    Goal: strengthen the posterior shoulder muscles without excessive load.
  5. Pendulum Exercises
    Supported on a table with one hand, let the other arm swing gently forward and backward, then side to side.
    Goal: mobilize the joint without direct load, reducing stiffness and pain.


A Simple, Safe Program to Keep Training Your Shoulders

You don’t have to stop.

In fact, intelligent movement is your best ally for healing.

Here’s a small weekly plan designed specifically to train your shoulders safely without further inflammation:

  • Monday:
    • Landmine Press 4×8 (Press without crushing the joints)
    • Cable Row 4×10 (Keep scapulae stable)
    • Scapular Push-ups 3×12 (Wake up the deep musculature)
  • Wednesday:
    • Incline Dumbbell Press 3×12 (More natural shoulder angle)
    • Face Pulls 4×15 (Gold-standard work for cuff and posture)
    • Single-Arm Landmine Row 3×10 (Total control throughout the movement)
  • Friday:
    • Light Partial Lateral Raises 3×15 (No jerks, just smooth fluid motion)
    • Band External Rotations 3×20 (Cuff armored, zero stress)
    • Passive Hangs 3×20 seconds (Create space and natural decompression)

Bonus tip: always take at least one day of active recovery between sessions to give your tissues time to heal!


RELATED:》》》Is Heavy Overhead Pressing Actually Hurting My Shoulder Joint Long-Term?


Conclusion

Protecting your shoulder now doesn’t mean training less.

It means training smarter.

With patience, strategy, and respect for your body, you can not only lift heavy again, but do so without the thought of pain lurking around the corner.

Shoulders aren’t a body part to improvise.

They’re your ticket to a future of strength, freedom, and movement without limits.

Take care of them today… and tomorrow you’ll be unstoppable.

Recommended
Categories
Shoulders STRENGTH BUILDING AND MUSCLE MASS

Are Arnold Presses Worth the Hype or Just Overcomplicated Shoulder Work?

Are Arnold Presses truly revolutionary or just unnecessary complications for your shoulders?

Let’s be honest.

If you’ve been around the magical world of Instagram Fitness for a while, you’ve probably seen at least a hundred reels where some tattooed gym bro yells in your face:

“If you’re not doing Arnold Presses, you’re not even training your shoulders, brother!”

Sure.

By now it seems like the Arnold Press is the Holy Grail for getting shoulders as big and round as hot-air balloons.

But let’s pause for a moment:

Is this so-called Arnold Press really a nuclear bomb of an exercise?

Or is it just a fancy way to rotate dumbbells to look cool?

Spoiler: it depends.


What exactly is an Arnold Press?

Imagine your classic shoulder press.

Now imagine it decided to sign up for a contemporary dance class.

That’s the Arnold Press.

You start with the dumbbells in front of your chest, palms facing you (kind of like guarding your lunch sandwich from a hungry coworker).

As you press up, you rotate your wrists outward until you end up in a standard overhead-press position.

Then you lower the weights following that same curved path.

It’s a press plus a rotation all in one.

A more “fluid” movement, sure, but also decidedly more “intense” for the shoulder.

And no, it wasn’t made up on a whim: Arnold Schwarzenegger himself invented it back when dinosaurs still roamed Gold’s Gym Venice Beach.


Why include this rotation?

Great question.

And no, it’s not just for show like an Instagram reel.

The short answer?

More tension. More muscle engagement. More pump.

The initial rotation forces you to recruit the anterior deltoid right away, progressively load the lateral deltoid during the press, and even engage the upper chest for stability.

A much more “complete” workout compared to the usual vertical press.

By extending the movement, you also increase the contraction range:

  • More path traveled = more positive muscle damage = more growth.

On paper, it sounds perfect.

In practice… you feel the fire.

When I first really tried it—with about 70% of the weight I normally use for a shoulder press—

after just eight reps I literally felt my anterior deltoid burning like someone had lit a barbecue on my shoulder.

But it wasn’t just there:

  • I felt constant tension in the lateral deltoid, especially at the top of the press.
  • And a small but annoying fatigue in the upper chest that I don’t normally notice during classic presses.

In short:

It’s not just the muscle you expect that blows up.

The Arnold Press surprises you, making you work those micro-areas we often neglect.

And that mix of burn and control made me realize how different—and how “real”—it is for building a complete shoulder.


The dark side of the Arnold Press

Male-athlete-training-shoulders-with-dumbbells-in-dark-gym

Let’s be clear: this move is NOT for everyone.

Why?

Because the shoulder is already the most unstable joint in the human body.

Adding rotation under heavy load is like asking a tightrope walker to tap-dance on a high wire.

If you don’t have good scapular stability.

If your rotator cuff starts crying at the mere mention of “press.”

If you haven’t yet learned to control movements slowly and mindfully…

The Arnold Press can turn from a “growth tool” into a “one-way ticket to physical therapy.”

Personal experience?

When I used to do it as a newbie and loaded up too much (because, yes, I wanted to look tough), after three weeks my left shoulder was cracking louder than a peanut-festival.


Arnold Press vs Overhead Press: two very different worlds

Alright, let’s clear things up once and for all.

The Arnold Press is often compared to both the classic overhead press (barbell or dumbbells) and the dumbbell shoulder press.

But the comparison is less straightforward than it seems.

When we talk about the Overhead Press, we’re talking the king of pure upper-body strength.

In contrast, the Arnold Press is like a technical ballet requiring grace and control.

Here are the main differences:

  1. Trajectory of Movement
    • Shoulder Press: straight vertical path. You start with the dumbbells at your shoulders, palms facing forward, and push up like a rocket taking off.
    • Arnold Press: curved, rotational path. You begin with the weights close to your chest, palms inward, then rotate as you press upward, opening the shoulders.
  2. Range of Motion
    • Shoulder Press: relatively short, direct range. Starting “open,” elbows out, you push up and down without big changes.
    • Arnold Press: extended range. You start much lower and “closed,” putting the deltoids under tension from the first inch.
  3. Muscles Involved
    • Shoulder Press:
      • Lateral deltoids
      • Anterior deltoids (moderately)
      • Triceps
      • Upper trapezius
    • Arnold Press:
      • Anterior deltoids (heavily activated)
      • Lateral deltoids
      • Clavicular head of the pectoralis (upper chest)
      • Triceps
      • Scapular stabilizers and rhomboids
  4. Type of Muscle Activation
    • Shoulder Press: emphasis on pure vertical pressing. The core and traps do most of the stabilization.
    • Arnold Press: multi-plane activation—you coordinate rotation, pressing, and dynamic stabilization. It’s almost like an implicit mini “core workout.”

In essence:

  • The shoulder press targets strength and stability.
  • The Arnold Press targets mobility, global activation, and pump.


How to start doing Arnold Presses (without wrecking your shoulders)

Want to try the Arnold Press without ending up best friends with a physical therapist?

Here’s a simple, clear, safe game plan to start on the right foot:

  1. Choosing the weights
    • Go lighter than you would for a classic shoulder press.
    • If you normally press 20 kg per hand, start Arnold Presses with 12–14 kg.
    • Remember: better to look humble today than be injured tomorrow.
  2. Initial setup
    • Sit on a bench with a backrest—ideally slightly inclined (80–85°).
    • Feet planted firmly, core braced as if you’re about to take a punch in the gut.
    • Dumbbells in front of your chest, palms facing you.
    • Elbows tucked toward your body, not flapping like chicken wings.
  3. Perfect execution
    • Press the dumbbells up while rotating your wrists outward.
    • Reach the top with arms extended and palms facing forward.
    • Control the movement as if you’re carrying two full glasses without spilling a drop.
    • Lower slowly, reversing the motion.
    • No jerks, no snaps—just pure fluidity.
  4. Breathing (the part everyone gets wrong)
    • Inhale deeply as you lower the weights.
    • Exhale during the upward press.
    • Never hold your breath like you’re diving—you’ll mess up your internal pressure and might even pass out (true story).
  5. Recommended training scheme
    • Sets: 3–4
    • Reps: 8–12
    • Rest: 60–90 seconds between sets
    • When to insert: after heavy lifts (like military press or bench press)
  6. Warning signs: when to stop
    • Sharp, stabbing pain
    • Unusual cracking or instability
    • Inability to control the descent


My mistakes to avoid with the Arnold Press

Learning from my mistakes could save you months of frustration:

  • Loading too much
    It’s not a max lift—always use manageable weights.
  • Skipping the warm-up
    Your shoulders need to be “oiled” before you dive in.
  • Rushing the rotation
    If you speed through the movement, you stress the joint and halve the benefits.
  • Rounding your back
    Keep your core locked and your spine neutral, as if bracing for a Mike Tyson hook.


When and how to include the Arnold Press in your routine

To add the Arnold Press without self-destructing, follow this plan:

  • Use it after your main strength exercise.
    For example, after a military press or bench press.
  • Keep reps between 8 and 12.
    Focus on quality over quantity.
  • Mind-muscle connection.
    You should feel your shoulder working, not just “pushing.”
  • Frequency: once or twice a week max.
    It shouldn’t become the centerpiece of your program.

Treat it like a refined dessert, not an all-you-can-eat buffet.


Valid alternatives if the Arnold Press scares you

If rotating dumbbells under load freaks you out more than a call from an unknown number, try these:

  • Dumbbell overhead press with neutral grip (palms facing each other)
  • Landmine press (stable and shoulder-friendly)
  • Front raise + overhead press combo (two movements, same stimulus with less stress)

Don’t feel any less “badass” choosing these variants—rather, prove you know how to listen to your body.


Which activates the deltoids more (and how)?

  • Shoulder Press
    Primarily hits the lateral deltoid (side of the shoulder) and a bit of the anterior head—more “balanced.”
  • Arnold Press
    Heavily activates the anterior deltoid and keeps the lateral engaged throughout the top phase.
    The constant position change also delivers a greater pump.

How to optimize deltoid activation with the Arnold Press:

  • Slow, controlled movement (no jerks)
  • Full range of motion (start right from the chest, not halfway up)
  • Half-second pause at the top for maximal isometric contraction

In short:

  • Want full, toned front delts? The Arnold Press is your perfect ally.
  • Want Superman-wide shoulders? Balance it with specific lateral-deltoid work.


Are there variants of the Arnold Press?

Oh yes.

The Arnold Press is like a pizza—you can top it with a ton of “toppings.”

Here are some interesting variants:

  1. Seated Arnold Press
    Classic on a bench with back support—maximum stability, zero leg drive.
  2. Standing Arnold Press
    Done standing—engages the core even more, harder to balance and control.
  3. Single-Arm Arnold Press
    One arm at a time—helps correct muscle imbalances.
  4. Resistance Band Arnold Press
    Use a band instead of dumbbells—constant tension, less joint stress.
  5. Tempo Arnold Press
    Perform the up and down phases over 4–5 seconds—burn guaranteed, doubled effectiveness.
  6. Kettlebell Arnold Press
    Swap dumbbells for kettlebells—different center of gravity, even more stabilizer challenge.

Which one to choose?

It depends on your level, your goals, and how much you want to scream from deltoid burn.


How many times per week to include the Arnold Press? And with which shoulder exercises to combine?

Practical tip:

The Arnold Press is intense. It’s not a daily espresso shot.

  • Ideal frequency: 1–2 times per week, depending on your total volume.
  • How to insert:
    • Shoulder day: after your base strength move (military or push press)
    • Upper-body day: after bench or as accessory work

Example killer 3D shoulder combo:

  • Overhead barbell press (base strength) – 3×5
  • Arnold Press (mobility + continuous tension) – 3×10
  • Lateral raises (pure lateral delts) – 3×15
  • Rear delt flyes (rear delts) – 3×15
  • Face pulls (shoulder health) – 3×20

Why combine like this?

To train all three deltoid heads (anterior, lateral, posterior), not just always pushing forward like a workhorse.


Conclusion: Arnold Press yes or no?

If you know what you’re doing:

Yes, absolutely!

It can give you fuller, more aesthetic shoulders and a spectacular pump.

If you still have gaps in technique, stability, or mobility:

No, wait.

Build a solid foundation first.

Training well isn’t just about “pushing heavy.”

In the gym, the winner adapts, not the one who mindlessly copies TikTok workouts.

So, my friend, if you want to rotate those dumbbells like a Venice Beach superstar…

Make sure your shoulders are ready to handle the load.

Then go ahead with the Arnold Press… and savor every single burn.

Recommended
Categories
Shoulders STRENGTH BUILDING AND MUSCLE MASS

How Do I Make My Shoulders Look Wider From the Front, Not Just the Side?

I admit it without shame:

For years I had the classic “Instagram profile shoulders.”

But when I looked at myself from the front… all the size just vanished.

Are you in the same boat?

Relax, we’ve all been there.

The good news is you can fix it.

And you don’t need to become a bodybuilder or live in the gym.


The Role of Front Deltoids in Frontal Width

Why-Front-Delts-Matter-for-Upper-Body-Width

Front deltoids are the muscles sitting right above your chest, at the front of your shoulder.

Visually, they’re the first thing you notice when you look at someone head-on.

So yes: they definitely contribute to the shoulder’s frontal appearance, especially across the upper chest.

But beware: they’re not what makes you look “wide” from the front.

That’s always the job of the lateral deltoid.

The front delts add thickness and volume to the front, helping to create a round, full, three-dimensional shoulder.

That’s why you should train them—but without overdoing it.


Why They Are Often Overtrained (Without You Realizing It)

The problem?

Many people overtrain them unintentionally.

Every time you do:

  • Bench press
  • Incline bench press
  • Parallel-bar dips
  • Push-ups
  • Arnold presses
  • Military presses

your front delts are working, often more than necessary.

That’s why so many have overdeveloped fronts but neglected lateral and rear delts.

This creates a visual imbalance: “closed” shoulders, overly front-heavy, and lacking width.

Plus, dominant front delts can pull your shoulders forward and worsen posture, making you look narrower—even if you’re more muscular!


How to Train the Front Deltoids Strategically

Man-doing-dumbbell-front-raise-for-deltoids

I’m not saying ignore them.

Far from it.

I’m saying train them with strategy.

Here’s how:

  • Avoid heavy vertical presses too frequently, like military presses three times a week.
  • Prioritize multi-joint movements such as push presses or incline bench presses, which recruit multiple muscle groups.
  • If you want to isolate them, use light, technical sets, for example:
    • Single-Dumbbell Front Raise (Hammer Grip)
      Hold one dumbbell in a neutral grip (palm facing inward).
      With your arm straight, lift to eye level.
      Move slowly and under control, avoiding torso swing.
      Focus on pressing with the deltoid, not the traps.
    • Landmine Press (Unilateral or Two-Handed)
      Anchor one end of the barbell in a corner or holder.
      Start with your hand at shoulder height, press the barbell up and slightly forward.
      Control the descent and avoid locking out the elbow at the top.
      Keep your core stable and movement fluid—a great way to protect the shoulder while targeting the front delts.
    • Overhead Plate Raise (Controlled, Slow, No Swing)
      Hold a weight plate horizontally with both hands, arms extended in front.
      Raise the plate overhead, keeping your arms nearly straight, then lower under control.
      Use a moderate load: here, tension and fluidity are key, not raw strength.

A good rule of thumb: one session of front-delt isolation per week is more than enough for most people.

You’re already getting plenty of volume from all the other exercises.


The Real Secret? Visual and Functional Balance

Too much front delt development:

  • Rounded posture
  • Closed-in shoulders

Neglected lateral delts:

  • No real width

Weak rear delts:

  • Zero scapular support
  • Higher injury risk

Conclusion?

Don’t eliminate front delts from your program—integrate them intelligently into a complete plan.

Only then will you get:

  • Shoulders that look wide from the front
  • A three-dimensional shape
  • A posture reminiscent of a Greek statue (or at least a serious athlete)
  • And none of the annoying pain from asymmetric overload


Width Is a Matter of Illusion (and Precision)

Let’s start here:

We’re not talking about getting huge.

We’re talking about presence.

You know that feeling of taking up more space without saying a word?

That V-shape that makes you look more athletic, more proportioned, more… dominant?

And no, doing just one military press every Monday morning won’t get you there.

Because the truth is most people overtrain their front delts and completely forget the lateral delts—which are the ones that make you look wider when you’re facing someone.

Yes, those little devils on the side of your humerus that give you hell during sloppy lateral raises.

But they’re the secret to looking like a beast even when you’re standing still.


The Lateral Deltoid: Your Upper Body’s Hidden Thunder

Imagine wearing invisible shoulder pads sewn right into your flesh.

That’s the effect of a well-developed lateral deltoid.

This muscle primarily abducts the arm, and it is by far the biggest contributor to your visual width.

But it doesn’t grow on pats on the back.

The lateral delt is a diva:

  • It doesn’t like heavy loads
  • It hates being overlooked
  • If you don’t isolate it properly… it goes on strike

You need precision.
Technique.
Time under tension.
And the right dose of madness to endure the burn that feels like you’re orbiting Earth.


Common Mistakes (I’ve Made Them All)

Be honest.

You grabbed two dumbbells, stood in front of the mirror, did lateral raises by shrugging your shoulders, and moved on.

Three sets of 12, then next exercise.

Too bad you trained your traps more than your delts.

I spent months “doing” lateral raises without actually activating the target muscle.

For the lateral delt you need:

  • Slowness
  • Isolation
  • Proper angle

When you feel it burning like you’re lifting a water bottle with a dislocated shoulder…

You know you’re on the right track.


Truly Effective Exercises (Those That Really Work)

Here are my favorites—and trust me, they didn’t make the cut by accident. I tested each one with blood (okay, sweat), tears, and brutal self-critique.

  • Dumbbell Lateral Raises (Done Right)
    Slight forward lean, elbows slightly bent, lift with the elbow, not the hand, stopping just above shoulder height.
  • Cable Lateral Raises
    Constant tension, one shoulder at a time, no cheating—just good pain.
  • Seated Lateral Raises
    No torso swing, no momentum—pure delt work.
  • Lean-Away Lateral Raises (from Low Cable)
    Lean sideways holding the cable column, maximizing stretch and pump for brutal 40-second sets.
  • Wide-Grip Upright Rows
    Avoid narrow grip (which hits traps too much). Wide grip, elbows high, medium-low load.


And from the Front, Does It Work? Yes, But With an Addition

The lateral delts are the heart of width, but if you have:

  • Rounded posture
  • Overactive traps
  • Tight chest

…you’ll never look wide.

You need balance.
You need to open your shoulders.
You need to strengthen your rear delts and postural muscles.

Add these to your weekly routine:

  • Face Pulls
    Use a rope, moderate weight, slow movement, pulling toward your face with wide elbows.
  • Reverse Flyes (Cable or Pec Deck)
    Keep your torso upright, control the movement, squeeze the rear delts.
  • Band Pull-Aparts
    Perfect for pre-workout activation or daily morning resets to improve posture.


Attention: Without Nutrition and Recovery, Nothing Grows

You can do lateral raises every day until doomsday

But if you don’t eat enough protein, don’t sleep, don’t recover,

Your body will cruelly ignore your efforts in the name of homeostasis.

Delts are small, yes.

But they still need fuel.

And if you’re in a calorie deficit (or even maintenance),

Your body says, “We’ve got just enough energy to survive… who cares about shoulder growth?”

So what happens?

Zero growth.

At best, a slow recomposition.

If you want noticeable results—those that make a difference under a tight shirt—

You need a calorie surplus.

Not like an offseason bodybuilder binge, but you must:

  • Eat enough carbs to support volume and muscle recovery (or your glycogen and pump vanish).
  • Aim for at least 1.6–2 g of protein per kg of bodyweight to supply the bricks for new muscle.
  • Get at least 7 real hours of sleep (no Netflix in bed, no TikTok binges).
  • Drink water like you’re crossing the Sahara—hydration affects cell volume, performance, and yes, pump.

Remember, muscle doesn’t grow in the gym.

That’s where you destroy it.

It grows when you rest, eat, and sleep properly.

So if your shoulders aren’t budging, check your plate.

That might be the real blocker.


The Biomechanics of Width: Why Some Look Wider Even Without Being Big

Ever notice certain people look broad-shouldered even if they’re not especially muscular?

It’s not magic. It’s skeletal structure and posture.

People with long clavicles have a natural advantage: the distance between delts is greater, so they look wider even without huge muscles.

But those with shorter clavicles can compensate by:

  • Training muscles that project laterally (lateral delts, long head of the triceps, upper lats).
  • Improving scapular posture, keeping shoulders open, scapulae depressed and slightly retracted.
  • Avoiding keeping elbows glued to the sides when walking—your movement pattern also sends a message of openness or closure.

Yes, the body is a visual system. Every detail counts.


The Role of the Latissimus Dorsi in Frontal Width (Spoiler: It Helps More Than You Think)

Wait, isn’t the lat just for back width?

Partly yes… but also no.

A broad, well-developed back creates a wider base for your shoulders.

When you train lats with wide pull-ups, lat pulldowns, rows with full contraction, you’re building a “cape” that supports your frontal width.

Above all, the lats also improve posture and chest expansion.

The more open you are frontally, the wider your shoulders appear—even if the tape measure doesn’t change.

It’s a biomechanical optical trick. And it works.


Watch Your Mobility: The Silent Enemy of Width

Everyone wants to widen.

Few worry about having the room to widen.

If you have tightness in:

  • Pectoralis minor
  • Front deltoids
  • Anterior shoulder capsule
  • Overactive upper traps

…you risk a closed posture even with muscle mass.

You end up looking narrow.

Include in your warm-up:

  • Thoracic mobility (foam-roller extensions)
  • Active chest stretches (e.g., doorway stretch)
  • Shoulder mobilizations with a stick or band

And every now and then, treat yourself to a session with a manual therapist or skilled physiotherapist.

Joint freedom is a powerful aesthetic multiplier.


Training Shoulders at High Frequency: Yes, But With Intelligence

Shoulders, especially lateral delts, respond well to frequent stimulus:

They’re used in almost every upper-body movement.

Training them two or even three times a week is not only possible—it’s recommended if you manage volume and intensity.

Here’s an effective example plan:

  • Day 1: Technical Volume
    Controlled sets, slow movement, perfect isolation (e.g., cable raises 4×15 slow).
    No need to explode—feel the muscle from start to finish.
  • Day 2: Pump and Burn
    Supersets, drop-sets, high time under tension (e.g., 21s lateral raises or triple drop-sets).
    You can take some sets to technical failure—no cheating, true form only.
  • Day 3: Postural Focus and Activation
    Band pull-aparts, face pulls, posture drills—perfect even on leg day or active rest.
    No failure here, just precision and quality.

Remember: if you feel joint pain instead of muscle fatigue…

You’re doing something wrong.

Technique > weight. Always.

And use failure intelligently, not as a badge of honor.


The Final Aesthetic Touch: Arms Matter Too (But Strategically)

Surprisingly, arms that are too big relative to shoulders can make shoulders look narrower.

Especially if you have dominant biceps and under-developed lateral triceps.

How to fix it?

  • Develop the long head of the triceps with skullcrushers, French presses, and overhead rope pushdowns.
  • Avoid biceps-only pump sessions. Train the back of the arm like a volume artist.
  • Make sure your arms “frame” outward, enhancing the sense of shoulder width rather than sabotaging it.


Conclusion

It’s not about extreme volume.

It’s about shape.

Angles.

Visual presence.

Want to look wider from the front?

Then break the bro-standard workout loop.

Focus on isolation.

Prioritize lateral delts.

Fix your posture.

Balance the rear.

And stay consistent—no visual change happens in two weeks.

But when it does…

Oh, brother, you’ll notice.

And so will everyone around you.

Now go.

Ignite those shoulders.

And conquer that mirror.

Recommended
Categories
Shoulders STRENGTH BUILDING AND MUSCLE MASS

Do Resistance Bands Actually Build Shoulder Mass or Just Improve Stability?

I’ll tell you the truth: when I see someone in the gym pulling and letting go of a resistance band with a serious face, I can’t help but wonder if they’re trying to build muscle…

…or tame an invisible boa constrictor.

For years I viewed resistance bands the way I viewed zucchini at age ten: with suspicion and a hint of disdain.

Then, as often happens, karma showed up.

A little shoulder tweak, a physio armed with a smile and a red band, and that’s when I realized: resistance bands are seriously underrated.

But… can they actually help you build shoulder mass,

or are they just good for “staying upright like Uncle Bob after a few too many beers at Thanksgiving?


The Paradox of the Resistance Band: Colorful but Treacherous

Resistance-Bands-Colorful-But-Surprisingly-Tough

At first glance they look harmless.

Light.

Colorful.

Perfect for Instagram pics or letting your dog play with them.

Yet when you actually use them… they stare you down and whisper, “Today I’m going to wreck your shoulders… in a good way.”

The reason is simple: the resistance of the band changes as you stretch it.

Translation: the more you pull, the more it hates you.

And that variable resistance forces your deltoids to work where they would normally relax.

At the hardest point.

Right where a dumbbell sometimes “dies” and you start to wobble.


A Touch of Science

Studies say some interesting things.

For example, research published in the Journal of Strength and Conditioning Research measured muscle activation during exercises done with bands versus those done with weights.

Result?

Activation levels were similar.

Your muscle basically can’t tell if you’re lifting a 10-kilogram dumbbell or pulling on a green band until your ears start to ring.

So yes, bands can stimulate muscle growth.

But… there’s a but.


The Resistance Band Bodybuilder Myth & Progressive Overload

Can-Resistance-Bands-Really-Build-Muscle

Dreaming of rounded shoulders like bowling balls?

The kind that make every T-shirt look two sizes smaller?

Perfect.

Let’s be real.

With bands alone… you’ll hardly get there.

Or at least, not quickly.

Not because they’re useless—far from it!

But because building serious muscle mass requires progressive overload, and achieving that with bands is trickier than with dumbbells or barbells.

With iron you just add a couple of plates.

With a band?

You have to get creative.

But don’t get me wrong: it’s not impossible.

You can achieve overload with bands—you just have to think outside the box.

Here’s how you can ramp up the stimulus with resistance bands:

  • Choose thicker bands = more resistance
  • Increase stretch by stepping farther apart or pre-tensioning the band
  • Slow down the time under tension (3-second concentric and 3-second eccentric = pure fire)
  • Add isometric pauses at the toughest points of the movement
  • Increase total volume (more sets, more reps, less rest)

In short: yes, you can progress with bands.

But it’s a more technical, less immediate path.

And here’s the key point: there’s room to grow, but it’s not infinite.

At some point you might find yourself doing shoulder presses with three bands at once—one anchored to the door, one under your feet, one tied to your roommate’s ankle…

…and that’s when you realize maybe it’s time to throw some real weights into the mix.

The risk is hitting a plateau.

That moment when the muscle adapts and stops growing.

And you can’t keep cranking up tension forever, because bands have physical limits (and so do you, unless you want to launch yourself like a broken slingshot).


Where Resistance Bands Shine

When-Resistance-Bands-Are-Your-Best-Friend

Here’s where bands become true superheroes:

  • Joint warm-up (hello, rotator cuff)
  • Targeted muscle activation (waking up those rear delts that have been snoozing since ’99)
  • “Joint-friendly” workouts for creaky shoulders
  • Continuous tension in exercises where there’s usually a dead spot

Think lateral raises with a band: at the top, where a dumbbell gets easy, the band squeezes you mercilessly.

Or banded face pulls: one of the most overlooked, magical exercises for building the posterior deltoids and preventing injuries.


The Perfect Mix: Bands + Iron

Out there you’ll hear “only weights!” or “only bodyweight!”

I say: mix it up, brother.

Do the heavy lifting with weights, sure.

But finish the session with a shoulder-burn circuit using bands.

Killer example:
Push press + banded lateral raises + banded face pulls

Repeat 3 ruthless rounds.

Then come back and tell me how you feel.

Bands help you:

  • Refine shape
  • Add volume without joint stress
  • Correct imbalances
  • Pump blood in all the right spots

And if you’re traveling?

Stash a band in your suitcase and you can get a decent workout anywhere—even in a hotel room the size of a trunk.


My Resistance Band Confession

Confession time.

Years ago I injured my shoulder doing an overhead press with all my heart… but zero brain.

From there, a long stint of bands and physical therapy.

I thought my dreams of gladiator shoulders were over.

But…

After endless face pulls, extensions, and band pull-aparts…

I ended up with shoulders that are rounder, more responsive, and healthier.

Now I always use them.

Not as the star of the show, but as those supporting characters that save the movie.


Exercise Examples for Shoulders with Bands

All resistance-band shoulder exercises, explained so you can do them tomorrow morning:

  1. Banded Overhead Press
    Feet on the band, handles at shoulder height, palms forward.
    Press overhead until arms are fully extended.
    Control the descent.
    Focus: anterior deltoids & stabilization
  2. Lateral Raises
    Feet on the band, handles in hand.
    Slightly bend arms, lift laterally to shoulder height.
    Brief pause, then return slowly.
    Focus: lateral deltoids
  3. Front Raises
    Same setup, but lift in front of you, not to the side.
    Don’t go above eye level.
    Focus: anterior deltoids
  4. Banded Face Pulls
    Anchor band to a rack or door.
    Pull to your face with wide elbows.
    Squeeze shoulder blades.
    Focus: posterior deltoids & cuff
  5. Rear Delt Fly
    Hold the band straight in front of you at shoulder height, arms extended.
    Pull the band apart sideways into a “T” position, squeezing your shoulder blades together.
    Control the return to start.
    Focus: posterior deltoids
  6. Shoulder External Rotation
    Perfect for the cuff.
    Anchor the band at waist height.
    Stand sideways to the anchor, elbow bent at 90 degrees, tucked at your side.
    Rotate your forearm outward against the band’s resistance.
    Focus: rotator cuff muscles & injury prevention
  7. Shoulder Isometric Hold
    Stand on the band, hold the handles.
    Lift your arms laterally to shoulder height and hold the position under tension.
    Keep the core tight and resist movement.
    Focus: endurance & control


Can You Train the Whole Body with Bands?

Oh, absolutely.

And I’ll tell you more: you can have a brutal full-body session with just a band.

Legs:

  • Banded squats
  • Lunges
  • Banded hip thrusts
  • Side walks (ninja-duck style)
  • Romanian deadlifts (band under feet)

Core:

  • Russian twists (band anchored)
  • Anti-rotation (Pallof press style)
  • Crunches with resistance
  • Leg raises with band at feet

Chest & Back:

  • Banded chest press
  • Chest fly
  • Horizontal rows
  • High-anchor lat pull-downs

Arms:

  • Bicep curls
  • Overhead tricep extensions
  • Tricep kickbacks

In short, you can do it all.

The only difference is you must pay even more attention to control, form, and progression.

But if you do it right… sweat is guaranteed.


RELATED:》》》Elastic Band Workouts: 13 Progressive Routines for Beginners to Pros + Advantages


What Results Are Truly Achievable?

Let’s be honest.

If you’re a beginner, bands are magic.

They give you:

  • Motor control
  • Functional strength
  • Early muscle gains
  • Stability
  • All with lower injury risk

For intermediates?

They’re an excellent tool for extra volume, finishers, deload days, and focused work.

Advanced lifters?

That’s where the story gets thinner.

Bands don’t replace the big lifts but complement them.

An experienced athlete can use them for:

  • Targeted activation (smart warm-ups)
  • Final pumps & refinements
  • Alternative deload workouts
  • Muscle maintenance on the road or during rehab

In summary: yes, you can see visible results.

But context matters.

They’re not everything, but they’re an essential slice of the muscle-building buffet.


The Final Verdict

Yes.

Resistance bands are absolutely necessary.

No, they won’t build IFBB-level shoulders by themselves.

But they’re crucial for laying solid foundations, stabilizing joints, and refining details that weights often neglect.

They’re versatile, affordable, easy to use anywhere, and reward those who respect them.

If you want shoulders that are strong, mobile, visually impressive, and functionally powerful…

…don’t ignore resistance bands.

They’re not the main course.

But they’re the seasoning that makes the meal memorable.

So stop underrating them.

Add them to your arsenal.

And get your shoulders ready.

Because the band pump?

You’ll never forget it again.

Recommended
Categories
Shoulders STRENGTH BUILDING AND MUSCLE MASS

Why Does My Shoulder Strength Drop So Fast When I Miss a Few Workouts?

Why does my shoulder strength drop so quickly when I miss a workout?

Have you ever experienced this?

You’re training your shoulders like a champ.

Your military press is soaring.

Your rear delts are finally waving back at you in the mirror.

You feel powerful.

Coordinated.

Unstoppable.

Then it happens.

A fever.

A business trip.

A week of vacation spent on cocktails and buffet breakfasts.

You come back to the gym all fired up, pick up the barbell and… nothing.

It doesn’t work.

Your press feels weak, your balance is gone, and those 44-pound plates you were lifting with one hand now feel like concrete.

“How is it possible I lost strength so fast?”

I’ll tell you why.

Get ready, because shoulders are real divas.


Shoulders are drama queens: delicate yet indispensable

Shoulders-Drama-Queens-Of-The-Upper-Body

The shoulder complex—and yes, it really is complex—is a precision machine.

We’ve got the anterior, lateral, and posterior deltoids, plus the entire rotator cuff crew.

These muscles handle movements in almost every direction.

  • Pressing overhead
  • Pulling from the ground
  • Lifting to the side
  • Rotating
  • Stabilizing

But the more complex a system, the more fragile it is.

And when you don’t stimulate it for a while, it starts to forget how it worked.

You don’t just lose strength.

You lose coordination.

You lose mind-muscle connection.

You lose confidence.


Neuro-efficiency: the brain’s equivalent of Wi-Fi

Neuro-Efficiency-How-Your-Brain-Saves-Energy

When we talk about strength, it’s not just about the muscles.

It’s about the signal that travels from the brain to the muscle fiber.

By training, you strengthen that connection.

Your shoulder learns when to activate, how much force to apply, how to stabilize.

But if you skip training for a week (or two)…

That connection weakens.

It’s like leaving your router unplugged for days: when you turn it back on, it’s slow at first.

Same thing with your neuromuscular system.

You haven’t gotten weaker.

You’ve just temporarily forgotten how to activate the strength you already have.


Small muscles, rapid drops

Deltoids, as impressive as they look when well-developed, are not large muscles.

And smaller muscles, alas, lose strength faster when left unstimulated.

Think about the quads: you can skip a week of squats and still come back lifting well.

But the deltoids?

It takes very little for them to “switch off.”

It’s a bit like those cacti that seem tough, but if you never rotate them toward the sun, they still wilt.


Muscle memory exists, but it needs fuel

The good news is there is muscle memory.

When you resume training, your muscles bounce back much faster than when you built them from scratch.

But it needs stimulus.

It needs volume.

It needs you to get back into the groove.

You can’t expect your overhead press to return to max after 10 days of Netflix and hot chocolate.


Inflammation plays hide-and-seek with strength

When you take a break from training—maybe due to stress or illness—it’s easy to accumulate systemic inflammation.

And that sneaks right into the most mobile joints.

Guess which joint is the most mobile (and unstable) in the human body?

Right: the shoulder.

Inflammation reduces movement fluidity, slows neuromuscular communication, and makes every gesture more fatiguing.

You might not notice at first, but if your press feels weak, inflammation could be the culprit.


The brain is the real muscle that rusts

Do you know the most fragile part of all this?

The mind.

When you return after a break, there’s often a little voice whispering:

“Watch your shoulder… What if you hurt yourself?”

“Don’t push too hard; you’re not who you were before…”

This tiny doubt slows muscle activation.

Your body protects itself.

You don’t feel safe, so you don’t push.

And strength seems gone, but it’s actually being held back.


So… what do you do?

Simple: come back smart.

Heroics aren’t needed.

Consistency is.

Here’s what really works:

  • Start with moderate loads: your body needs to “remember,” not be traumatized.
  • Gradually increase volume: light sets, but plenty of well-executed reps.
  • Prioritize warm-up: scapulohumeral mobility, rotator cuff activation, band work… all those boring things that save your joints.
  • Engage the entire chain: involve traps, rhomboids, core. The shoulder is part of an ecosystem, not an island.
  • Keep workouts short but frequent: two or three 20-minute shoulder sessions per week work better than a single “shoulder day” every so often.


The role of postural balance

Often the “lost” strength isn’t just muscular, but postural.

When we train regularly, we maintain good alignment between scapulae, spine, and shoulders.

But with inactivity, the scapulae “forget” how to stay in place.

Result?

When you lift again, your biomechanics are off.

The lift isn’t as efficient.

And it feels like you’re weaker, when really you’re pushing off-axis.

So yes: training shoulders also means paying attention to how the rest of your body moves.


In general, if I don’t train for 10 days… how many kilos of strength do I lose?

Okay, million-squat question: do you really lose all that strength in so little time?

The answer: it depends.

But here’s the deal.

If you’ve been training consistently for months (or years), a 10-day break won’t erase your gains.

However… you might notice a 5–10% drop in perceived load.

This means:

  • If you were military pressing 40 kg, it might feel like 44–45 kg.
  • If you used 20 kg dumbbells for lateral raises, they might feel “sinfully heavy” after the break.

Keep in mind: it’s not just muscle loss.

It’s loss of:

  • Coordination
  • Neuromuscular activation
  • Joint elasticity
  • Mental confidence in the movement

So the kilos themselves don’t vanish in 10 days.

They just feel heavier because you’re a bit out of groove.

The good news?

It takes just 2–3 targeted workouts to almost fully bounce back.

The body is lazy, yes.

But also incredibly efficient at remembering.


Restarting with the three heads of the deltoid: why it’s crucial (and how to do it)

Skipping a few workouts might seem harmless.

But when you come back, the deltoid doesn’t care about “a bit of everything”:

It demands surgical precision.

The deltoid has three distinct heads, each with different functions:

  • Anterior deltoid – for front raises (forward and overhead presses)
  • Lateral deltoid – for side raises of the arm
  • Posterior deltoid – the most ignored, yet key for stability and posture

Why train all three separately?

If you neglect one, the others get overloaded.

Result? Pain, muscle imbalance, and stalled strength.

How to reactivate them after a break:

Deltoid anterior

  • Exercise: Arnold press
  • Execution: seated, rotate the dumbbells from “palms facing you” to overhead as you twist your wrists
  • 3 sets of 10–12 reps

Deltoid lateral

  • Exercise: Dumbbell or cable lateral raises
  • Execution: arms slightly bent, lift to shoulder height, no higher
  • 3 sets of 12–15 slow, controlled reps

Deltoid posterior

  • Exercise: Reverse fly on an incline bench or with cables
  • Execution: torso inclined, open your arms behind you as if hugging a large barrel
  • 3 sets of 12 reps emphasizing contraction

Pro tip:

Do it all in a circuit the first week.

More volume, less load, maximum stimulation.

That way you reboot without traumatizing.


What happens to the body if you stop training for a few weeks? (Pros and cons)

Stopping exercise isn’t a disaster.

But it has effects—both good and bad.

Negative side (the ones you already suspect)

  • Perceived strength loss: as mentioned, you don’t lose actual kilos, but the weights feel heavier.
  • Reduced insulin sensitivity: less training = higher risk of fat gain if diet stays the same.
  • Joint stiffness: you feel “stiff,” especially in shoulders, hips, and back.
  • Less muscle pump: tone drops a bit; you feel less “full.”
  • Decreased aerobic capacity: even two weeks without cardio lowers VO₂max.
  • Increased stress: exercise regulates mood, so fewer endorphins = more mood swings.

Positive side (yes, there are some!)

  • Systemic supercompensation: your body regenerates; joints deflate, muscles truly recover.
  • Mental reset: a break helps you find motivation, creativity, and drive to improve.
  • Fewer overuse injuries: sometimes you must rest, and that break can save you from bigger issues.
  • Rediscovery of balance: too much training can become an obsession. Pausing reminds you you do it for well-being, not punishment.

So what to do if you’re off for 1–3 weeks?

Don’t panic.

Keep your body active with mobility work and walks.

When you return, do a “reset week” focusing on technique and low volume.

Then… start roaring again, but intelligently.


RELATED》》》How Do I Make My Shoulders Look Wider From the Front, Not Just the Side?


Conclusion

Sure, it can be frustrating to feel weaker after just a week off.

But the truth?

Your strength hasn’t gone anywhere.

It’s just on vacation.

And with a bit of stimulus, a bit of patience, and the usual dose of sweat…

It comes back.

Actually, it comes back even stronger, because every break forces you to restart with more awareness.

Now that you know…

Pick up that barbell again.

Take it easy, but do it.

Your shoulders are already waiting for you.

Recommended
Categories
Shoulders STRENGTH BUILDING AND MUSCLE MASS

Is Heavy Overhead Pressing Actually Hurting My Shoulder Joint Long-Term?

Let’s ask ourselves some uncomfortable questions.

Have you ever felt that odd twinge in your shoulder after a heavy military press?

That sneaky pinch that starts deep, then maybe goes away, only to come back when you try to wash your hair or throw a ball?

Welcome to the club.

I’ve been there myself, both feet in.

At first, it was just an annoyance.

Then one day I was doing an overhead press like I was blessing the planet with my barbell… and BAM.

Something wasn’t right.


The (Unhealthy) Allure of the Overhead Press

Why-The-Overhead-Press-Is-A-Double-Edged-Sword

Let’s be honest: the overhead press is sexy.

It’s one of those exercises that makes you feel powerful.

Alpha male.

Testosterone surging just at the thought of lifting that barbell overhead.

For many, it’s the true measure of “real” strength.

But it’s also potentially one of the fastest ways to wreck your shoulders long‑term.

And no, I’m not just talking about people with chronic pain.

I’m talking about those who think they’re doing everything right… until it’s too late.


What’s Really Happening Inside That Shoulder?

A quick anatomy lesson—don’t panic.

The shoulder isn’t built for stability.

It’s built for movement.

It’s like a race‑drone: agile, fast, with insane maneuverability…

But if you’re off by just a few degrees, BOOM: you crash into a wall.

Its beauty is also its weakness.

It’s the most mobile joint in the human body—and therefore the most vulnerable.

Every time you lift a weight overhead, something crazy happens:

  • Team Effort: A squad of muscles, tendons, and bones must work in perfect sync to keep the humeral head from popping out like a champagne cork.
  • If Something Gets Stuck:
    • the movement shifts
    • the rotator cuff strains
    • tendons get pinched
    • and that insidious pain starts—something you ignore at first… but that never really leaves.

It’s like precision machinery: if one gear is off, the whole system grinds to a halt.

You might think, “It’s just pressing a barbell…”

But inside your shoulder, there’s micro‑mechanics worthy of a Swiss watch.

If one component wears out, sticks, or misaligns…

It’s not a question of if it’ll hurt.

It’s only a question of when.


The Shoulder Complex: Who Does What?

How-The-Shoulder-Complex-Really-Works

The shoulder is a precision machine—an entire biomechanical ecosystem where every part has a specific job.

Let’s break it down practically and clearly:

Glenohumeral Joint

  • Function: Enables most shoulder movements—lifting, rotating, extending, etc.
  • Problem: Highly mobile but inherently unstable; most injuries (dislocations, impingements) happen here.

Rotator Cuff

  • Function: Four muscles (supraspinatus, infraspinatus, teres minor, subscapularis) actively stabilize the humeral head in the socket during movement—like tent cords keeping everything aligned.
  • Problem: When they weaken or inflame, the shoulder becomes unstable and more pain‑prone.

Acromion

  • Function: Bony roof of the joint and attachment point for the deltoid.
  • Problem: A hooked or prominent acromion can pinch the tendons beneath it during overhead presses.

Clavicle

  • Function: Bridge between arm and torso, transmitting force and keeping the shoulder suspended.
  • Problem: Poor movement or stiffness alters the mechanics of the entire complex.

Scapula

  • Function: The hidden queen—flat, wing‑shaped bone guiding rotation, elevation, and tilt.
  • Problem: A lazy or locked scapula makes every overhead movement inefficient and dangerous.

In summary?

Every time you lift a weight overhead, you set in motion a super complex system where:

  • A rotating bone (humerus)
  • A mobile platform (scapula)
  • A rigid base (clavicle)
  • A bony roof (acromion)
  • And a team of deep muscles (rotator cuff) that hold it all together

If just one of them messes up timing or position… goodbye mobility, hello pain.

And all these players have to work in perfect harmony.

Too bad that when you throw 70, 80, 100 kg into a vertical press, a sour note often pops up.

We’re talking about:

  • Impingement (tendons pinching under the acromion)
  • Inflammation (bursa, tendons, cuff)
  • Microlesions that become chronic
  • Instability due to imbalances between scapulae and deltoids


The Real Culprits? Spoiler: It’s Not Just the Weight

Sure, lifting heavy can be an issue.

But weight itself isn’t the enemy.

The real culprits are:

  • Limited shoulder and thoracic mobility
  • Office‑gremlin posture
  • A core as weak as pudding
  • Lazy scapulae that don’t rotate properly
  • Ego chasing a PR every week

Combine all that with forced vertical pressing…

One bad rep and your shoulder will send you the bill.


Shoulder‑Friendly Overhead Press Alternatives

Luckily, there are smarter ways to press.

You don’t have to ditch overhead pressing—but you can modulate it intelligently.

Here are a few gems:

  • Landmine Press
    • Execution: Press one end of the barbell diagonally upward with one or both hands, starting from the chest.
    • Benefits: Diagonal path = less joint stress; ideal for limited mobility or shoulder discomfort; teaches control and functional pressing.
  • Arnold Press
    • Execution: Start with palms facing your face and elbows forward; rotate wrists during the press until palms face forward overhead.
    • Benefits: Activates all deltoid heads; improves movement control; increases rotational and pressing range.
  • Push Press (With Control)
    • Execution: Bar on shoulders, slight knee bend, use leg drive to help press the weight overhead.
    • Benefits: Trains power and lower‑to‑upper body coordination; great if you have solid core and technique; lets you move more load with control.
  • Single‑Arm Dumbbell Press
    • Execution: Press one dumbbell at a time overhead, keeping torso stable and core braced.
    • Benefits: Improves side‑to‑side balance; encourages a natural shoulder path; reduces compensations.
  • Z Press
    • Execution: Seated on the floor with legs extended, press barbell or dumbbells overhead without lumbar support.
    • Benefits: Maximizes core and deltoid isolation; zero cheating—if you lack control, nothing moves; enhances posture, stability, and pure pressing strength.


Prehab Training: Your Shoulder’s Seat Belt

Want the real game‑changer?

Work before you work.

I’m talking “prehab”—preventive training.

Here’s what saved my overhead press:

  • Band Pull‑Aparts

    • Execution: Pull an elastic band in front of your chest with arms straight, squeezing the shoulder blades.
    • Benefits: Activates rhomboids and rear deltoids; improves posture and scapular control.
  • Face Pulls

    • Execution: With cable or band at face height, pull toward your forehead with elbows high.
    • Benefits: Strengthens the rotator cuff; prevents impingement; boosts stability.
  • Wall Slides + Shoulder CARs

    • Wall Slides: Back and arms against the wall, slide arms up while maintaining contact.
    • Shoulder CARs: Slow, controlled full circles with the arm extended overhead.
    • Benefits: Enhance scapular mobility and coordination in overhead motion.
  • Thoracic Foam Rolling (Basic)

    • Execution: Lie down on a foam roller placed across your upper back.
      Roll slowly up and down along your spine, focusing on unlocking stuck areas.
      Benefits: Enhances thoracic extension, reduces stiffness, and preps your upper body for vertical movement.
  • Pectoral & Lat Stretching

    • Pecs: Place arm at 90° against a wall and rotate your torso away.
    • Lats: Hands on a support, push your chest down.
    • Benefits: Releases anterior and lateral shoulder tension; expands overhead range.

Do these religiously—like brushing your teeth.

Skip them, and you’ll end up with a shoulder on ice instead of fresh breath.


Shoulders Aren’t Trained Only by Pressing

Surprise: many painful shoulders stem from poor pulling mechanics.

If your anterior delts are overactive, pecs tight, and back lazy…

Every overhead press becomes a time bomb.

You need balance:

  • Heavy Rows & Cleans
    • Execution: Barbell or dumbbells, pull toward your navel with a straight back.
    • Benefits: Strengthens lats and rhomboids; balances pressing; stabilizes scapulae.
  • Scapular Pull‑Ups
    • Execution: From a hang, lift and lower only the scapulae without bending elbows.
    • Benefits: Improves scapular control and posterior activation.
  • Reverse Flyes (Focused)
    • Execution: Hinge forward, arms open in a “T” with light dumbbells, slow and controlled.
    • Benefits: Activates rear delts; protects the rotator cuff.
  • Face Pull Variations
    • Execution: Pull toward the face with ropes or bands, varying angles and grips.
    • Benefits: Works trapezius, rotator cuff, and upper back—true anti‑shoulder‑pain workhorse.
  • External Rotations with Band
    • Execution: Elbow at 90° by your side, rotate forearm outward against a light band.
    • Benefits: Fortifies tiny rotator muscles; stabilizes the joint.


When Is Heavy Overhead Pressing Worth It?

It makes sense to grind away at heavy overhead presses if:

  • You’re a strongman, CrossFitter, or powerlifter with competitions ahead
  • You have panther‑like mobility and flawless technique
  • You’re pain‑free and know how to manage yourself

Otherwise…

Maybe ask yourself, “Why am I pressing so hard vertically?”

True strength is also knowing when you don’t need to prove it.


Is the Bench Press Also a Long‑Term Shoulder Saboteur?

Is-Bench-Press-Slowly-Destroying-Your-Shoulders

Oh yes.

The bench press.

The undisputed queen of gyms worldwide.

The exercise that defines a generation’s manliness.

But it too… can subtly sabotage your poor shoulders.

The flat bench looks innocent but is a wolf in sheep’s clothing.

Especially if done with:

  • Elbows Flared Too Wide
  • Circus‑Level Lumbar Arch
  • Dominant Pecs & Lazy Scapulae
  • Zero Eccentric Control

The problem?

Bench pressing strengthens certain muscles… and ignores others.

If your gym life is bench‑bench‑bench, you’re likely creating an anterior imbalance that pulls the shoulder out of alignment.

Then you try an overhead press…

BOOM.

Your rotator cuff gets stretched like a failed pizza dough.

So yes, benching can co‑blame the disaster.

It’s not evil in itself…

But it requires balance.

Think of your shoulder as a team:

If you train only the striker (chest) and ignore the defense (scapulae, cuff, rhomboids)…

Eventually you’ll concede a goal.


RELATED:》》》Should I Train Shoulders Right After Chest Day or Is That Killing My Gains?


Are There Any Benefits to the Overhead Press?

Absolutely.

Let’s not make it the scapegoat of joint pain.

When done well, the overhead press is one of the most complete upper‑body exercises.

Here’s what it offers:

  • Strong, Symmetrical Deltoids, especially the front and lateral heads
  • Active Trapezius, key stabilizers for robust shoulders
  • A Rock‑Solid Core, because you must resist the weight’s torque overhead
  • Scapulohumeral Coordination, learning physiological shoulder movement
  • Improved Posture, especially when paired with unilateral pressing

And let’s be honest: there’s something epic about pressing a barbell overhead.

It’s a gesture that screams power.

But the real benefit?

It forces you to respect your body.

You can’t cheat.

If your mobility or strength gaps exist, it tells you immediately.

In that sense, the overhead press is almost diagnostic.

It reveals where you excel… and where you’re a walking disaster.


Are there mobility exercises that help with the Overhead Press?

Many think improving the press means just… pressing more.

Wrong.

Sometimes it’s like trying to push a locked door.

You need specific mobility work, or every rep becomes forced.

Key Areas to Mobilize:

  • Shoulders (especially external rotation)
  • Thoracic Spine
  • Scapulae (rotation and control)
  • Lats and Triceps

Useful Mobility Drills:

  • Wall Angels
    • Execution: Back, elbows, and hands against the wall; slide arms up without losing contact.
    • Benefits: Enhances scapular mobility and external rotation.
  • Thoracic Rotations on Foam Roller (Advanced)
    • Execution: After basic rolling, stay positioned over the roller and slowly rotate your torso side to side.
      Think small, controlled movements—not jerking.
      Benefits: Boosts rotational mobility in the upper spine, making overhead lifts smoother and safer.
  • Lat Stretch with Stick or Rings
    • Execution: Grip a stick or ring overhead, hinge forward, and push your chest down.
    • Benefits: Stretches tight lats; opens the overhead path.
  • Shoulder CARs (Controlled Articular Rotations)
    • Execution: Arm extended, make a slow, full‑circle rotation overhead.
    • Benefits: Boosts control and movement quality.
  • 90/90 Hip + External Rotation with Stick
    • Execution: Sit with one leg bent at 90°. With the arm also at 90°, use a stick to guide external rotation.
    • Benefits: Ideal for shoulders stuck in external rotation.

When You Truly Need Them:

  • You can’t keep arms straight overhead without arching your back
  • Elbows flare and the bar drifts forward instead of up
  • You feel lumbar tension during the press
  • Scapulae don’t lift or they pop
  • You end sessions feeling stiff rather than strong

In these cases, every minute on mobility is a win for joint longevity.

Mobility isn’t random stretching—it’s movement strategy and construction.

And those who invest in mobility today… press harder (and better) tomorrow.


RELATED:》》》What’s Causing My Shoulder Press to Plateau Even After Increasing Volume and Calories?


Conclusion

Overhead presses aren’t the problem.

The problem is doing them without preparation, technique, or patience.

Treating them like a simple dumbbell curl is a common mistake.

They’re not a curl.

If you lack mobility, control, or strength where it matters,

your shoulders will eventually send you warnings

and if you ignore them, real pain arrives.

The true athlete isn’t the one who lifts the most.

It’s the one who stays standing the longest.

And honestly, I’d rather lift “properly” for another twenty years…

than look cool today and spend tomorrow icing my shoulder.

Recommended
Categories
Shoulders STRENGTH BUILDING AND MUSCLE MASS

Why Aren’t My Shoulders Getting Bigger Even Though They’re Always Sore?

Okay, let’s be clear.

Shoulders are an enigma.

You train them hard, consistently, with all the willpower in the world.

Each week you whip them with dumbbells, barbells, bands, cables, machines, and even suspicious movements that not even Google knows.

You wake up the next day and can’t even comb your hair.

Yet… nothing.

Nada.

No Marvel‑comic volume.

Just pain.

And so you wonder:

But if they hurt this much… why don’t they grow?

It’s frustrating, I know.

But don’t worry, there are much simpler explanations (and solutions) than you think.

Let’s explore them together.


Shoulders are always involved, but never stars

Shoulders-Work-Hard-But-Are-Neglected

This is the paradox.

Shoulders participate in everything: bench press, rows, pull‑ups, push press…

But they rarely get direct attention.

And when you train them, they’re already tired.

It’s like asking someone to run a marathon… after doing 100 squats.

Maybe it’s time to give shoulders their own day in the spotlight.

A whole day for them.

Done right, with purpose.


Pain isn’t always a sign of growth (in fact, sometimes it’s a warning)

I know, it’s counterintuitive.

You’ve spent your whole life believing “no pain, no gain.”

But the truth?

Delayed onset muscle soreness (DOMS) isn’t directly linked to muscle growth.

Pain is more often a sign of tissue damage, not effective stimulus.

You can beat a muscle to death and get… only inflammation.

It’s like burning a field believing it’ll grow faster.

No, friend. You’re just destroying it.


You train shoulders as if they were one… but they are three

Here’s the most common mistake.

You treat the shoulder as a single muscle, one unified entity.

Spoiler: it’s not.

Shoulders are a messy trio of deltoids: anterior, lateral, and posterior.

Three siblings with different personalities.

Anterior deltoid

The golden child: everyone uses it (even by accident) during bench press, push movements, and even during post‑workout frustration shrugs.

Lateral deltoid

The one that gives you width and presence. But if you don’t train it specifically, it wastes away in loneliness.

Posterior deltoid

A gym myth. Rarely seen in the wild. Often forgotten, always underdeveloped.

If you’re not giving love to all three, you’ve already lost from the start.


You’re confusing work with effective stimulus

Doing seven different exercises in one shoulder workout doesn’t mean you’re stimulating the muscles well.

Maybe you’re just wearing them out.

They feel trained, but really they’re stressed, inefficient, and drained.

Volume must be managed, not simply increased.

Too much volume without recovery = chronic inflammation, strength loss, stagnation.

Effective stimulus comes from:

  • The right choice of exercises
  • Impeccable execution
  • Load progression
  • Active recovery

Not from random TikTok circuits.


The Most Effective Way to Train Shoulders:


Recovery is the real training (but no one wants to admit it)

Brutal truth: muscles grow when you’re not training.

During the workout you break them.

During recovery you rebuild them.

And if you don’t sleep, don’t eat enough, and don’t allow enough time…

Guess what?

You’re just accruing debt.

And sooner or later, your body sends the bill.

At best you don’t grow.

At worst, you get injured.


Traps steal the show from your shoulders (and pain is useless if they feel it)

Yes, those cursed traps.

Your traps are like nosy coworkers who want to do everything—even when nobody asked.

Every time you lift dumbbells for a lateral raise hoping to blast the side delts…

Guess who jumps in first?

The traps.

Always them.

And the kicker?

They give you that burn. They make you think “it’s working.”

You wake up with that twinge between neck and shoulder and think:

“Wow, I destroyed my delts!”

But no.

You just fatigued the wrong group.

It’s pain, yes… but useless.

Not growth. Not progress.

Just another muscular distraction.

To prevent this identity theft, control every single degree of movement.

No swings, no arms flailing like windmills.

Keep a slight bend, lift with control, and above all: pull with your deltoid, not your ears.

Because every time your traps take over, the deltoid sits on the bench and watches.


Technical execution: continuous tension, consistent growth

(Don’t confuse pain with quality work)

Listen with love and a bit of frustration from a former culprit:

If you do lateral raises like you’re tossing frisbees to seagulls…

You’re training your ego, not your delts.

The lateral deltoid isn’t a fan of explosive movements.

It wants continuous tension. It wants control. It wants precision.

The famous “two C’s” of real growth.

And no, it won’t give you the instant circus‑pump satisfaction.

Often you’ll feel less pain. But what you feel… is precisely where you should feel it.

That small burn right in the middle of the arm, just below the shoulder.

If it burns there, you’re doing it right.

If it burns in the traps or around the scapula, you’re making a mess.

Continuous tension keeps the muscle under stress through the entire rep.

And you know what happens with this approach?

Not only do you feel less soreness later…

But you finally start seeing shape change.

From “normal shoulders” to “what do you do in the gym?”

So ditch the mirror for ego‑boosting.

Use it to check execution.

Because that’s where the real difference is made.


Strength is the foundation: return to the press

Yes, the military press.

That old‑school, tough, unfashionable but insanely effective move.

If your overhead press hasn’t improved in months…

Chances are your shoulders aren’t growing either.

You can do all the lateral raises you want, but if you’re not getting stronger on a heavy, clean press…

You’re just polishing a car without an engine.


Checklist for truly growing deltoids

  • Prioritize lateral and posterior deltoids
  • Check your execution: slow, precise, mindful
  • Don’t sacrifice technique for ego
  • Alternate isolation exercises with strength movements
  • Schedule dedicated shoulder days
  • Take care of nutrition, sleep, and recovery
  • Track loads and improvements


How to tell if your shoulders are really growing

The scale won’t tell you.

Photos… yes. But you need patience.

The real indicator? Your clothes.

When your shirts start pulling at the shoulder seams.

When you hear that subtle “pop” in the stitching as you slip into an old tee, that’s a good sign.

And maybe someone will drop a comment like:

“Oh, you’re in shape, huh?”

That’s when you know it’s not all in your head.

It’s not just post‑workout pump. That’s as fleeting as an Instagram story.

True growth shows over time, with:

  • Progress photos (same angle, same lighting, every 4–6 weeks)
  • Improvements in loads and technique
  • Increased arm/shoulder circumference
  • And above all, that feeling of “density” when you touch them. Like there’s real stuff under there.


Small shoulder muscles: what they are and how to train them

Beyond the three deltoid heads, there are small but crucial muscles:

  • Supraspinatus
  • Infraspinatus
  • Teres minor
  • Subscapularis

These are part of the rotator cuff. Small, but vital for joint health and stability during heavy moves.

How to train them?

Not with explosive movements or insane weights.

They need control, technique, and moderate loads.

Don’t underestimate them: if these muscles are weak, injury risk goes up.

And if you hurt a shoulder… progress grinds to a halt.


Practical Exercises to Train the Small Shoulder Muscles (Rotator Cuff)
  • External rotations with band or dumbbell
    (rotating the arm outward while keeping the elbow close to the side)
  • Cuban press
    (external rotation plus an overhead press using very light weights)
  • Face pulls with rope
    (pulling the rope toward the face, focusing on external rotation)
  • Sidelying external rotations
    (external rotations performed lying on your side, perfect for isolation)
  • Isometric holds in external rotation
    (holding the arm externally rotated against resistance for 20–30 seconds)


What the shoulder really is, recovery speed, and training frequency

The shoulder is the body’s most mobile joint.

High freedom of movement, but low intrinsic stability.

The deltoid muscle is a mix of slow‑twitch (type I) and fast‑twitch (type II) fibers.

This means…

  • It resists fatigue well, so it tolerates more volume
  • But it also needs heavy loads to recruit fast fibers

In plain terms?

You can train shoulders more often than other muscles, but you need variety:

  • Heavy loads for low reps
  • Medium loads for higher reps
  • Advanced techniques

And yes, you must train all three heads every time.

Training only the anterior deltoid (as many unknowingly do) gives you only a broader chest.

But “3D” shoulders? They come from balance.


Why after a well‑done shoulder workout… you don’t feel pain

This trips up many.

You think: “If I don’t feel soreness, I didn’t work hard enough.”

But often shoulders—especially conditioned ones—don’t give strong DOMS.

Do you know why?

  • Fibers adapt quickly
  • They’re used daily (even just for posture)
  • Your volume isn’t new or intense enough to trigger deep adaptations

Perhaps you’re not pushing enough

Here’s the naked truth: maybe you’re hitting shoulders at a bare minimum.

A couple of raises, light presses, some stretching, and you’re done.

But for real growth, you need to shock them.

Try:

  • Slow eccentrics (3–4 seconds down)
  • Supersets of lateral and posterior raises
  • Giant sets: 4 shoulder exercises with no rest
  • Final drop sets to technical failure

I guarantee: you’ll feel it.

And if you burn afterward, that’s good news.


Training shoulders twice a week: yes or no?

Absolutely yes.

Especially if:

  • You recover well
  • Shoulders are a weak point
  • You use different approaches in each session

Example:

  • Day 1: strength (presses, military, low reps)
  • Day 2: isolation (raises, face pulls, high reps)

Multiple weekly stimuli accelerate adaptation.

And the body… responds.


Conclusion

It’s not easy.

Building real, full, round shoulders that shout “I actually train” takes patience, awareness, and a healthy dose of humility.

You need to ignore the noise of pain and start listening to the body’s real signals.

You need to do less… but better.

And above all, you need not to quit.

Because true progress doesn’t happen overnight.

But if you stick with it, adjust your approach, and follow a thoughtful path…

Your shoulders will come.

And when they do, they won’t just be bigger.

They’ll be strong.

Functional.

And ridiculously proud of you.

Recommended
Categories
Shoulders STRENGTH BUILDING AND MUSCLE MASS

Can Overtraining Delts Make My Bench Press Progress Worse?

I have a complicated relationship with my shoulders.

It’s like an ex who wishes you Merry Christmas but wrecks your life the rest of the year.

In the early days of my “Sunday gym bro” career, my only goal was big shoulders.

Spherical.

Full.

Those shoulders that make your shirt burst open even if your chest is as flat as a tortilla.

So I hammered sideways raises, military presses, face pulls, Arnold presses, front raises, supersets, drop‑sets, tri‑sets, and every cool‑sounding English word to make my workout look serious.

Too bad that while my shoulders grew beautifully round, my bench press… moved backward like the volume on an embarrassing voice memo.


The Dominant Shoulder Syndrome
  • During bench, you feel your shoulders more than your chest
  • After every chest session, your front delts are sore
  • When you do flyes, your shoulders scream
  • Your chest won’t grow despite endless bench variations

Welcome to the “dominant shoulder” club.
An exclusive club nobody wants to join.


The day my bench decided to hate me

When-My-Bench-Turned-Against-Me

I remember it well.

I walked into the gym all pumped.

It was Monday.

Chest day, baby.

I lay back, gripped the bar, took a deep breath, lowered with control… and at the push, something felt off.

The power didn’t come from my chest.

It was like my shoulders were doing the pressing instead of my pecs.

And they were already fatigued.

In short, it felt like I was pushing a fridge full of regrets.

That’s when I realized something was wrong.

My chest wasn’t working like it should.

And the shoulders were to blame.


Front delts: those busybodies that always butt in

Let’s be honest: the front delt (also called the anterior deltoid) isn’t shy.

It’s invasive.

It steps in whenever it can, even when you didn’t invite it.

During the bench press, it should support the chest and triceps.

But if it’s fatigued or overactive (spoiler: it often is), it steals the show.

It’s like asking a friend to help paint a wall… and he repaints your entire house without asking.

Result?

  • Your chest shuts off.
  • Your press loses power.
  • Your form breaks down.
  • And the gains… never show up.


What science says (don’t worry, it’s understandable)

Have you ever wondered which muscles really work during the bench press?

EMG studies (that’s electromyography—basically sensors that read which muscles are firing the hardest) show the anterior delt lights up a lot during benching.

So if you’re already pounding it with a ton of dedicated shoulder exercises… the cumulative stress becomes unsustainable.

And that’s where trouble starts:

  • Chronic overload of the front delts
  • Progressive shutdown of the chest
  • Compensations and injury risk (especially rotator cuff)
  • Total stall in chest strength and hypertrophy

Not exactly what you dreamed of when you started the “Arnold chest bench program.”


How I fixed it (after years of frustration)

Once I realized the problem, I had to unlearn a lot.

  • I drastically cut direct volume for my front delts.
  • No more front raises.
  • No more military press the day before bench.
  • No more shoulders in shreds three times a week.

Instead, I:

  • Started focusing more on rear delts and traps to improve posture and balance.
  • Corrected my bench technique (scapula retraction, feet planted, natural arch).
  • Added variations like dumbbell bench, decline bench, and peak‑contraction flyes.
  • Trained chest when my shoulders were fresh, not baked like a Margherita pizza.

Result?

My chest began to respond.

My bench strength shot up.

And finally… I felt my pecs doing the work again.


But I still want big shoulders!

A-Man-With-Killer-Shoulders

Fair enough.

Me too.

And you can have killer shoulders without wrecking your bench.

  • Build massive lateral and rear delts for that “wardrobe‑filling” look without bench interference.
  • Use multifunction movements like push press or landmine press when chest isn’t the priority.
  • And above all, program intelligently: more isn’t always better. Better is better.


Practical examples: how to train chest and shoulders without waging war

We all want a clear, effective routine that doesn’t self‑sabotage by midweek.

Because nothing kills a chest day like showing up with trashed shoulders.

It’s like going on a first date after eating six tortillas.

Doesn’t end well.

So here are two tried‑and‑true weekly routines built to maximize chest work without shoulders throwing a wrench in the dumbbells.

Routine 1: Chest focus – shoulders in support

Monday – Chest (strength + hypertrophy)

  • Barbell bench press – 4×5
  • Incline dumbbell press – 3×8
  • Cable flyes – 3×12
  • Weighted push‑ups – 3×max
  • Face pulls – 3×15

Thursday – Shoulder isolation

  • Lateral raises – 4×15
  • 90° incline bench rear delt raises – 4×12
  • Light dumbbell overhead press – 3×10
  • Dumbbell shrugs – 3×15
  • Plank + wall slides – 3×30″

In this routine, shoulders don’t interfere with the chest.

In fact, the postural work improves the bench.

Routine 2: Full upper body – smart distribution

Monday – Push (chest, triceps, shoulders)

  • Bench press – 4×6
  • Dips – 3×max
  • Dumbbell overhead press – 3×10
  • Lateral raises – 3×15
  • Skull crushers – 3×12

Thursday – Pull + rear delts

  • Pull‑ups – 4×8
  • One‑arm dumbbell row – 3×10
  • Cable rear delt flyes – 3×15
  • Face pulls – 3×15
  • Biceps curls – your choice

This approach lets you train chest and shoulders on the same day,

but without excessive shoulder volume or bench compromise.


Conclusion: give your chest room to breathe

Training shoulders is important, of course.

But if you want a powerful bench press and a chest that pops out of your shirt, you must find balance.

Give your chest space.

Let it do its job.

Don’t smother it with front raises and military presses 24/7.

Your shoulders will still shine.

But your chest… will finally steal the show.

And the bench?

Ah, it will climb back up like it deserves.

Recommended
Categories
Shoulders STRENGTH BUILDING AND MUSCLE MASS

I’ve noticed my left shoulder is visibly smaller—should I train it more often than the right?

Have you ever looked in the mirror after a workout, with your headphones still in and your shirt a little sweaty, and thought:

“Wait… why does my right shoulder look like The Rock and my left more like a half mozzarella?

Welcome to the club.

No one really talks about it, but muscle imbalances—especially in the shoulders—are one of the most common issues in the gym.

The problem?

It’s sneaky.

You only notice it when one of your deltoids has already gone on vacation while the other has won Mr. Olympia.

And trust me, I’ve been there.


Why It Really Happens (Spoiler: It’s Not Just the Workout’s Fault)

No, you’re not broken.

Our body is naturally asymmetrical.

No one is perfectly balanced, not even those who seem chiseled in marble on Instagram.

And in everyday life, we do everything with a dominant side.

You always carry your bag on the same shoulder.

You always sleep curled to one side.

You write, use your phone, and eat all with the same hand.

Now imagine doing that for years.

Then you join a gym and expect your muscles to magically grow in perfect synchrony?

Yeah, right.

Then add to that:

  • Compensations during execution (the stronger side takes all the load)
  • Old injuries that make you avoid certain movements
  • Reduced mobility on one side (your left shoulder blade moves like a rusty door hinge)

…and the disaster is served.

And what if it isn’t just a volume problem?

Have you noticed that your left shoulder is smaller?

Okay.

But… are you sure it’s only a matter of muscle mass?

Because sometimes the problem isn’t so much in the muscle…

…it’s in how that muscle moves.

And in the position from which it starts.

Yes, we’re talking about posture, hidden tensions, and shoulder blades that act like divas.


How to Recognize an Imbalanced Shoulder (No CT Scan Needed)

How-to-recognize-an-imbalanced-shoulder

It’s not enough to just look at the deltoid.

Sometimes the imbalance is noticeable even before you start training.

Here are the signals your body is already sending you:

  • A shoulder closer to the ear even when standing still
  • Clavicles that aren’t parallel
  • A more swollen trapezius on one side
  • T-shirts that hang “askew” even if you put them on correctly
  • Photos where you always appear tilted
  • One side fatiguing first, trembling, or losing control during exercises
  • Strange aches in the neck and shoulder blade after a workout


Why Does It Happen?

Here are the typical causes that might be sabotaging you behind the scenes:

  • As we’ve already seen, a dominant side takes over in most daily tasks
  • Desk posture: contracted shoulders, tilted head, backpack always on one side
  • Chronic muscle tensions, especially in the trapezius
  • Scapular dysfunctions (winged or stuck shoulder blades)
  • Scoliosis or a rotated pelvis that makes you compensate upward


When I Realized My Shoulder Was Slacking Off

When-I-Noticed-My-Shoulder-Was-Being-Lazy

For years, I pushed hard on the bench press.

Barbell, 100 kg, playing tough.

Then one day I tried dumbbells.

And that’s when the epiphany hit.

My right arm rose like a five‐star elevator.

My left arm looked like it was searching for Wi-Fi.

I felt robbed.

Years of bench pressing only to end up with one shoulder like a bodybuilder’s and the other like an intern’s.

But that’s when I decided: no more fake “symmetrical training.”

It was time to fix things.


1. Solution Number One: Unilateral Exercises (Your New Best Friend)

Solution-Number-One-Unilateral-Exercises

The first step?

Ditch the barbell.

If you really want to even the playing field, you have to start isolating the shoulders one at a time.

And you must start with the weak side. Always.

Because if you start with the strong side, you’ll end up too tired and not give enough attention to the other.

That just won’t do.

Here are some exercises I incorporated with the precision of a surgeon:

  • Single-arm dumbbell shoulder press
    • Keep your back straight, core engaged, and move slowly as if you were pouring fine wine.
  • Single lateral raises
    • Focus on the movement. Don’t just flail your arm upward. Lift with the deltoid, not with your entire being.
  • Single-arm Arnold press
    • It looks flashy, but most importantly, it forces you to work through the full range of motion.
  • Single-arm row for the rear deltoids
    • Because imbalance isn’t just “in front” – the back can be an even bigger mess.

TIP Bonus

If you really want to give the weak shoulder an extra boost:

  • Slow down the eccentric phase of the movement (the lowering)
  • Or add a 2–3 second isometric pause at the point of maximum contraction

2. Mobility and Stretching (Every Day, No Excuses)

I ignored this part for YEARS.

And I paid the price in tears, painful shoulder shrugs, and frustration.

If your shoulder blade moves poorly, your deltoid can’t even activate properly.

And you know what the brain does? It compensates.

And guess who compensates? The other side.

Do these exercises every single day:

  • Foam rolling the upper back: 1–2 minutes
  • Stretching the trapezius and scalenes (neck): 30 seconds per side
  • Scapular wall slides: 2 sets of 10
  • Band dislocations: with a resistance band, slow and controlled

3. Targeted Reinforcement

Okay, you’ve loosened the tensions and mobilized the shoulder blades, but now you need to build support.

This isn’t about “bulking up” the shoulders, but about reactivating those postural muscles that keep everything aligned.

  • Face pulls with a resistance band
    • One of the most underrated… and effective… exercises.
    • It reactivates the middle trapezius and rhomboids as if you had spent a week in a postural retreat.
    • Pull the band toward your face (hence the name), keep your elbows high, and squeeze the shoulder blades together.
    • Slow movements, zero momentum. Total focus.
  • Y-T-W with light dumbbells
    • The letters of the alphabet? Almost.
    • Lying face down on an incline bench or stability ball, raise your arms forming first a Y, then a T, and finally a W.
    • Each position targets a different group of stabilizing muscles.
    • Ridiculously light weights (around 1–2 kg), but they burn as if you were lifting a coffee machine with your pinky.
  • Scapular planks
    • The “zen” plank, but with active shoulder blade movement.
    • Start in a plank, but instead of remaining still, push your shoulder blades outward and then bring them back together, without bending your arms.
    • It sounds easy.
    • After 10 repetitions, you’ll feel your upper back wake up from years of deep sleep.

4. Change Your Daily Habits

I know, working out at the gym is cool, but the real battle is fought outside, in the little things every day.

Because you can do all the shoulder presses in the world, but if you always carry your bag on the same shoulder… goodbye symmetry.

Here are the daily missions to retrain your body:

  • Switch the Side When Carrying Your Bag
    • Even if you feel clumsy and off-balance, resist. It’s like training your core on your way to work.
  • Use the Mouse with Your Other Hand for at Least 10 Minutes a Day
    • I’m not saying become ambidextrous in Excel, but even just navigating Google with your left is neurological exercise.
  • Sleep on the Other Side Too
    • At first, it might feel like sleeping on a train’s floor, but over time your body will adapt. And it will thank you.
  • Hang Your Jacket Using Both Hands
    • Or even better, use that lazy hand. Coordination, mobility, and a bit of scapular activation all in one.
  • Brush Your Teeth with Your Left (if You’re Right-Handed, of Course)
    • It might feel like you’re back in kindergarten, but it’s a fine motor control exercise.
    • Plus, you’re training without even thinking about it.


When to Call an Expert

If the difference between your shoulders is very evident, or if you have:

  • Persistent pain
  • A feeling of instability
  • Difficulty with overhead movements

…get checked by a physical therapist or an osteopath.

You might have a deeper musculoskeletal dysfunction, and fixing it now is worth a thousand times more than ignoring it for years.


Mind Over Matter (and Ego)

When I started working on my weak side, I had to face my worst enemy: pride.

Reducing the loads?

Doing more repetitions with less weight?

Being slow and controlled instead of explosive and loud?

It was incredibly difficult.

But it was essential.

Focus on the so-called mind-muscle connection.

Feel the shoulder working.

No tricks, no extra pull from the trapezius or neck.

Just focus, control, and technique.


Could Being Too Young Be the Reason?

Yes, absolutely.

If you’re under 20–22 years old, your body is still a work in progress.

Muscular maturity doesn’t arrive all at once, and often one side of the body “starts earlier than the other,” like siblings racing to put on their shoes.

So no panic: a less developed shoulder at that age can be completely normal.


RELATED:》》》 Deltoid Development: Should You Isolate the Front, Side, and Rear?


Conclusion

If you’ve read this far, you deserve a reward.

Or at least a symmetrical shoulder shrug.

The truth is, correcting an imbalance is more of a mental challenge than a physical one.

It requires awareness, consistency, and the willingness to break out of your routine.

But I assure you, it’s worth it.

More fluid workouts

Less risk of injuries

A more harmonious aesthetic

A posture that makes a great impression

And the next time you look in the mirror, you won’t see one shoulder working while the other takes a vacation.

You’ll see two strong, balanced shoulders ready to support you in every challenge.

Now it’s your turn:

Have you ever noticed an imbalance in your shoulders?

Have you tried unilateral exercises, changed your habits, or discovered something useful?

Tell me in the comments!

Sharing your experience can help others who are fighting the same battle!

Recommended