The deadlift is the king of exercises.
Not only does it strengthen the body, but it also makes you feel as if you could move mountains.
In the beginning, I did not really know what to expect, but every repetition taught me something new.
Deadlifts have shown me how every muscle, from the back to the legs, works in perfect harmony.
Today I consider them the foundation of my training because every lift reminds me how much I have learned and how much further I can improve.
The Role of the Neck: A Fundamental Element in Deadlifts
Every person has a unique neck.
Those with a long neck might need to keep their chin slightly tucked to “lengthen” the neck and prevent hyperextension.
Those with a short neck, on the other hand, might feel more comfortable keeping it in a neutral position, with the chin in line with the chest, to ensure balance and control.
A broad neck often indicates greater upper body strength and can facilitate a stable posture.
Which Neck Muscles are Involved?
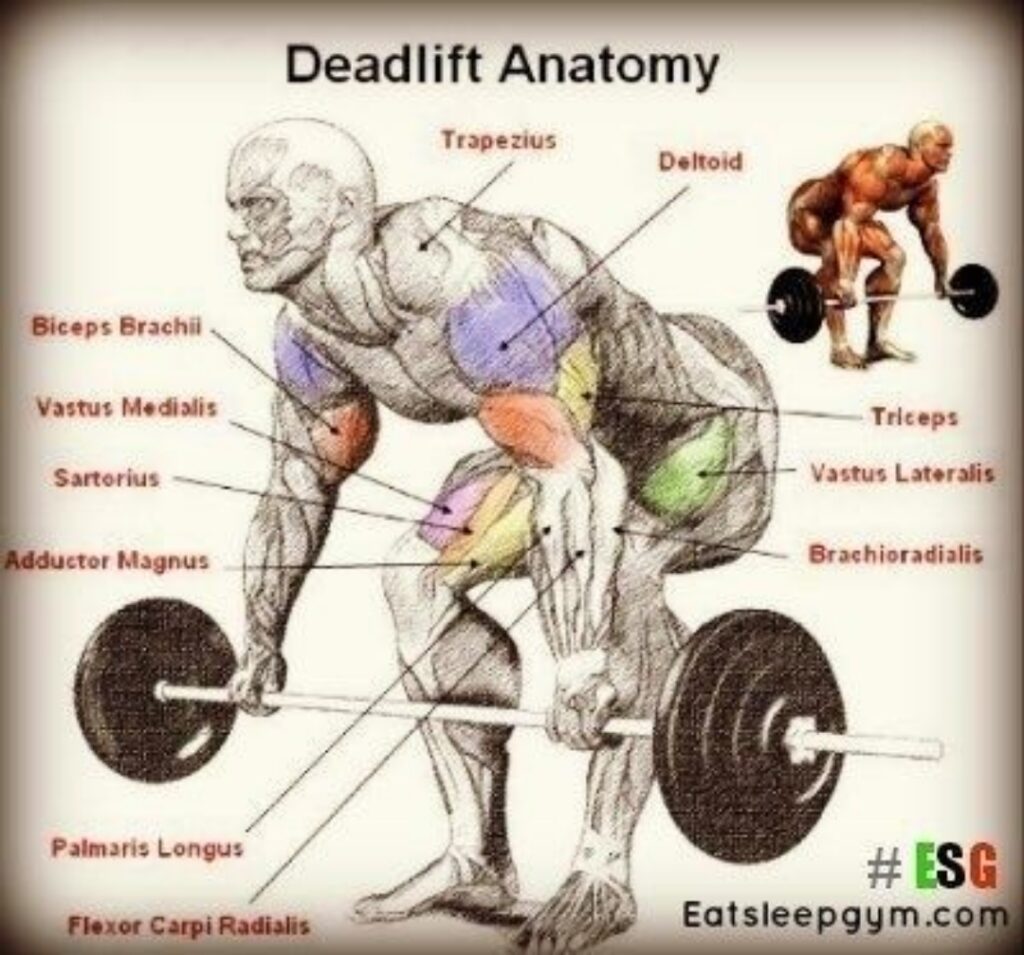
- Trapezius:
This muscle extends from the nape of the neck to the shoulders. It helps to stabilize the neck and shoulders, maintaining good posture during the lift.
- Sternocleidomastoid (SCM):
The sternocleidomastoid (SCM) helps you rotate and tilt your head. Even though it doesn’t play a major role in deadlifts, a balanced neck keeps this muscle from being overworked.
- Scalene Muscles: These small muscles help stabilize the side of the neck. They contribute to maintaining balance during the movement, especially when lifting heavy weights.
Neck Positioning in the Different Phases of the Deadlift
As you approach the bar, your neck must be in a neutral position.
No excessive tension.
Keeping the chin slightly tucked is fundamental: not too high, not too low.
At the start of the lift, look at a point in front of you, avoiding fixing your gaze on the floor or the ceiling.
During the pull phase, the neck should remain relaxed but aligned with the spine.
If you look too far down, you risk stiffening your neck and compromising your breathing.
Conversely, looking too far up can create imbalances and unnecessary stress.
Over time, I’ve come across various opinions online—some claimed to look down, others straight ahead or slightly down.
The truth?
A simple neutral gaze works best.
This approach helps keep your back straight, your shoulders back, and allows for smooth, fluid breathing.
Common Mistakes: The Neck and the Spine in Trouble
I made my mistakes.
Not pulling the shoulders back enough, thereby loading the weight on the lower back.
The next day, a nagging sensation in my lower back reminded me of my error.
My personal trainer explained that I was overusing the lumbar area instead of engaging the entire posterior chain.
Other frequent mistakes include excessive arching or too much rounding of the back.
The solution?
Keep the neck in a neutral position and the spine straight throughout the movement.
Remember: control and technique are more important than heavy loads.
The Hips: The Engine of the Deadlift
The hips are the true engine of the deadlift.
Imagine them as the engine of a car: if they are strong and well-coordinated, energy transfers effortlessly to the entire body.
The hip hinge technique during deadlifts is fundamental.
It is about bending at the hips, not the back.
Think about how you lift a heavy bag.
You don’t bend your back, right?
Instead, push your hips back, as if you were trying to touch a wall behind you.
This movement activates the glutes and hamstrings, which become the real driving force of the lift.
Why the Hips Are So Important
During the deadlift, the hips act as a pivot.
If you engage them well, the movement becomes smooth and secure.
If the hips are not active, the force dissipates and you risk overloading your back.
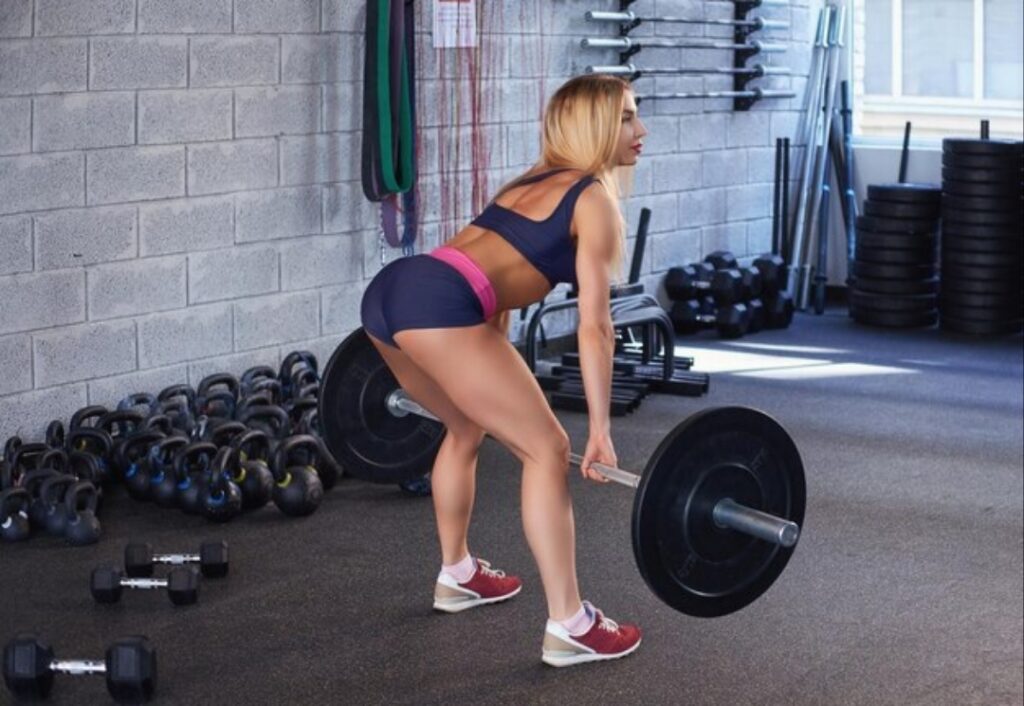
Practical Example: The Correct Hip Tilt
- Starting Position:
Stand with your feet shoulder-width apart. Bring your shins close to the bar while keeping your feet firmly planted on the ground.
- The Movement:
Imagine you have a solid door in front of you. Instead of bending forward by curving your back, push your hips backward. The back remains straight, and the movement is driven by the hips. This is the true “hip hinge.”
- During the Lift:
As you lift the bar, focus on your hips. Use your glutes and hamstrings to drive the movement. Do not let the lower back bear the excess load. A good indicator is feeling a slight contraction in the glutes as the hips push back.
Additional Tips and Common Mistakes to Avoid
Try performing the movement in front of a mirror or ask a training partner to observe you.
Make sure that during the bending phase, your back stays straight and the movement originates from the hips.
A trick is to imagine pushing an invisible chair back with your glutes, feeling how the muscles in the legs and hips engage in synergy.
Active hips not only improve the safety and effectiveness of the deadlift, but also make the movement more natural and less stressful for the spine.
Many tend to bend too far forward, excessively loading the back.
Remember: the movement must come from the hips, not the back.
If you feel pain in your lower back, you are probably using the wrong technique and not engaging your hips enough.
RELATED:》》》Are Trap Bar Deadlifts Safer Than Straight Bar Deadlifts for Avoiding Injuries?
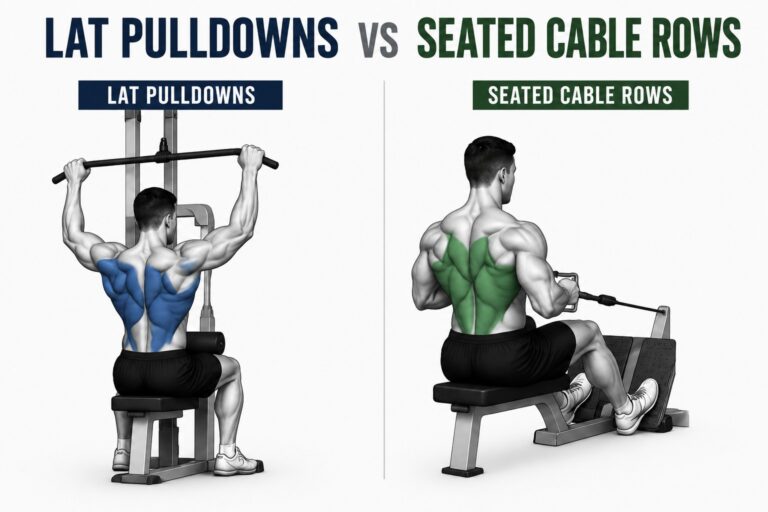
The Secret of Active Lats
Effectively activating the lats does not simply mean pulling the shoulders back from the start.
The real trick is to contract the back muscles evenly throughout the movement while maintaining a natural posture.
How to Activate Them in Practice
To understand better, here are some practical steps to follow:
Discover the Feeling of Scapular Retraction: Before starting the deadlift, try a simple exercise:
- Stand with your back straight.
- Imagine you are squeezing a tennis ball between your shoulder blades.
- Slowly pull your shoulders back and slightly down, without lifting them toward your ears.
- Hold the position for 3–5 seconds, then relax.
This exercise helps “awaken” the lat muscles and familiarize you with proper activation.
Beginning of the Movement: Light but Decisive Activation
- When you grab the bar, do not immediately focus on forcefully pulling your shoulders back.
- Instead, activate the back muscles by recalling that sensation of “a ball between the shoulder blades.”
- You should not force the retraction excessively: the goal is to keep the shoulder blades in a naturally supportive position.
During the Lift: Maintain the Balance
- As you lift the bar, strive to keep a constant tension in the lats.
- Imagine the back muscles working like an elastic band that stabilizes your torso.
- This helps distribute the load evenly and prevents the shoulders from “locking” in an unnatural position.
- Remember: it is not about a sudden pull, but about controlling the movement with gradual activation.
Coordination with Arms and Forearms
- Once the lats are activated, let the arms and forearms “assist” the movement.
- They should not work in isolation.
- The focus is on maintaining synergy: the back stabilizes while the arms guide the bar in a controlled manner.
Practical Example During the Deadlift
- Initial Phase:
Before lifting, perform a slight scapular retraction. - Lifting Phase:
As the bar leaves the ground, focus on maintaining constant tension in the lats, as if you wanted to “hold” the correct form throughout the movement. - Intermediate Phase:
When the bar passes the knees, ensure that the tension does not drop: the back muscles must remain active, working in synergy with the core and glutes. - Final Phase:
Once in an upright position, verify that your shoulder blades remain “activated” but not overly forced.
The Distance of the Hands on the Bar
The grip on the bar is fundamental.
A grip that is too narrow can strain the wrists and shoulders.
A grip that is too wide reduces control and leverage.
A good starting point is to have your hands just outside your legs when you are in an upright position.
This ensures a solid grip and a smooth movement.
Experiment with different distances until you find the one that makes you feel most secure.
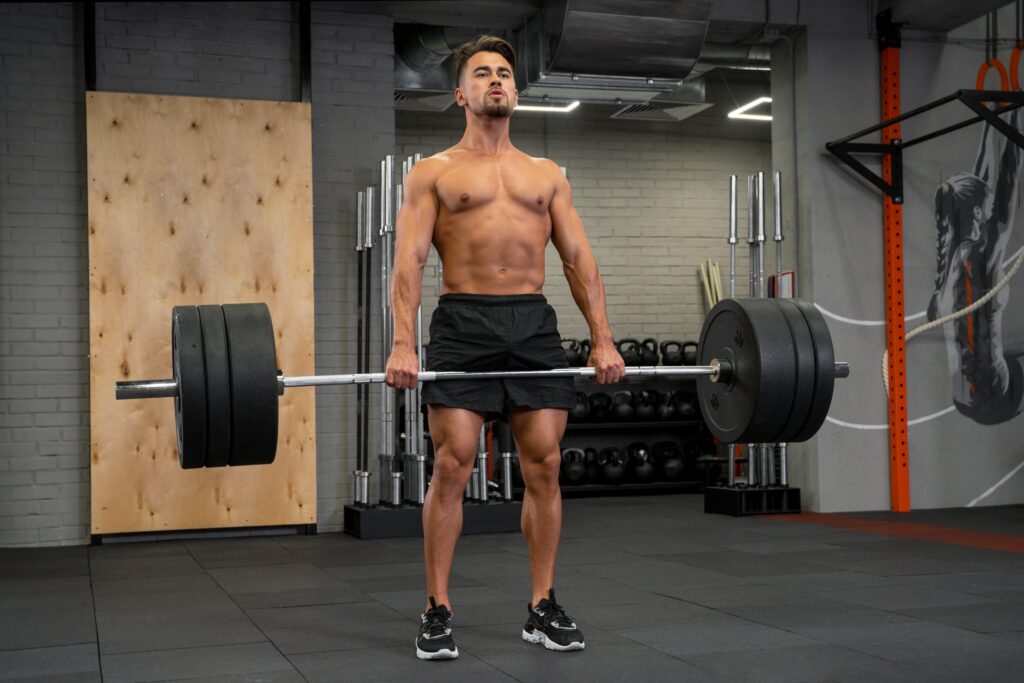
Safe and Complete Execution of Deadlifts
Here is a step-by-step guide to performing deadlifts safely:
Foot Positioning:
Place your feet shoulder-width apart, with your toes slightly turned out.
The shins should be close to the bar.
Preparation and Grip:
Bend your knees and lean your torso forward while keeping a neutral back.
Grab the bar with both hands, holding it firmly.
Your arms should be straight, but not rigid.
The Lift:
Push through your heels and engage your core.
As the bar passes your knees, push your hips forward.
Stand up straight, avoiding hyperextending your back.
During the Movement:
Keep your neck neutral, with your gaze fixed on a point in front of you.
The shoulders should remain back and the back always aligned.
Returning to the Ground:
Lower the bar in a controlled manner, always maintaining good technique.
Release the weight gradually, avoiding sudden movements.
Is It a Good Practice to Watch Yourself in the Mirror During a Deadlift?
At first, I often found myself checking my form in the mirror.
I watched every movement carefully, trying to understand how to position my head, neck, and shoulders.
Then, a trainer told me not to fixate too much on the mirror.
Why?
Because focusing too much on it disrupts the natural rhythm of the movement and makes you lose body awareness.
Over time, I learned to trust my body.
The technique becomes automatic and you no longer need to check yourself every second.
My Deadlift Story
Everything started with modest loads—22 lbs on each side of the bar—marking my very first deadlift experience.
I was full of enthusiasm and ready to push my limits.
Soon, I progressed to 44 lbs, 66 lbs, and eventually even reached a total load of about 154 lbs.
My ambition pushed me to progress too quickly, always aiming for higher numbers.
The result?
Persistent lower back pain.
My personal trainer pointed out that I was overusing my lower back, which was compromising my technique.
So, I decided to start over, going back to 22 lbs per side and focusing on proper form.
With patience and dedication, every mistake became a valuable lesson and every improvement a personal victory.
In the end, after about six months of consistent training and a smarter approach, I managed to deadlift a total of around 220 lbs.
This journey taught me that success isn’t just about ambition—it’s about understanding and respecting your own limits.
Deadlift: A Friend or an Enemy for the Back?
Many avoid deadlifts because they think they might curve the back.
In reality, when performed correctly, deadlifts strengthen the spine.
Using the proper technique—with a neutral back, engaged core, and active stabilizers—works the posterior chain (spinal erectors, glutes, and hamstrings), distributing the load evenly and reducing stress on the lower back.
Over time, this leads to better posture even outside the gym and helps prevent chronic pain.
How to Start and Progress
A good protocol to begin with might be:
3–4 sets of 6–8 repetitions, using a load equal to 60–70% of your one-rep max.
This setup allows you to focus on technique without overloading your back.
After about 3–4 months of consistent training, you may already notice a difference:
- The muscles of the back and core strengthen,
- Posture improves, and
- Daily activities become easier thanks to increased stability.
The Art of the Pull: Arms, Hands, and Lats at Work
I have seen several gym-goers who, focused solely on the lift, begin to bend their arms.
This causes the biceps to engage, reducing the effectiveness of the movement and diverting attention from the main strength: that of the legs, hips, and back.
When performing the deadlift, the arms should remain extended and serve only as a bridge to grip the barbell.
The real power must come from the muscles of the lower body and the posterior chain, such as the erector spinae, glutes, and hamstrings.
Excessively bending the arms not only places unnecessary strain on the biceps but also leads to a loss of movement stability.
This behavior can result in inefficient technique and, over time, increase the risk of injury.
Moreover, excessive involvement of the biceps can cause the weight not to be distributed correctly, fatiguing the lower back.
Breathing in Deadlifts: The Heart of the Core
Since I started training, I realized that breathing is much more than an automatic act.
It has become a true ally, capable of transforming a risky deadlift into a smooth and safe movement.
I still remember the first time my trainer talked to me about the Valsalva maneuver.
He said, “Take a deep breath, fill your belly with air, and hold your breath. This way, your core will stiffen like a natural belt and protect your back.”
At first, I was skeptical, but after trying it, I understood how much this technique can make a difference.
Breathe and Lift
I learned that proper breathing during deadlifts truly makes a difference.
Before grabbing the barbell, I take a deep breath, as if I were inflating a balloon in my stomach.
This helps create a solid base, engaging the core and protecting the back.
I hold my breath for a moment, as if I were charging up a silent energy.
This pause allows me to keep my core braced throughout the movement.
While lifting the weight, I continue to maintain that tension in the abdominal and back muscles.
Only when I pass the critical point do I begin to exhale slowly, always maintaining control.
Focusing on this cycle—inhale, hold, and exhale—has helped me perform safer and more powerful deadlifts.
It is a small gesture that, when done correctly, drastically improves technique and protects the back.
The Mystery of the Gym Belt
The weightlifting belt is not just a fashion accessory.
It is used to support the core and protect the lower back during heavy lifts.
It is often misused as a shortcut to compensate for technical errors.
But its true purpose is to provide additional support to the core, amplifying the intra-abdominal pressure already created by proper breathing.
Use it as a support tool, not as a cushion to lean on.
Remember: the belt is worn to help you maintain correct posture, not to lift the weight in place of your muscles.
In practice, wear it when working with heavy loads, but continue to focus on technique and core strengthening.
This balance will allow you to improve your lifts safely and more effectively.
Neck Pain After Deadlifts in the Days Following
I once saw a fellow gym-goer complaining about neck pain after deadlifts, and his trainer suggested some practical tips.
First of all, it is essential to take a break to let the muscles relax and recover.
To reduce inflammation, apply ice to the neck for about 20 minutes, repeating several times in the first 48 hours.
Then, use warm compresses to promote relaxation and improve circulation.
Complement this with gentle stretching: slowly tilt your head from one side to the other and make slow circles to ease the tension.
If the pain persists, consult a physical therapist.
And, of course, review your deadlift technique with a trainer to prevent the problem from recurring.
RELATED: 》》》 What Are the Risks of Deadlifts?
Conclusion
Don’t be fooled—when it comes to deadlifts, even though a well-positioned neck may seem like a small detail, it provides the stability that turns every rep into solid progress.
However, it is not just this that makes the difference.
Certainly, keeping the neck in a neutral position is essential to protect the back, but the core, shoulders, and the entire body alignment also play a crucial role.
When all these elements work together, every repetition brings you closer to your goals.
And what do you think?
Have you ever noticed differences when you focus on neck positioning during deadlifts?
Leave me a comment below—I would love to hear your experiences and advice!
FAQs
On a scale from 1 to 10, how difficult is it to perform a deadlift?
For beginners, it may seem like a 7 or 8, but with practice and proper technique, it becomes a 4 or 5.
What role do the neck muscles play in supporting during the deadlift?
Although not the main engine of the movement, proper neck positioning protects the cervical muscles from excessive tension, integrating with the core work for optimal stability.
During the top phase of the deadlift, should I extend my neck backwards?
No, keep your neck in a neutral position to protect the cervical spine.
How can I monitor my neck position during training?
Try recording yourself with your phone or ask a training partner to observe you. Small videos can help you correct any deviations and develop proper awareness.
Can I specifically train the neck muscles to improve stability in deadlifts?
Certainly! Neck strengthening exercises, such as light extensions and flexions, can contribute to greater stability, but remember that overall technique and a strong core are fundamental.
Does neck positioning also affect breathing during the deadlift?
Absolutely. Maintaining a neutral neck position facilitates correct breathing, which in turn helps create the intra-abdominal pressure that protects the back.