Pull-ups used to feel like a video game where the boss fight starts at rep number three.
Not because I was “weak,” but because I was doing a bunch of small, invisible things that slowly stole reps.
Once those “rep thieves” got exposed, my numbers climbed in a way that finally made sense.
Before anything else, a super simple definition.
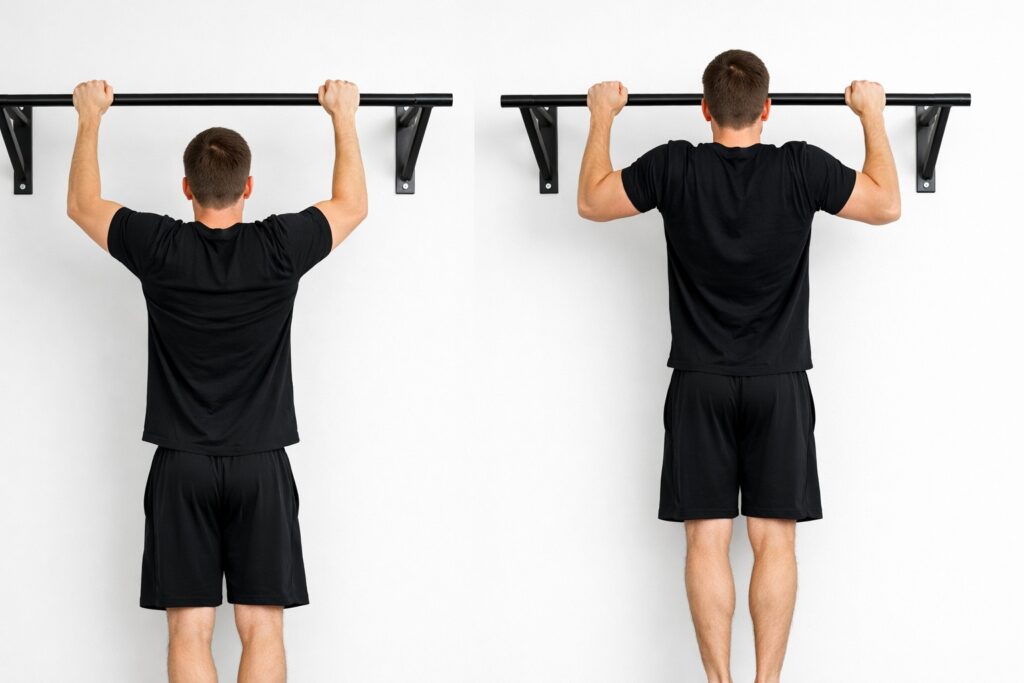
A pull-up is hanging from a bar with palms facing away, then pulling until the chin clearly gets above the bar, then going back down under control.
That’s the rep most people think they’re doing, even when the body is secretly doing something else.
Also, quick honesty.
Some days the bar feels friendly, and some days it feels like it moved two inches higher just to mess with you.
The goal here is to make your “bad days” less frustrating, and your “good days” repeatable.
Tip 1: Make Every Rep the Same Rep (Or Your Score Is Lying)
The first time I tried to increase pull-ups, I trained a number.
Then I realized I was training a moving target because my reps were changing when I got tired.
My “rep 1” and “rep 6” weren’t even the same exercise anymore.
Here’s the standard I started using.
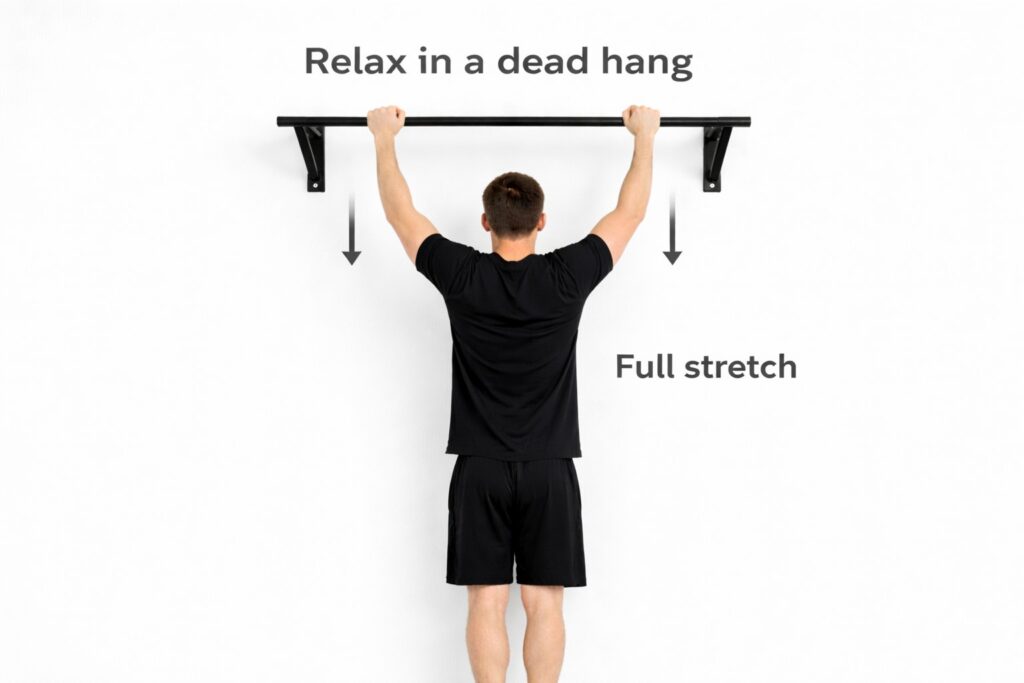
Start from a dead hang, meaning arms straight and shoulders not shrugged up into the ears.
Pull until the chin clearly clears the bar, then lower until arms are straight again.
If you want a simple self-check without filming a whole documentary, use this.
Hold the bottom position for one full second before every rep.
That one-second pause exposes half-reps instantly, like turning the lights on in a messy room.
Tip 2: Fix the Start Position (Most Reps Are Lost Before You Even Pull)
A lot of people fail pull-ups “mid-rep,” but the real failure starts at the shoulder before the elbow even bends.
When I cleaned up the first inch of the pull, reps appeared like I found them under the couch.
It felt less like “pulling harder” and more like “pulling in the right direction.”
Do this setup every set, even if it feels slow.
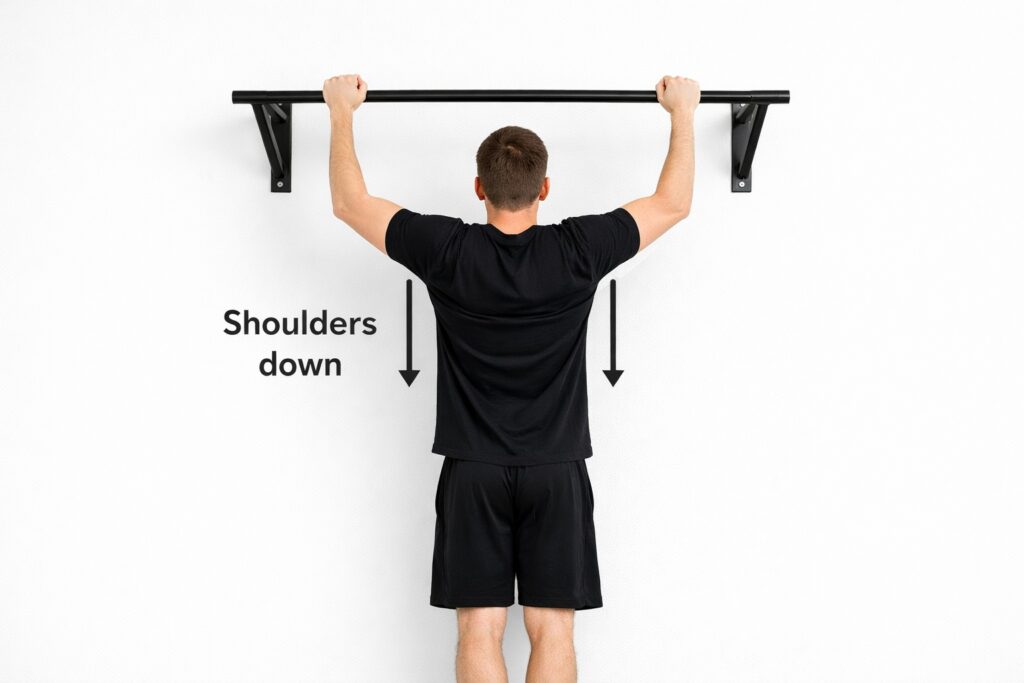
Grab the bar, then think “long neck,” meaning shoulders away from ears.
Squeeze the bar like you’re trying to leave fingerprints in it, and tighten your abs like you’re about to get poked.
Then do a tiny move before the real pull-up.
Pull the shoulder blades down and slightly back without bending the elbows much, like you’re trying to put your shoulders in your back pockets.
That’s the difference between pulling with your whole upper body vs. asking your biceps to do a group project alone.
Tip 3: Stop Kicking the Can Down the Road (Control the Lowering)
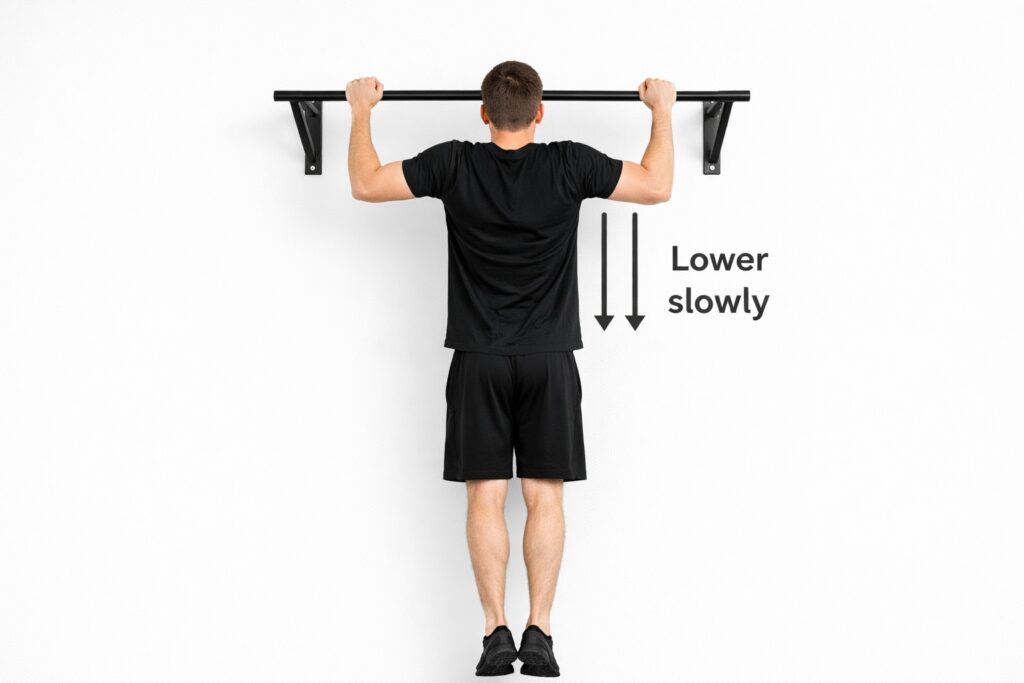
I used to drop down fast because it felt “efficient.”
Then I noticed my elbows and forearms got angry, and my reps didn’t improve.
Turns out the lowering part is not the boring part, it’s where your body learns control.
Use a simple lowering rule.
Lower for about 2 to 3 seconds, like counting “one… two… three” on the way down.
Keep the ribs from flaring up like you’re trying to show off your chest to the ceiling.
When you control the lowering, your next rep starts from a stronger position.
The set feels more stable, like the bar isn’t trying to spin you around.
That stability becomes extra reps over time, without needing superhero effort.
Tip 4: Use a “Breathing Script” So You Don’t Gas Out Early
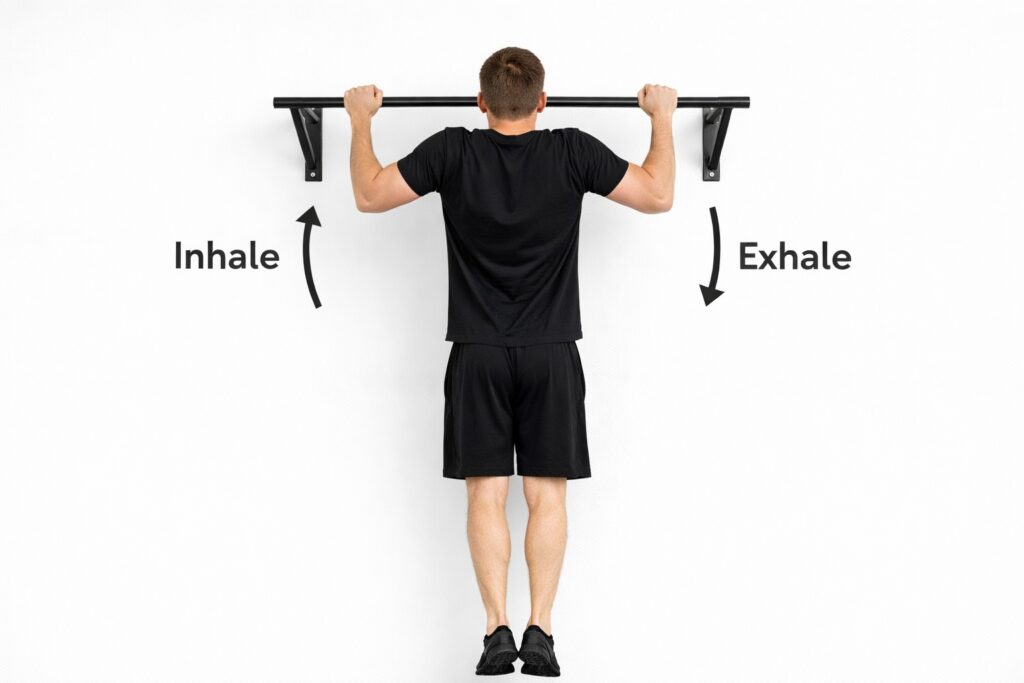
Pull-ups are strength, but they also have a sneaky cardio tax.
If you hold your breath randomly, the set feels like you’re fighting underwater by rep four.
I added a breathing script and the set stopped feeling like panic.
Try this rhythm.
Take a breath at the bottom while hanging, then start pulling.
Exhale near the top as your chin clears the bar, then reset at the bottom for the next breath.
If you’re doing multiple reps, don’t rush the inhale.
One calm breath per rep sounds too simple, but it changes how long you can keep clean form.
That’s not motivation, that’s oxygen being a useful employee for once.
Tip 5: Pick One Grip Width and Own It (Consistency Beats Variety Here)
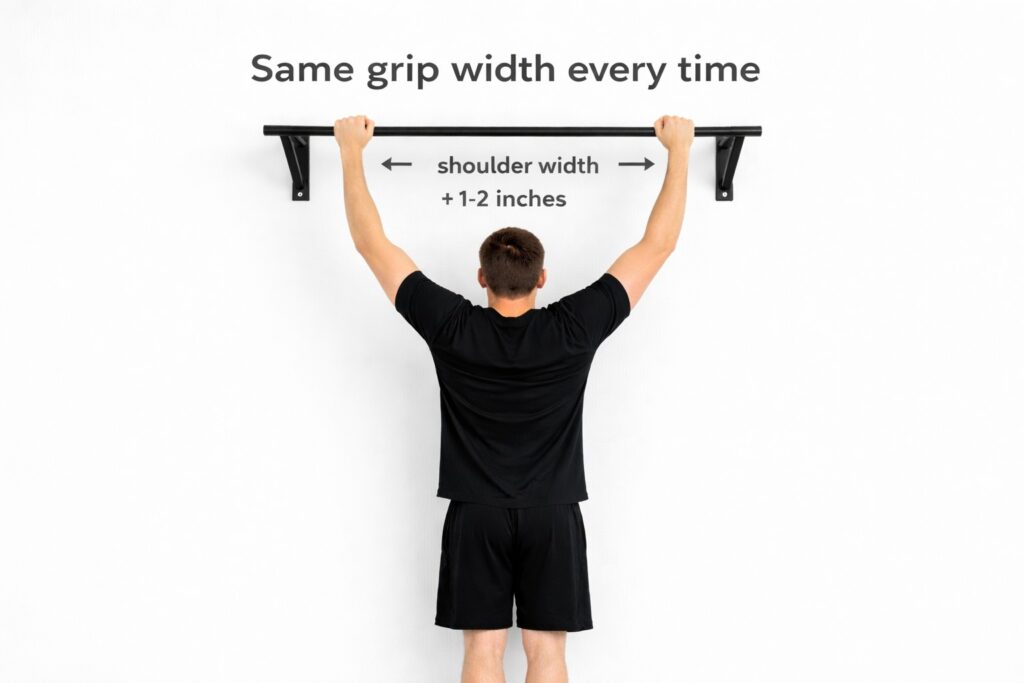
I used to change grip width every session because it felt “advanced.”
All it did was make every workout a new skill test, so my body never got really good at one version.
Reps went up faster once I standardized the grip.
A good default grip is slightly wider than shoulder width.
Hands not super wide, not super narrow, just comfortable enough that the wrists don’t hate you.
Thumb around the bar is usually more stable for most people, especially when fatigue kicks in.
If your elbows feel cranky, slightly adjust the width by one or two finger-lengths.
Tiny changes matter more than dramatic changes.
The goal is to build a reliable “home base” pull-up that your body recognizes instantly.
Tip 6: Train the “Top Inch” With Holds (Because That’s Where Reps Die)
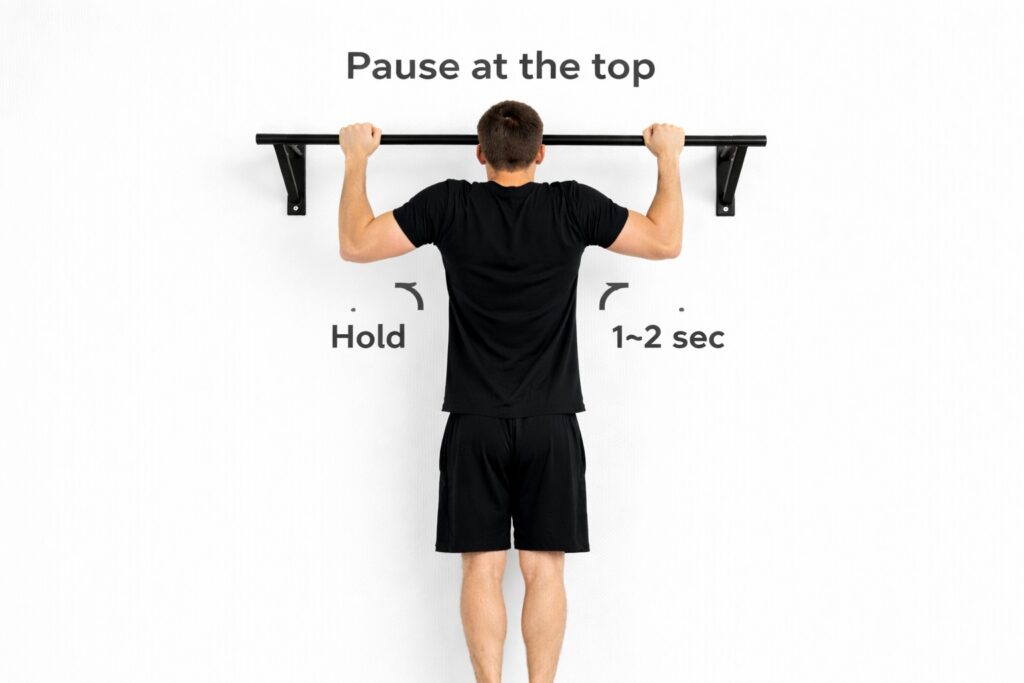
Most people fail pull-ups near the top.
That last bit where the chin needs to clear the bar is where the body suddenly gets very creative with cheating.
I got better at the top by training the top directly, not by just hoping it improves.
Do top holds like this.
Use a box or step to get your chin above the bar without burning a full rep.
Hold that top position for 10 to 20 seconds, keeping the chest up and shoulders down, then step back off.
Do 3 to 5 holds with 60 to 90 seconds rest.
The first time I tried 15 seconds, my upper back felt like it was doing a plank upside down.
After a couple sessions, that “top panic” calmed down, and normal reps suddenly stopped stalling at the finish line.
Tip 7: Build a Strong Bottom With Dead Hangs (But Do Them Like a Grown-Up)
Dead hangs sound basic, but they’re not just “hanging there.”
They build grip endurance, shoulder tolerance, and that calm feeling at the bottom of a rep.
My pull-ups improved when the bottom position stopped feeling like a free fall.
Do them with rules.
Hang with arms straight, shoulders gently pulled down, and ribs not flared.
Hold for 20 to 45 seconds, rest 60 seconds, and repeat for 3 to 5 rounds.
If your grip gives out first, that’s still useful data.
Better grip means you stop wasting energy just trying not to fall off the bar.
It’s hard to do pull-ups if your hands are screaming louder than your back.
Tip 8: Use Band-Assisted Pull-Ups the Right Way (Not As a Different Exercise)
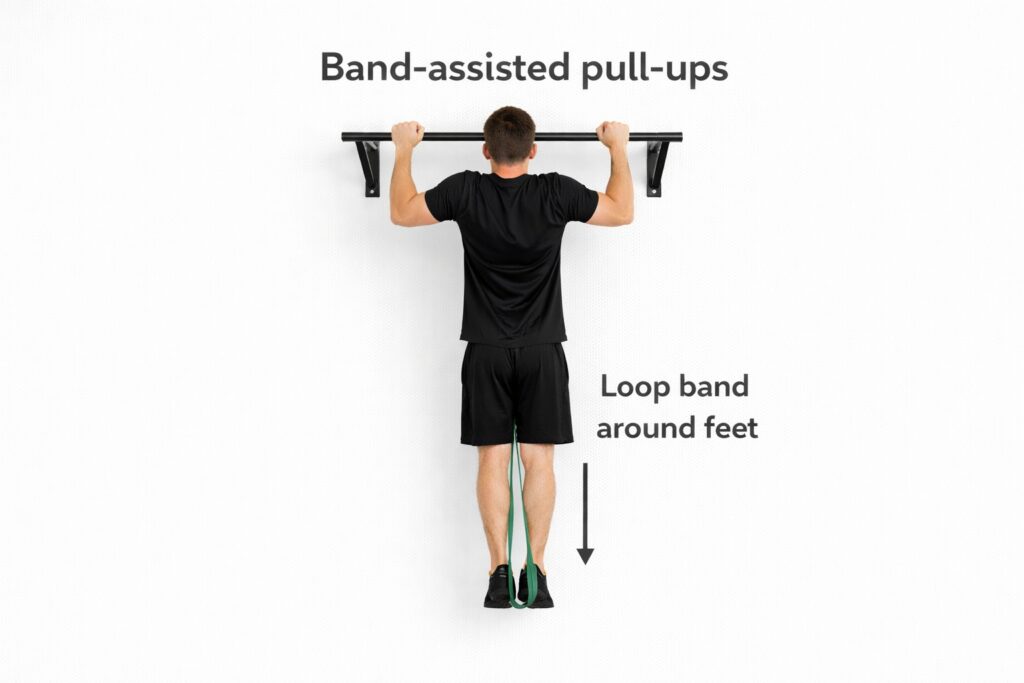
Bands can help, but they can also teach weird habits if the assistance is too strong.
I once used a thick band and felt like a rubber ball getting launched upward.
It made me feel powerful, but it didn’t build the exact strength I needed.
Pick the lightest band that still lets you do clean reps.
Aim for sets of 4 to 8 reps where the last rep is tough but still controlled.
Rest 90 to 150 seconds between sets, because rushing makes form melt.
Keep the same rep standard as unassisted pull-ups.
Dead hang at the bottom, chin clearly above the bar at the top, controlled lowering.
If the band turns your reps into bouncing, switch to a lighter band or a different assist method.
Tip 9: Try “Foot-Assisted” Pull-Ups for Precision (The Most Underrated Option)
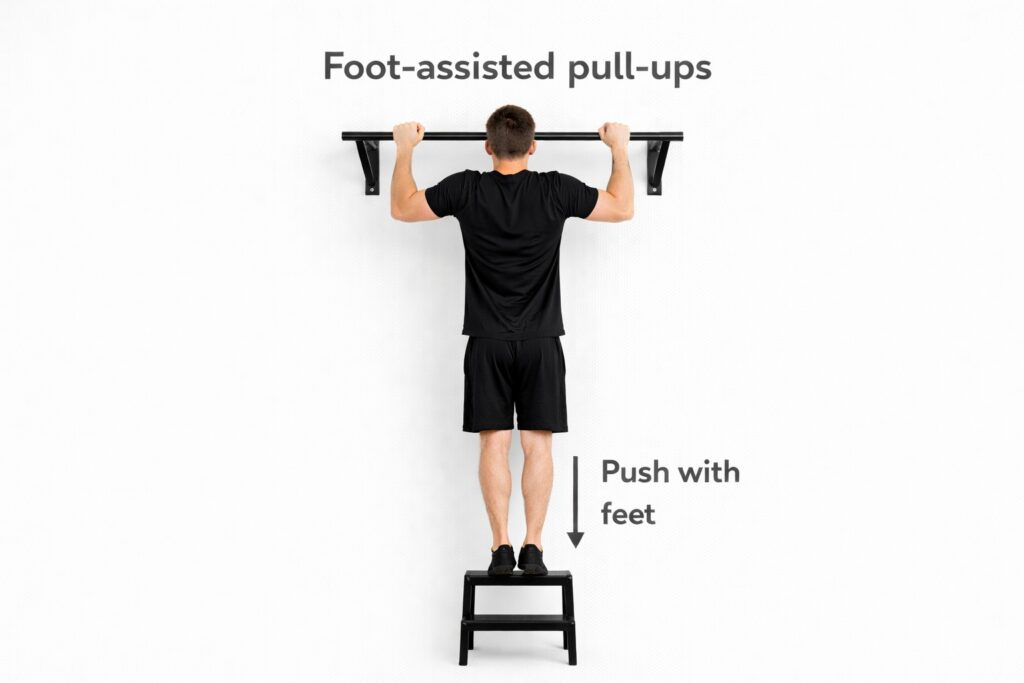
This is the method that made me feel the least “cheaty” while still letting me accumulate volume.
Put one foot on a box in front of you, or lightly on the ground if the bar is low.
Use the foot like a dial, not like a jump.
Here’s a full setup that worked well.
Do 5 sets of 6 reps, resting 90 seconds.
Use just enough leg help so the rep speed stays consistent, then reduce the help slightly set by set.
The sensation should be “back and arms working,” not “leg press to the sky.”
When it’s done right, your upper body gets a ton of high-quality practice.
That practice transfers to real reps because the motion stays honest and smooth.
Tip 10: Accumulate Reps Without Burning Out (Submax Sets Are Your Best Friend)
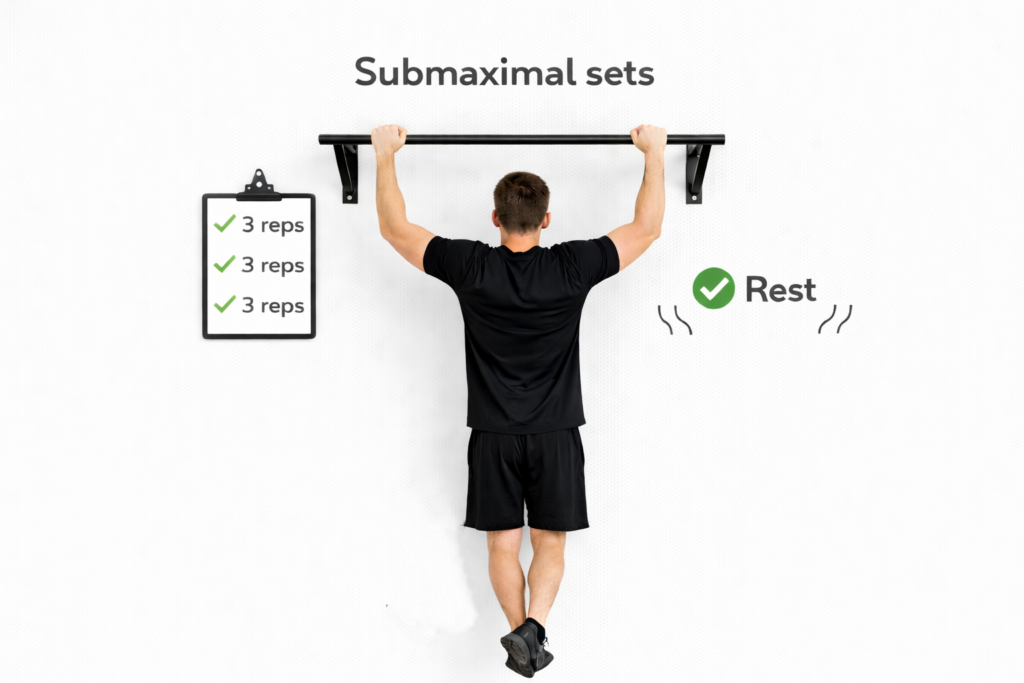
The biggest mistake I personally made was taking sets to failure too often.
It feels productive, but it wrecks technique, and then you practice sloppy reps with a tired nervous system.
That’s like practicing handwriting while riding a bicycle downhill.
Instead, keep most sets 1 to 2 reps away from failure.
If your max is 6 good reps, do sets of 3 or 4 for volume.
Use 6 to 10 total sets across a session, resting 60 to 120 seconds depending on how clean the reps stay.
A complete example from my own notes looked like this.
I had a shaky max of 6, so I did 8 sets of 3 reps, with 90 seconds rest.
The last sets were tough, forearms pumped, breathing louder, but the reps still looked the same as set one.
Tip 11: Use “Clusters” for More Quality Reps (Tiny Breaks, Same Set)
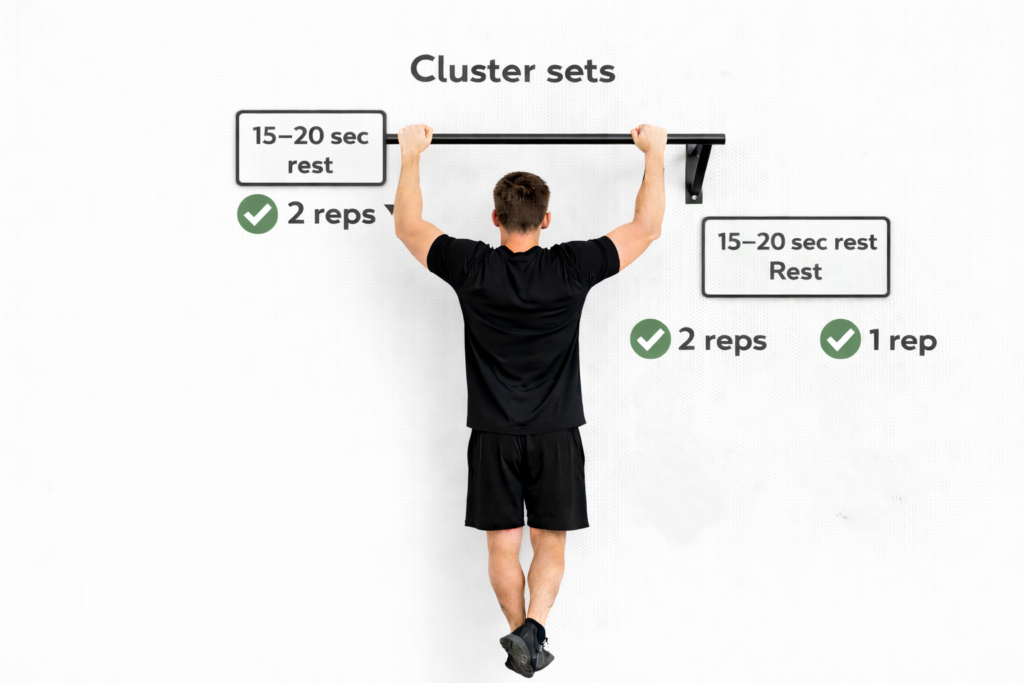
Clusters sound fancy, but they’re just mini-pauses that keep reps clean.
They helped me add volume on days when full sets fell apart too early.
The workout felt controlled instead of chaotic.
Here’s a simple cluster set.
Do 2 reps, rest 15 to 20 seconds, do 2 reps, rest 15 to 20 seconds, do 1 rep.
That’s 5 total reps that often feel cleaner than a straight set of 5.
Do 4 to 6 cluster sets with 2 minutes rest between clusters.
The fatigue feels different, more like “muscle working” and less like “technique collapsing.”
That difference matters, because clean practice builds repeatable reps.
Tip 12: Train Your Rowing Strength (So Pull-Ups Don’t Feel Like Pure Arm Work)
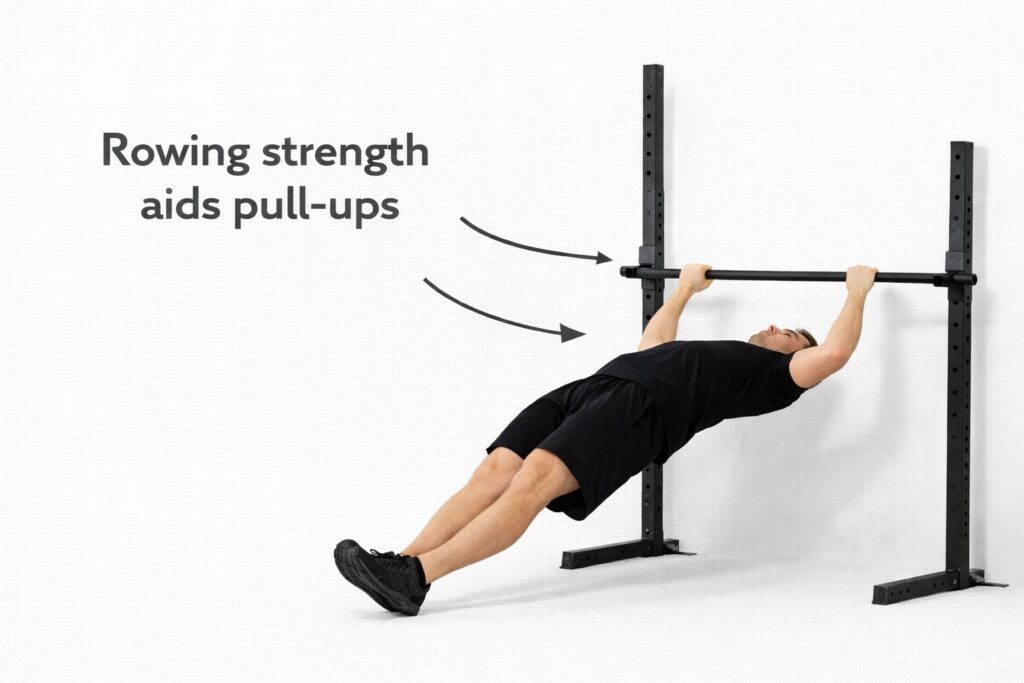
Pull-ups are vertical pulling, but a strong horizontal pull makes them feel more stable.
Rows teach your shoulder blades and upper back to pull and hold position.
When my rows got stronger, my pull-ups stopped feeling like biceps-only punishment.
A beginner-friendly row is the inverted row.
Set a bar at waist height, lie under it, grab it, keep your body straight like a plank, then pull your chest toward the bar.
Lower slowly for 2 seconds, pause 1 second at the top, then repeat.
A complete row prescription that pairs well with pull-up goals looks like this.
Do 4 sets of 8 to 12 reps, resting 90 seconds.
If it’s too hard, bend the knees to make the body angle easier, and keep the motion strict and smooth.
Tip 13: Don’t Ignore Scapular Pull-Ups (They Teach the Shoulder “Lock”)
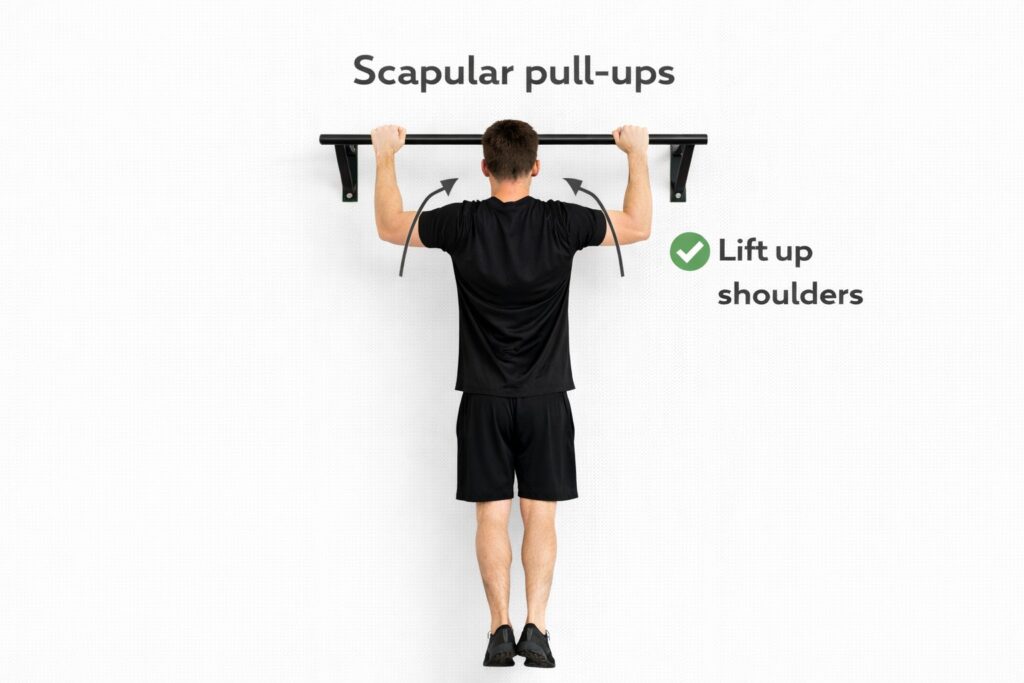
Scapular pull-ups are tiny pull-ups without bending the elbows.
They teach that crucial “shoulders down” motion that keeps the rep efficient and safer.
When I added them, my first rep stopped feeling like a dead-weight shock.
Here’s how to do them.
Hang from the bar with arms straight.
Without bending the elbows, pull your shoulder blades down and slightly back, lifting your body a little, then relax back to the hang.
Keep it controlled and small.
Do 3 sets of 8 to 12 reps, resting 60 seconds.
The burn shows up around the lower traps and lats, and it feels like your shoulders finally learned where they’re supposed to live.
Tip 14: Make Your “Support Stuff” Boring and Consistent (Grip, Elbows, Recovery)
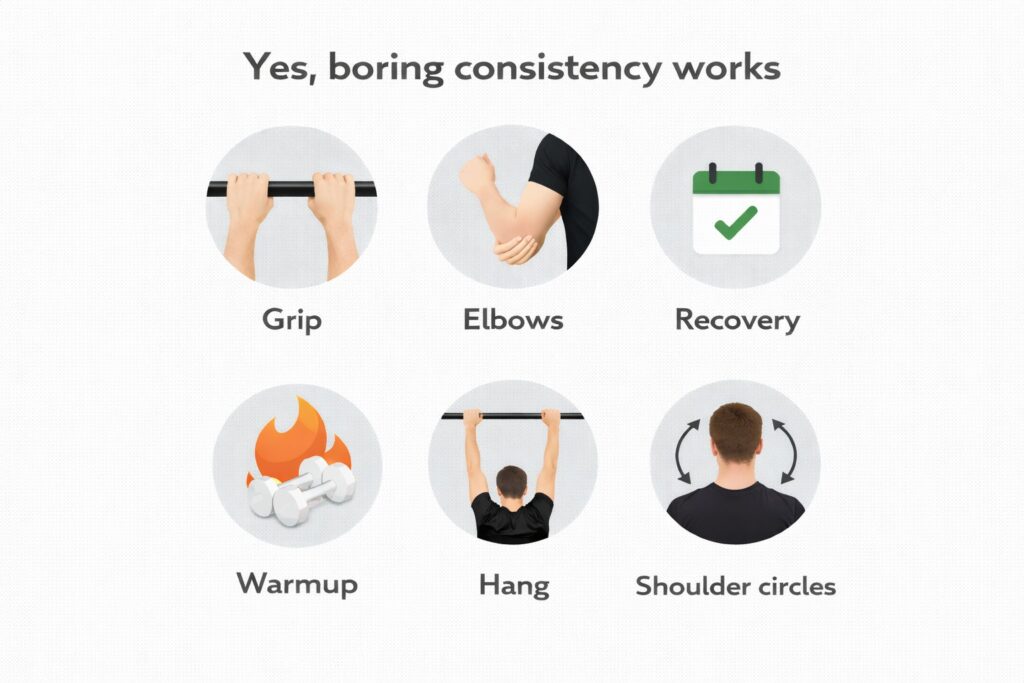
Pull-up progress can get sabotaged by boring things.
Grip fatigue, elbow irritation, and shoulder tightness don’t sound exciting, but they can cap your reps fast.
I’ve had sessions where my back felt strong and my elbows basically filed a complaint.
Two small habits helped a lot.
First, warm up with 2 to 3 minutes of easy hanging and shoulder circles, then do 2 sets of scapular pull-ups before real reps.
Second, stop death-gripping every set like the bar owes you money, and squeeze firmly but not with full panic.
If elbows feel hot or achy, adjust volume immediately.
Swap one heavy pull-up day for assisted reps and rows, keep everything smooth, and avoid fast drop-downs.
That “boring consistency” is often what keeps training frequent enough to actually improve reps.
RELATED:》》》Pull-Ups as Singles vs Sets: What I Felt
A Full Pull-Up Session That Adds Reps Without Turning Into Chaos
Here’s a complete session structure I’ve used when the goal was “more reps” rather than “one all-out set.”
This is written for someone with a current max of about 5 to 8 clean reps.
If your max is lower, the same structure works, just use assistance so the reps stay clean.
Warm-up (8 to 10 minutes)
Dead hang: 2 sets of 20 to 30 seconds, 60 seconds rest.
Scapular pull-ups: 2 sets of 10 reps, 60 seconds rest.
Easy assisted pull-ups: 2 sets of 3 reps, slow lowering, just to groove the motion.
Main work (25 to 35 minutes)
Option A (submax volume): 8 sets of 3 to 4 reps, 90 seconds rest, same clean rep standard.
Option B (clusters): 5 sets of (2 reps + 20 sec + 2 reps + 20 sec + 1 rep), 2 minutes rest.
Pick one option, not both, because the goal is quality reps, not total destruction.
Accessory (10 to 15 minutes)
Inverted rows: 4 sets of 10 reps, 90 seconds rest, 2-second lowering, 1-second pause at top.
Top holds: 3 holds of 12 to 20 seconds, 90 seconds rest, chin clearly above the bar.
By the end, the feeling should be “worked” not “wrecked.”
Forearms will pump, breathing will be louder, but the reps should still look like pull-ups, not like a survival dance.
How to Tell You’re Actually Improving
A lot of people only check max reps, then get confused when it fluctuates.
I started tracking smaller signals that don’t swing wildly day to day.
Those signals usually improve first, and max reps follow later.
Here are three practical markers.
Total clean reps in a session, like going from 24 clean reps to 32 clean reps with the same rest times.
Rep speed staying consistent, meaning rep 10 looks like rep 2 instead of slowing into glue.
Less “grip panic,” where you stop feeling like your fingers are the limiting factor before your back is even tired.
When those markers move, you’re not guessing anymore.
You’re building pull-ups the same way you build any skill plus strength.
The bar stops feeling like a random event, and starts feeling like a place where you can collect predictable reps.
Closing Thought
Increasing pull-up reps isn’t usually about finding one magic cue.
It’s stacking small changes that remove rep thieves and make your reps repeatable.
Once the reps are consistent, your body stops wasting energy and starts spending it on actual pulling.