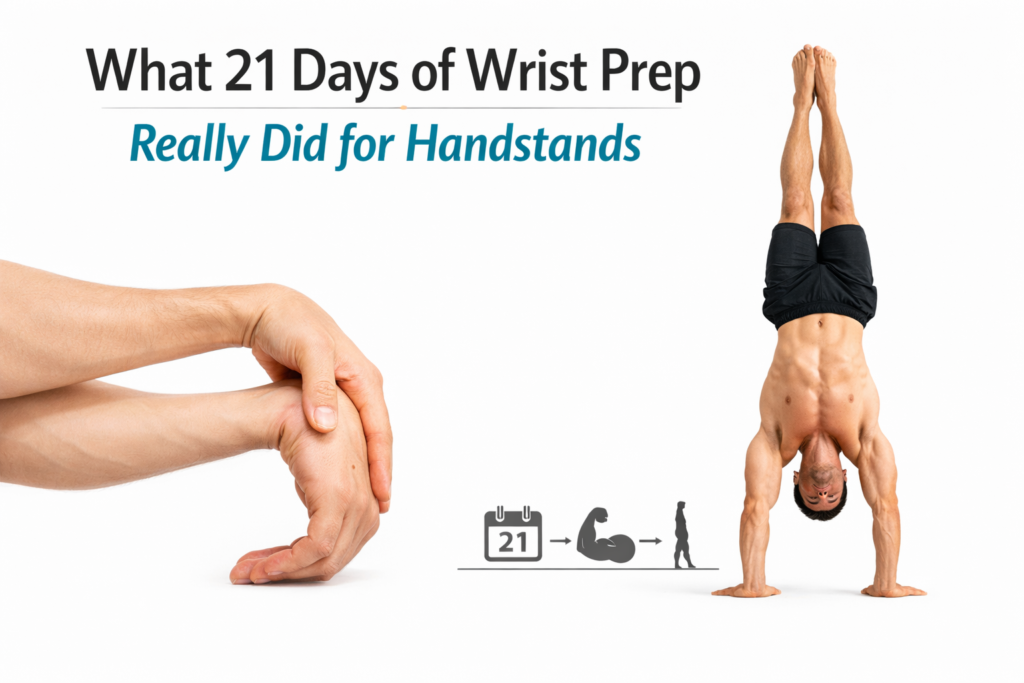
Handstands look like a shoulder skill on Instagram.
Real life feels more like a wrist negotiation with paperwork and a waiting room.
After enough “my wrists hate me” sessions, a simple question got annoying in a useful way.
Would a boring, consistent 21-day wrist prep block actually change anything, or would it just make me feel responsible while nothing improved.
So I treated it like a small personal trial, not just a vibe.
A fixed timeframe.
A repeatable routine.
A few baseline tests.
A daily log.
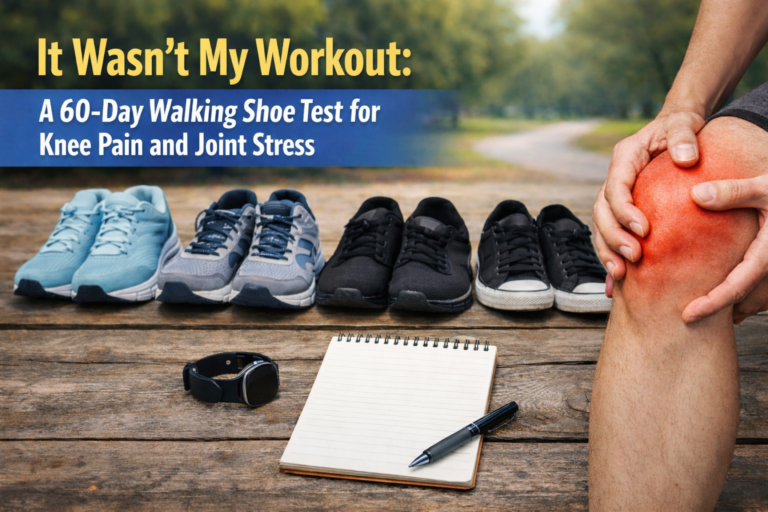
Who This Is For (And What This Is Not)
This is for anyone who wants to train handstands but keeps getting distracted by wrist discomfort, wrist weakness, or that shaky feeling where the hands look stable but the joints feel like jelly.
This is also for the person who doesn’t even know what “wrist extension” means yet and just knows that palms-on-floor feels rude.
No guru tone is coming.
No “just open your energy channels.”
No “pain is weakness leaving the body,” because pain is usually your body filing a complaint.
Also, this is not medical advice.
Injuries, nerve symptoms, swelling, sharp pain, numbness, tingling, or pain that worsens day by day deserve a real professional opinion.
This is one person’s 21-day test, explained like the reader is new to all of it, because most people are.
The Context Behind the Experiment
Before the 21 days, handstand practice was limited by the wrists more than the shoulders or balance.
Not every session, but often enough to be predictable.
The pattern was annoying.
Warm-up felt okay.
First few kick-ups felt okay.
Then time under load increased and the wrists started sending “we are not thrilled” messages.
The discomfort was mostly on the palm side, near the base of the hand, with a tight, pressure-y feeling when the wrist bent backward under load.
Sometimes it felt like a pinch at the front of the wrist, like something didn’t want to glide.
Sometimes it was just fatigue, like the joint got tired before the rest of the body.
The result was always the same.
Handstand time got cut short.
Form got worse.
Confidence dropped.
Then I’d compensate by training less on hands, which is the opposite of what you need to get better at handstands.
Quick Wrist Basics (So the Rest Makes Sense)
When people say “wrist flexibility,” they usually mean wrist extension.
Wrist extension is when the back of the hand moves toward the forearm.
That’s the position you’re in during a handstand, because the palms are flat and the forearm stacks over the hand.
Handstands don’t just require “bendiness.”
They require the ability to load that extended position while the small muscles of the hand and forearm stabilize and adjust.
A simple way to picture it is a door hinge.
Flexibility is the hinge moving freely.
Strength is the hinge holding a heavy door without wobbling.
Control is the hinge not squeaking, shifting, or slamming when the wind hits.
Wrist prep, when it actually works, improves all three, at least a little.
If it only improves one, the handstand still feels sketchy.
My Rules for the 21-Day Experiment (So It Wasn’t Just Random Effort)
A real test needs a few boring rules.
Rule one was keeping handstand training consistent but not increasing volume aggressively.
So I did the same handstand practice schedule I was already doing, with small adjustments only if pain forced it.
Rule two was performing wrist prep every day for 21 days.
No “five times per week if I feel like it.”
Daily means daily, because connective tissues respond better to frequent, tolerable input than to heroic sessions followed by nothing.
Rule three was tracking simple metrics, because memory lies.
A wrist that hurt yesterday will magically feel “always the same” unless you log it.
Rule four was keeping the wrist prep short enough to be sustainable.
If the routine takes forty minutes, it becomes a personality trait and then it dies.
I aimed for about 10 to 15 minutes most days.
Rule five was no pushing through sharp pain.
Mild discomfort that warmed up was acceptable.
Sharp pain, pinching that intensified, or symptoms that lingered for hours meant backing off.
Day 0 Measurements
I did four baseline tests.
Nothing fancy.
Just repeatable.
If you copy these, keep the conditions the same each time.
Same time of day if possible.
Same surface.
Same warm-up.
Same mindset, meaning no “today I’ll force it.”
Test 1: Wrist Extension Lean (Loaded Range Test)
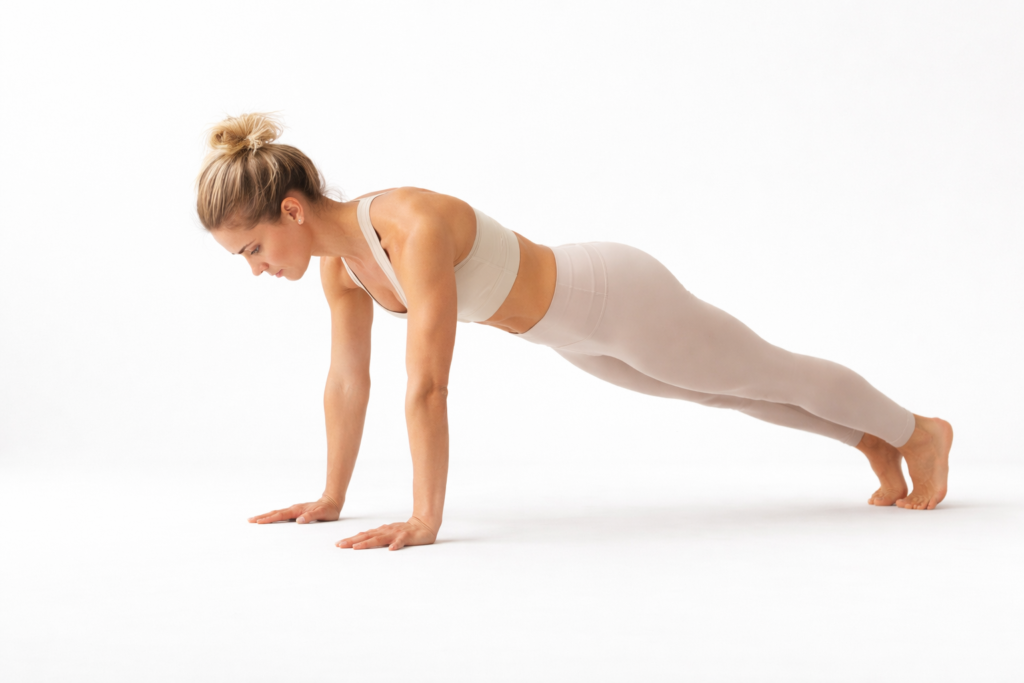
Hands flat on the floor, fingers forward, elbows locked, shoulders over hands.
From there, I leaned forward slowly until I hit the first strong discomfort or obvious compensation.
Compensation means heels lifting, fingers clawing, elbows bending, or shoulders twisting to avoid the wrist angle.
I measured the distance from the tip of my middle finger to the front of my shoulder using a tape measure.
Not perfect science, but consistent enough.
Day 0 result was: shoulder about 1.5 inches behind the fingertips before I had to stop.
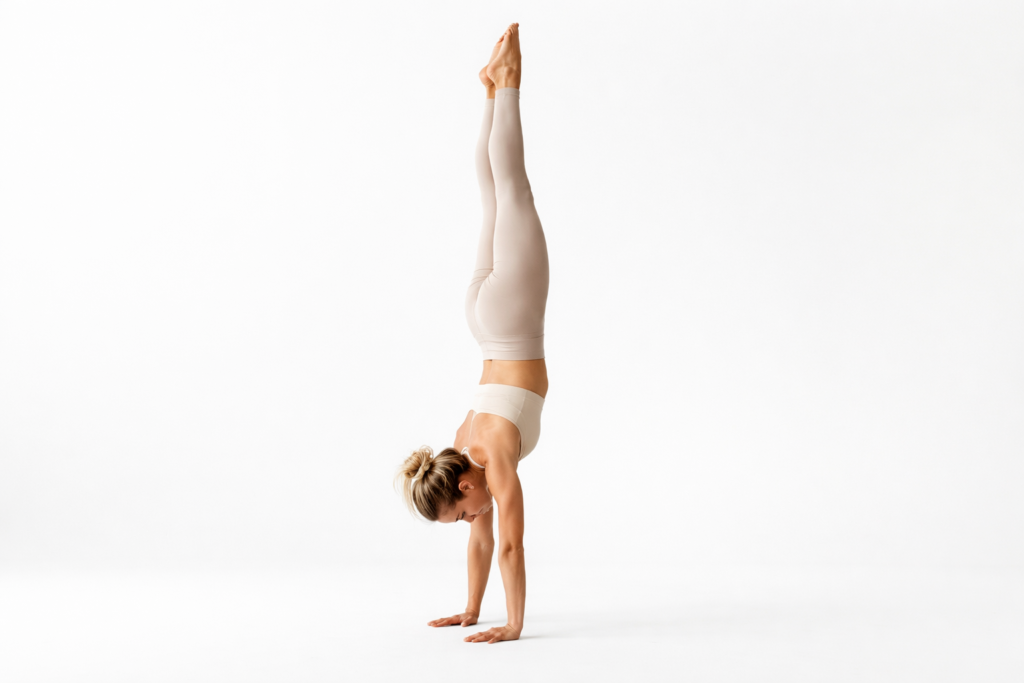
Test 2: Wall Handstand Hold Comfort Time
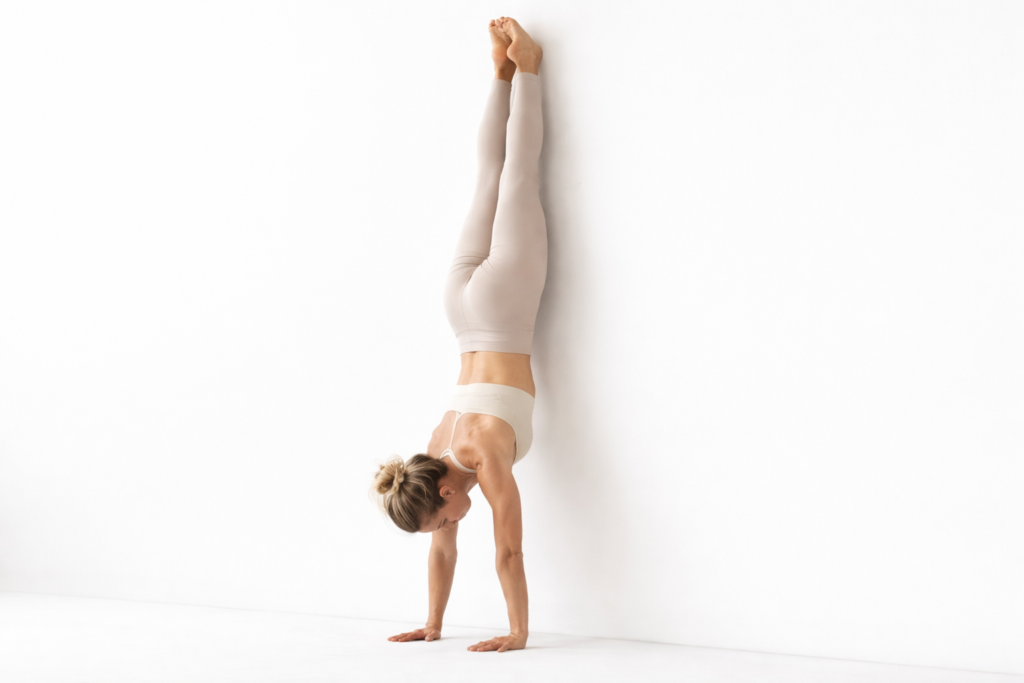
Chest-to-wall handstand, because it’s more consistent than freestanding attempts.
Hands about 6 to 8 inches from the wall, shoulders stacked, ribs tucked slightly, legs together.
I held the position until wrist discomfort hit a “I don’t like this” level, not until total failure.
Day 0 result was: discomfort ramped up noticeably around 20 to 25 seconds.
Test 3: Quadruped Rock Backs (Feel Test for Pinch)
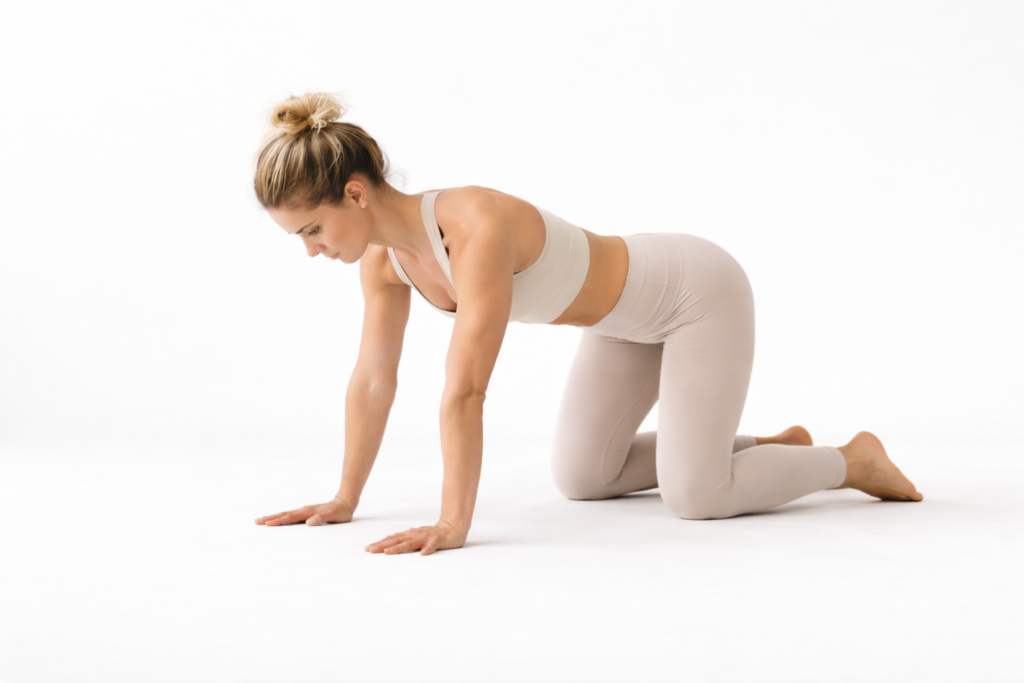
Hands on floor, knees on floor, elbows straight.
Then I rocked my body backward and forward gently, like a slow wave.
This test tells you if the wrist feels like it glides or if it pinches.
Day 0 result was: slight pinch feeling on forward rocks, especially on the right side.
Test 4: Post-Session Ache Duration

After handstand practice, I noted how long the wrists felt “irritated” afterward.
Day 0 result was: low-level ache lasted 2 to 4 hours on a typical session.
The Daily Wrist Prep Routine
This routine had four categories.
Mobility to open range.
Tendon and tissue loading to make the range stronger.
Forearm strength to support the joint.
Hand and finger control to improve stability.
Some days I did the full routine.
Some days I did the “minimum effective version.”
The key was never skipping entirely.
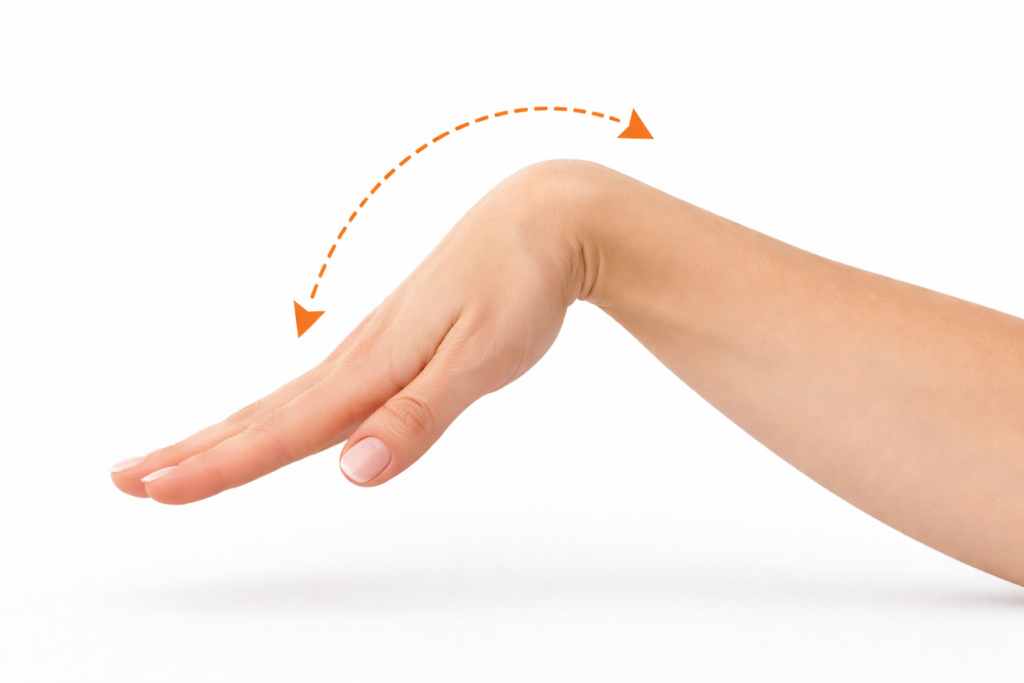
1) Wrist Circles and Angle Exploration (2 to 3 minutes)
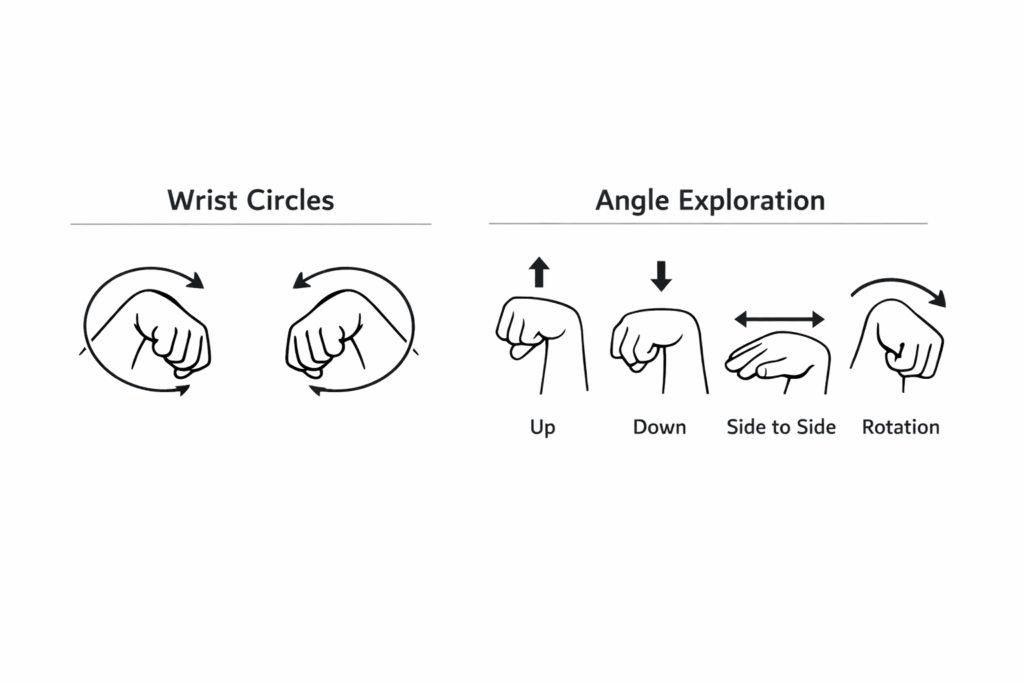
Hands in front of you, elbows straight.
Make slow wrist circles.
Then change angles.
Palms down.
Palms up.
Thumb side leading.
Pinky side leading.
The goal is not speed.
The goal is scanning for sticky spots like you’re debugging code.
If a direction feels crunchy or restricted, I slowed down and gave it extra time.
2) Palm Pulses in Quadruped (2 minutes)
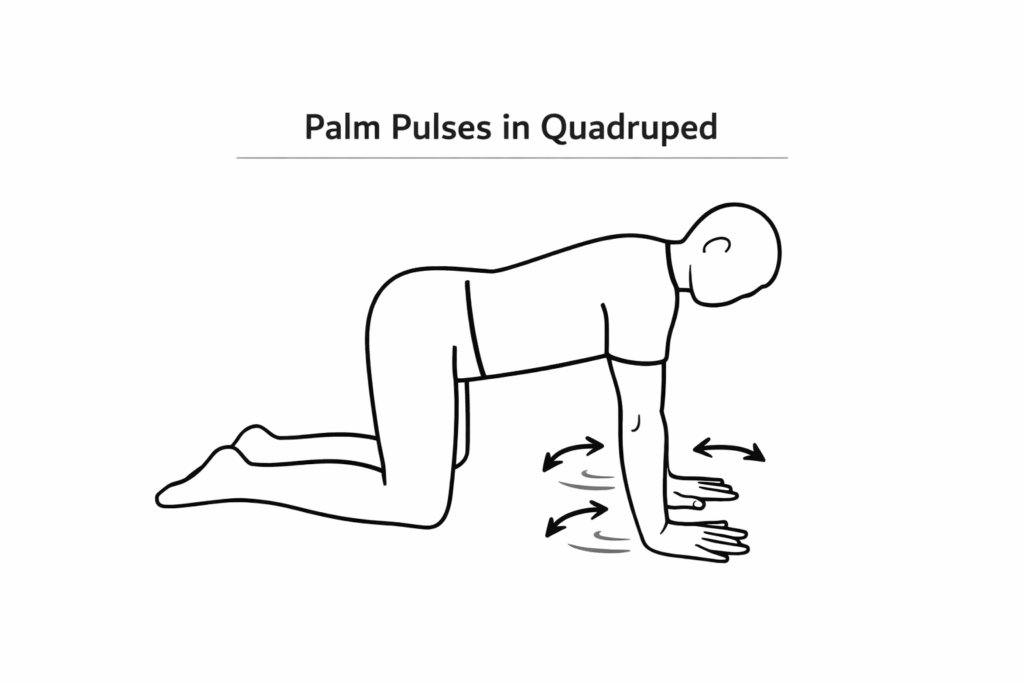
Hands flat on the floor, fingers forward, knees down.
Shoulders slightly forward of hands.
Then I gently pulsed, leaning forward a few centimeters and coming back.
Elbows stayed locked.
The pulse was controlled, not bouncing.
This is basically teaching the wrist, “Yes, we will go into extension, and no, we are not panicking.”
3) Wrist Extension Isometric Lean (2 to 3 sets)
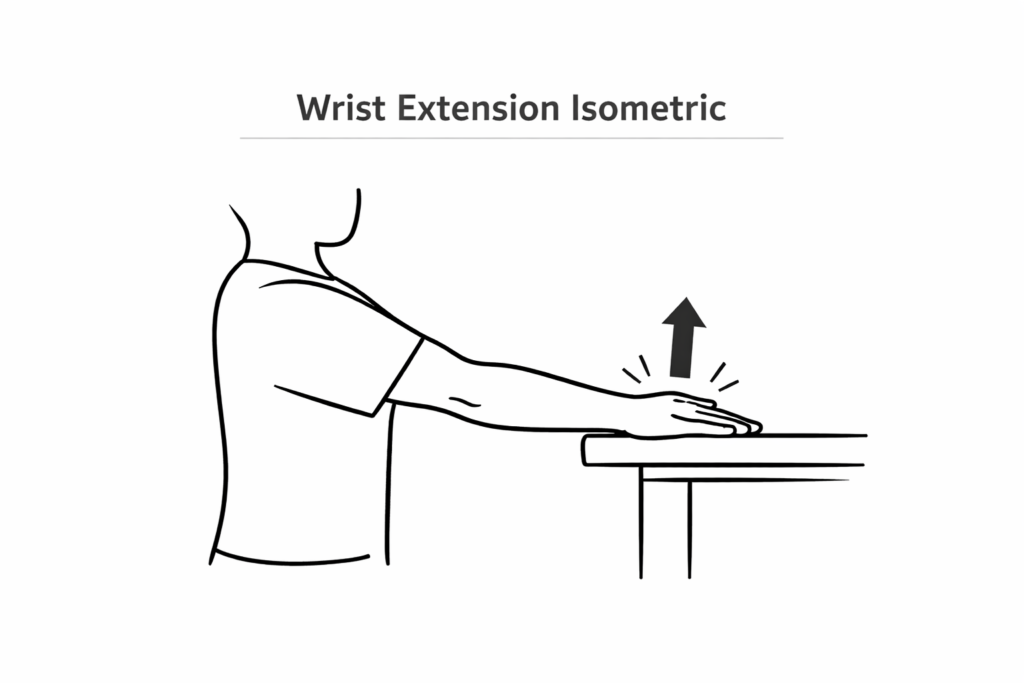
Same position as the pulse, but now I leaned to a tolerable edge and held.
Hold time was 20 to 30 seconds.
Intensity was moderate.
Not a max effort.
Isometrics are useful because they load the tissue without movement, which often feels safer when you’re sensitive.
If pinching appeared, I reduced the lean and held at a pain-free angle.
4) Wrist Push-Up Regressions (2 to 3 sets)
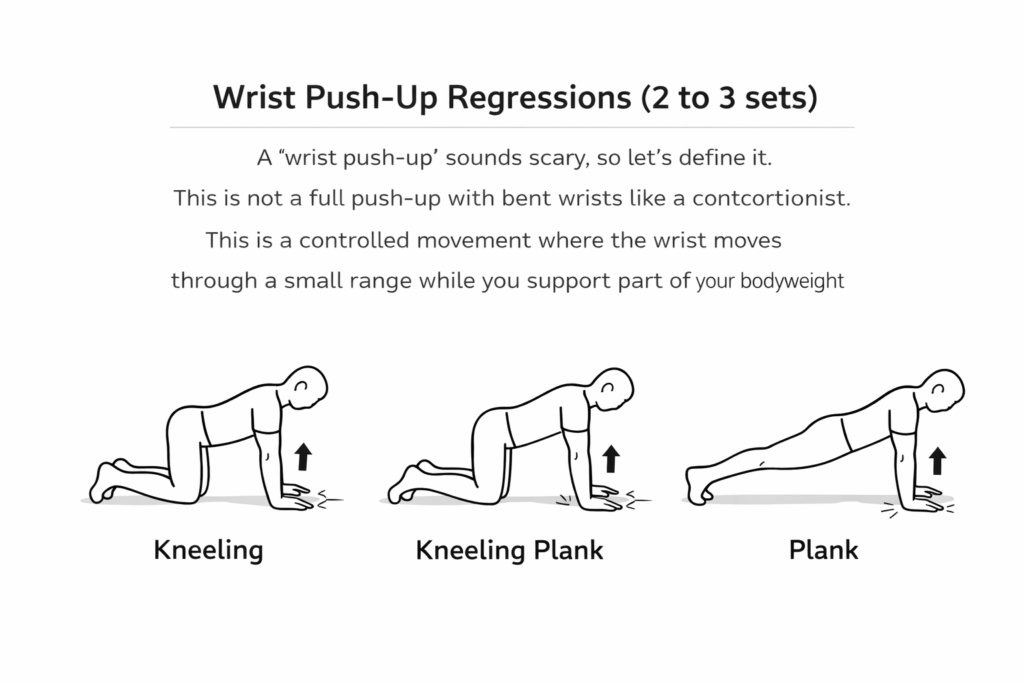
A “wrist push-up” sounds scary, so let’s define it.
This is not a full push-up with bent wrists like a contortionist.
This is a controlled movement where the wrist moves through a small range while you support part of your bodyweight.
I did it in quadruped first.
Hands flat, elbows straight, shoulders over hands.
Then I lifted the palm slightly by pressing into the fingertips, creating a tiny rocking motion between palm pressure and finger pressure.
Think of it like shifting weight between two contact points, not like lifting the whole hand dramatically.
If that felt fine, I progressed by shifting more forward and increasing load, eventually reaching a plank position.
5) Forearm Work: Wrist Curls and Reverse Wrist Curls (3 sets each, light)
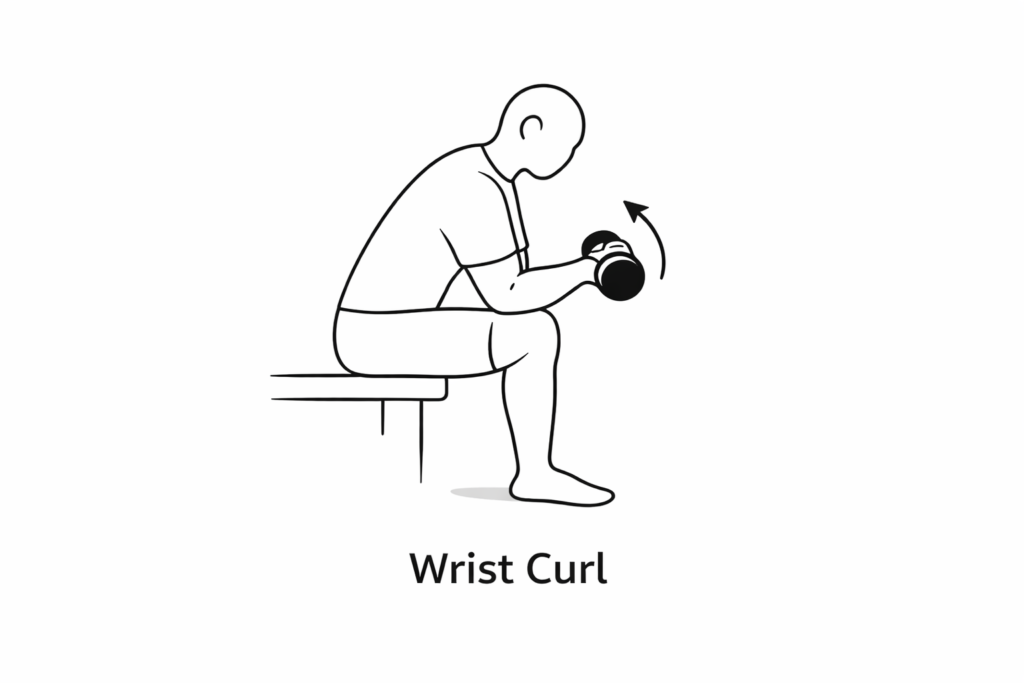
I used a light dumbbell, because ego lifting here is a comedy sketch.
Wrist curl means palm up, bending the wrist upward.
Reverse wrist curl means palm down, lifting the back of the hand upward.
I did 12 to 20 reps, slow, full control.
These aren’t glamorous.
They’re insurance.
6) Pronation and Supination (2 sets each side)
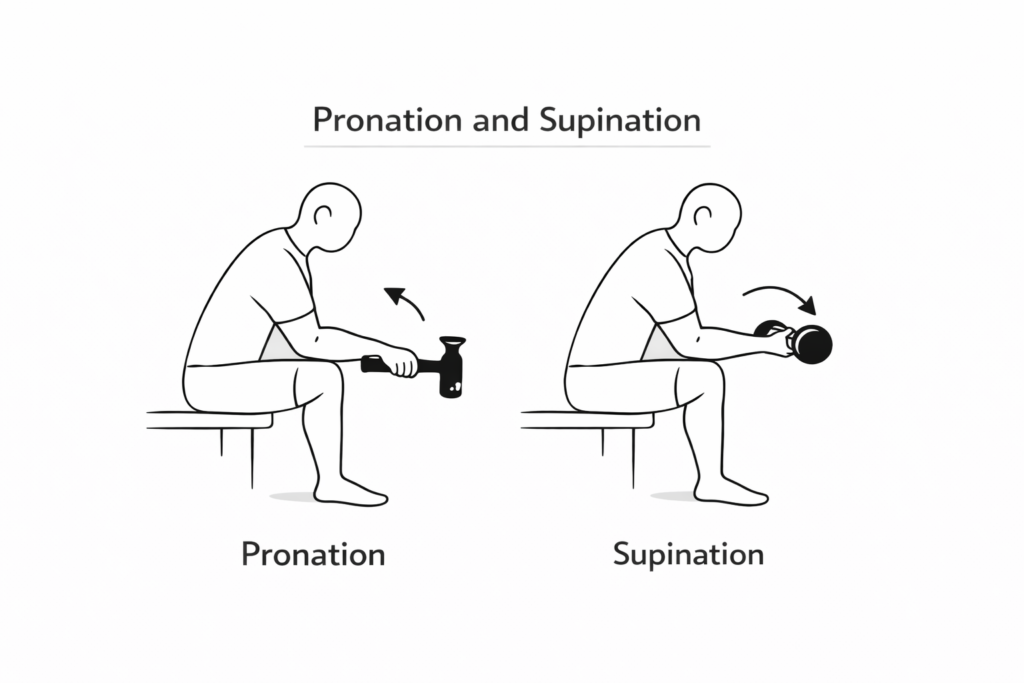
Pronation is rotating the forearm so the palm faces down.
Supination is rotating so the palm faces up.
I used a light hammer or a dumbbell held at one end.
That offset weight makes rotation harder, which trains the stabilizers.
10 to 15 slow reps each direction.
7) Finger Extensions (2 sets)
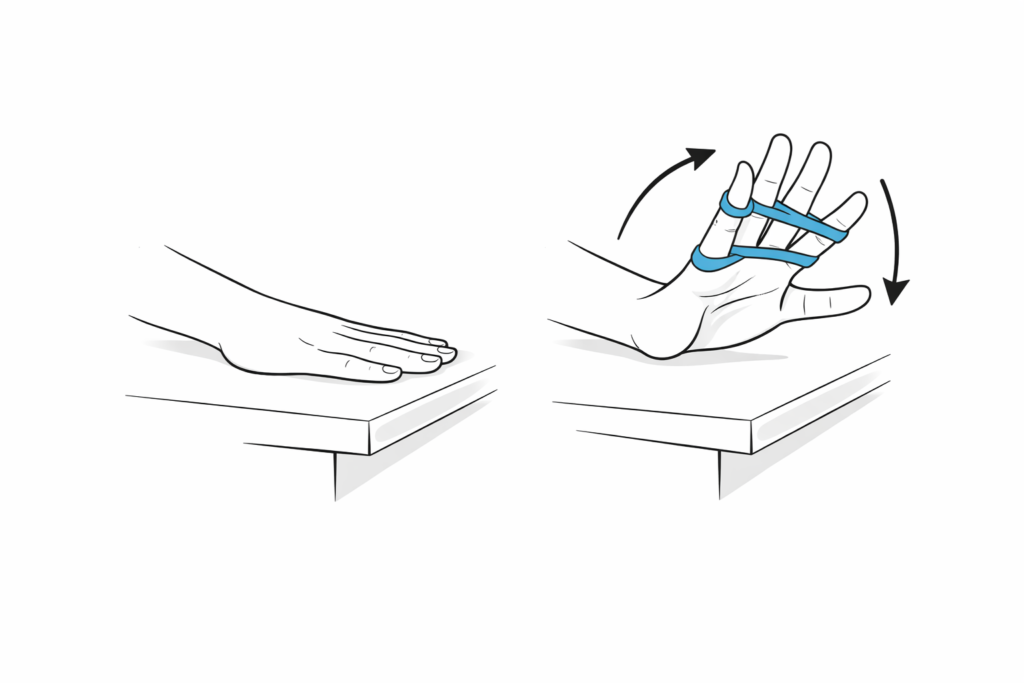
Handstand stability is not just wrist strength.
Fingers matter, because the fingers act like brakes and steering.
I used a rubber band around the fingers and opened the hand against resistance.
15 to 25 reps.
If you don’t have a band, you can still train finger extension by spreading the fingers hard and holding for a few seconds, though the band is better.
8) Optional: Soft Tissue (1 to 2 minutes)
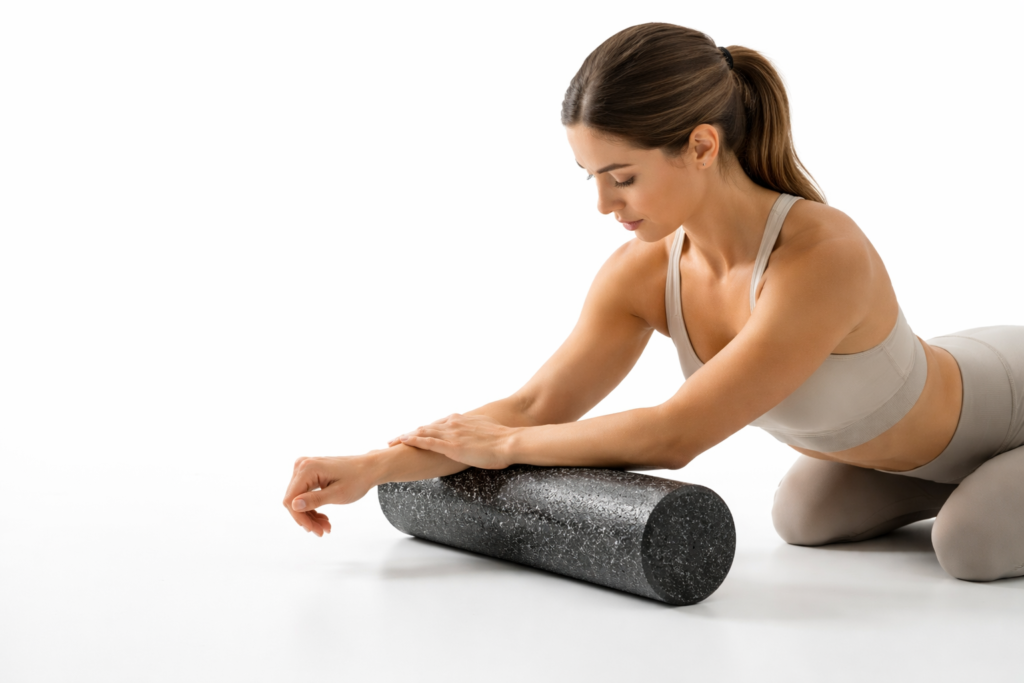
I lightly massaged the forearm flexors and extensors.
Not deep tissue torture.
More like convincing the muscles to unclench.
If I pressed too hard, it actually made things feel more sensitive, so gentle worked best.
How I Progressed It Over 21 Days
Progression was simple.
More range if pain-free.
More load if range felt stable.
More time under tension if load felt easy.
Week one emphasized comfort and consistency.
Week two emphasized gradually increasing load.
Week three emphasized making the wrist prep feel more like handstand demands.
The biggest mindset shift was treating wrists like a trainable system, not like fragile porcelain.
Porcelain breaks when you load it.
Tendons adapt when you load them correctly.
Days 1–7: The “Everything Feels Weird” Phase
Week one was mostly about reducing sensitivity.
The first two days felt deceptively easy, which is common.
The novelty made it feel like I was “doing something,” but that doesn’t mean adaptation happened yet.
Around day three or four, the wrists felt slightly more tired during normal handstand practice.
That wasn’t a bad sign.
That was just added workload.
The key was keeping intensity low enough that the tiredness didn’t become flare-up pain.
Quadruped pulses started feeling smoother by day five.
That pinch sensation during rock-backs didn’t vanish, but it reduced.
The most noticeable change was how fast discomfort warmed up and faded.
Before, discomfort would appear and then hang around.
During week one, discomfort appeared but also settled faster after stopping.
Baseline retest at day seven showed small movement.
Wrist extension lean improved by about half an inch.
Wall handstand discomfort time improved from about 20–25 seconds to about 30 seconds.
That’s not superhero progress.
That’s realistic progress.
Also, motivation improved, because seeing any number change makes the brain go, “Oh, this might be working.”
Days 8–14: The “Strength Shows Up” Phase
Week two is where things got more interesting.
I started leaning slightly further in the isometric holds, but only if the sensation stayed “stretch plus effort,” not “pinch plus regret.”
Wrist curls and reverse curls felt easier, which told me the forearms were adapting.
That matters because the forearm muscles help stabilize the wrist joint under load.
Handstand practice felt more consistent.
Not perfect, but less interrupted.
Instead of stopping because the wrists felt threatened, I stopped because shoulders got tired or balance practice got sloppy.
That was a big mental shift.
It felt like the limiting factor moved.
Day 14 retest showed clearer progress.
Wrist extension lean improved by about 1.5 inches compared to day 0.
Wall handstand discomfort time moved to roughly 40–45 seconds.
Post-session ache duration dropped to around 1 to 2 hours.
The pinch during rock-backs was still there sometimes, but it was less sharp and more like a mild “tight spot.”
One unexpected change was finger control.
That fingertip-to-palm shifting drill made my hands feel more “awake” during wall holds.
Balance corrections felt smaller and calmer, like the hands could whisper instead of scream.
Days 15–21: The “Specificity Kicks In” Phase
Week three focused on making the prep resemble handstand demands.
That meant more time in loaded extension, but still within tolerable limits.
I used a slightly more aggressive version of the lean holds.
Instead of just leaning and holding, I added tiny controlled pulses at the edge, like a micro range.
This was basically teaching the joint to handle small movement under load, which is what balancing a handstand requires.
I also added brief wall handstand holds right after the wrist prep on some days.
Not long holds.
Just 2 to 3 sets of 20 to 30 seconds, focusing on form and calmness.
The wrists handled that better than expected.
By day 21, the biggest difference was confidence.
That sounds psychological, but it’s actually physical trust.
When your wrists don’t feel fragile, you stop bracing emotionally.
Less bracing means less unnecessary tension.
Less tension means smoother balance.
It becomes a loop in the good direction.
Day 21 retest results looked like this.
Wrist extension lean improved by roughly 2 to 2.5 inches compared to day 0.
Wall handstand discomfort time reached about 55–60 seconds on a good day.
Post-session ache duration dropped to about 30 to 60 minutes, and sometimes it was basically gone.
Rock-back pinch sensation was reduced but not fully eliminated.
That last point matters, because 21 days improved a lot, but it didn’t rewrite my anatomy.
What Actually Improved
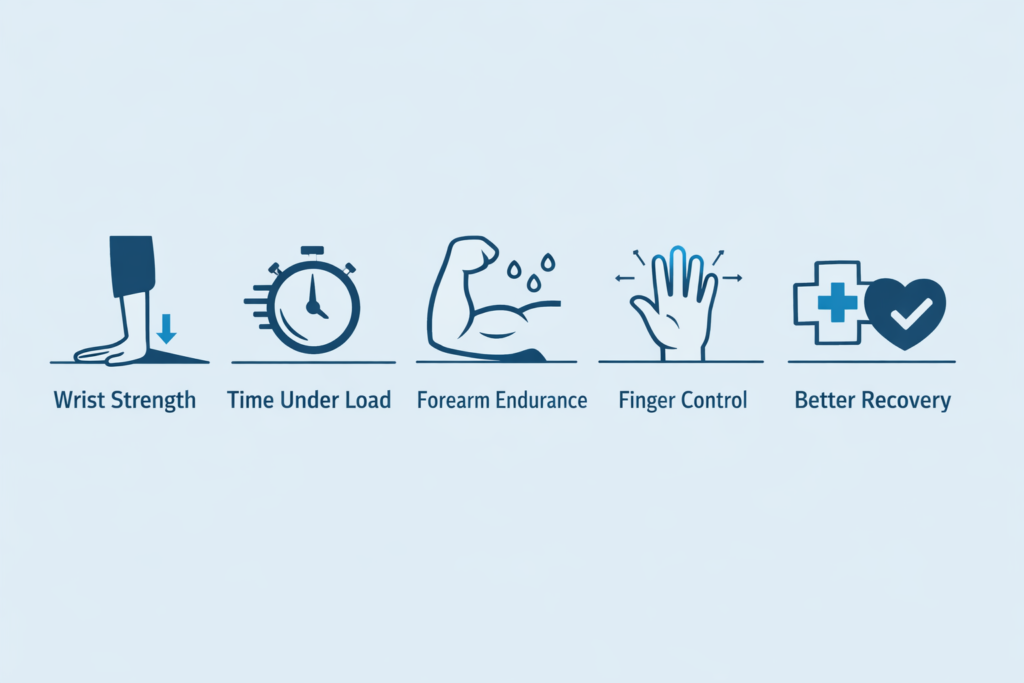
Loaded wrist extension improved the most.
That matters because handstands are loaded wrist extension, not relaxed stretching.
The wrists tolerated more time under bodyweight.
That matters because skill work needs practice time, not just single attempts.
Forearm endurance improved.
That matters because stabilizers get tired and tired stabilizers lead to sloppy joint mechanics.
Finger control improved slightly.
That matters because fingers are steering for the whole body in a handstand.
Recovery improved.
That matters because if your wrists stay irritated for hours, you subconsciously avoid training, even if you pretend you’re fine.
What Didn’t Change as Much as I Thought
Perfect pain-free handstands did not magically appear.
Balance still required practice, and my nervous system still needed repetition.
Also, the pinch sensation didn’t fully disappear.
That’s important, because pinching can be structural, technique-related, or both.
If a certain wrist angle causes impingement-like sensations, prep might reduce sensitivity without eliminating the cause.
This is where technique changes can matter, like hand placement, finger pressure distribution, and stacking.
Another thing that didn’t change much was comfort on very hard surfaces.
Floor handstands improved.
Hard, unforgiving surfaces still felt harsher than softer mats.
That’s normal, because surface compliance changes how forces distribute through the hand.
Why the Wrists Finally Adapted
![]()
Tendons and connective tissues adapt to repeated, tolerable loading.
They don’t adapt well to random spikes.
Daily wrist prep gave the tissues frequent signals to strengthen and calm down.
Isometrics likely helped reduce sensitivity while building strength in the joint angle that mattered.
Forearm strengthening reduced the “my wrist is doing everything alone” feeling.
Finger drills improved the ability to distribute load, which reduces joint stress.
Also, consistency removed the biggest enemy.
Inconsistency creates a cycle where the wrists never catch up, because they never get steady exposure.
The Form Details That Took Pressure Off the Wrists
A big lesson was that wrist prep doesn’t fix technique mistakes by itself.
It just gives you capacity.
Then you need to use that capacity with better mechanics.
Hand Position: Slight Turn-Out
Instead of fingers pointing perfectly forward, I slightly turned the hands out.
Think 10 to 30 degrees, not a dramatic angle.
This often reduces stress on the wrist because it matches how the forearm naturally rotates.
Finger Pressure: Using the Fingers as Brakes
In a handstand, you don’t just dump weight into the heel of the palm.
You shift pressure into the fingers to prevent falling forward.
That finger engagement reduces how much the wrist collapses into extension.
A useful cue is “press the fingertips like you’re trying to leave fingerprints in the floor.”
Stacking: Getting the Shoulders Over the Hands
If shoulders drift behind the hands, wrists get loaded in a less stable way.
If shoulders stack over the wrists, load distributes better and balance becomes easier.
That stacking cue mattered more as my wrists became capable of tolerating the position.
Where I Made Things Harder Than Necessary
First mistake was doing too much on day one.
Enthusiasm is cute until day three.
If the routine leaves you sore enough that you skip the next day, it’s too much.
Second mistake was confusing stretching discomfort with pinching discomfort.
Stretch discomfort feels broad and warm and fades as you ease off.
Pinching feels sharp, localized, and often gets worse if you push deeper.
Pinching deserves respect.
Third mistake was ignoring the role of the fingers early on.
When I focused only on wrist range, I missed how much stability comes from active hands.
Fourth mistake was not warming up the shoulders consistently.
Cold shoulders make handstands messier.
Messy handstands force the wrists to handle chaotic load.
That’s like testing a bridge during an earthquake and calling it “structural training.”
How to Structure Your Own Wrist Prep Experiment
Here’s a practical template that matches what worked best.
Daily routine, 10 to 15 minutes.
Keep intensity at a 6 or 7 out of 10, not a 10.
Daily Wrist Prep (10–15 minutes)
Wrist circles and angle exploration: 2 minutes.
Quadruped palm pulses: 2 minutes.
Wrist extension isometric leans: 2–3 sets of 20–30 seconds.
Finger-to-palm pressure shifts: 2–3 sets of 8–12 slow reps.
Wrist curls: 2–3 sets of 12–20 reps.
Reverse wrist curls: 2–3 sets of 12–20 reps.
Pronation and supination: 2 sets of 10–15 reps each direction.
Finger extensions: 2 sets of 15–25 reps.
Handstand Practice (3–5 days per week)
Start with wall holds to build clean stacking.
Add kick-ups or freestanding work after the wrists feel warm and stable.
Stop sets when form collapses, not when pain forces you out.
That keeps practice high quality and wrists happier.
When to Back Off (The “Be an Adult” Section)
Back off if pain gets sharper during the session.
Back off if discomfort lasts longer than usual afterward for multiple days.
Back off if you feel nerve-like symptoms, tingling, numbness, or burning.
Back off if swelling appears.
Back off if morning stiffness gets worse instead of better.
In those cases, reduce range, reduce load, and focus on pain-free movement.
If symptoms persist, a professional evaluation is worth it.
That’s not dramatic.
That’s just efficient.
RELATED:》》》 Why Your Wrists Explode During Diamond Push-Ups
Final Thoughts
So, was 21 days of wrist prep actually worth it.
Yes, in the way unsexy things are worth it.
Not because it made me instantly “good at handstands.”
Because it removed the wrist problem as a constant interruption.
More uninterrupted practice time means more skill progress over the long run.
Wrist prep didn’t feel like a magic hack.
It felt like finally paying the subscription fee for an ability I kept trying to use for free.
The best part was how realistic it was.
Ten to fifteen minutes per day.
No heroic sessions.
No mystical secrets.
Just consistent, tolerable loading and better mechanics.
If your wrists are the bottleneck right now, a 21-day block like this can be a real turning point.
Progress will probably be gradual.
Results will probably be measurable if you track them.
Confidence will probably improve along with capacity.
Then handstands become what they should be.
A skill you practice.
Not a joint you negotiate with.